
EN.PM.UM37 20131113
Corporate Headquarters:
12410 Milestone Center Drive
Suite 300
Germantown, MD 20876
800.544.4429
weatherbugprofessional.com
Technical Support: 888-239-0047 (option 1)
StreamerRT
Version 4.7 - User Guide
March 2010
Earth Networks – WeatherBug Corporate Headquarters
12410 Milestone Center Drive, Suite 300
Germantown, MD 20876
Phone: 800.544.4429
Website: www.earthnetworks.com
Technical Support: 888-239-0047 (option 1)

Earth Networks, Inc. Proprietary and Confidential Page 2 of 46
EN.PM.UM37 20131113
StreamerRT
October 2013
Table of Contents
1. Overview ...............................................................................................................................4
2. System Requirements ............................................................................................................4
3. Map Tips ...............................................................................................................................4
4. Map Controls .........................................................................................................................5
4.1. Zoom Levels ..................................................................................................................................... 5
4.2. Zoom-In............................................................................................................................................ 5
4.3. Zoom-Out ......................................................................................................................................... 5
4.4. Pan ................................................................................................................................................... 6
4.5. Full Extent ........................................................................................................................................ 6
5. Tools ......................................................................................................................................6
5.1. Line, Circle, Square Drawing Tools .................................................................................................. 6
5.2. Eraser Tool ....................................................................................................................................... 6
5.3. Save Drawings .................................................................................................................................. 6
5.4. Drawing Properties .......................................................................................................................... 6
5.5. Storm Tracking or Estimated Time of Arrival (ETA) Tool ................................................................. 7
6. Displayed Views ....................................................................................................................8
7. Data Pane ..............................................................................................................................8
7.1. Remove Layers from Map................................................................................................................ 8
7.2. Refresh and Clear All Layers ............................................................................................................ 8
7.3. View or Hide Data Layers ................................................................................................................. 8
7.4. Jump Data Layer to Top ................................................................................................................... 9
7.5. View Legends ................................................................................................................................... 9
7.6. Animate Data Layers ........................................................................................................................ 9
7.7. Plot Symbology .............................................................................................................................. 10
7.8. Move Layers to the Top of the Data Pane ..................................................................................... 10
7.9. Data Layer Update Time ................................................................................................................ 10
8. Viewing Custom Notifications .............................................................................................. 10
8.1. Active Custom Notifications .......................................................................................................... 11
8.2. Inactive Custom Notifications........................................................................................................ 12
8.3. All Custom Notifications ................................................................................................................ 12
8.4. Audio Notifications ........................................................................................................................ 12
9. Data Menu (Map Layers) ...................................................................................................... 12
9.1. Map Layers .................................................................................................................................... 12
9.2. Alerts .............................................................................................................................................. 13
9.2.1. Met Services .......................................................................................................................... 13
9.2.2. Earth Networks (Dangerous Thunderstorm Alerts) ............................................................... 16
9.2.3. Custom Notifications ............................................................................................................. 16
9.3. Current ........................................................................................................................................... 17
9.3.1. Surface Data........................................................................................................................... 17
9.3.2. Analysis .................................................................................................................................. 19
9.4. Forecast Model Data ..................................................................................................................... 20

Earth Networks, Inc. Proprietary and Confidential Page 3 of 46
EN.PM.UM37 20131113
9.4.1.DailyHighLow ............................................................................................................................... 20
9.4.2. Deviation ................................................................................................................................ 20
9.5. Radar & Satellite ............................................................................................................................ 22
9.5.1. Radar ...................................................................................................................................... 23
9.5.2. Precipitation .......................................................................................................................... 25
9.5.3. Satellite .................................................................................................................................. 25
9.6. Severe Weather ............................................................................................................................. 26
9.6.1. Lightning ................................................................................................................................ 26
9.6.2. Flood ...................................................................................................................................... 29
9.6.3. Fire ......................................................................................................................................... 30
9.6.4. Winter .................................................................................................................................... 30
9.6.5. Storm Reports ........................................................................................................................ 30
9.7. Tropical .......................................................................................................................................... 31
10. Settings ............................................................................................................................... 33
10.1. Edit Notifications ................................................................................................................... 34
10.1.1. Create New Locations ............................................................................................................ 35
10.1.2. Edit Locations ......................................................................................................................... 36
10.1.3. Delete Locations .................................................................................................................... 37
10.1.4. Copy Locations ....................................................................................................................... 37
10.1.5. Add New Rules to Locations .................................................................................................. 37
10.1.6. Turn Rules On or Off .............................................................................................................. 42
10.1.7. Edit Rules ............................................................................................................................... 42
10.1.8. Delete Rules ........................................................................................................................... 43
10.1.9. Email Notifications ................................................................................................................. 43
10.2. Settings .................................................................................................................................. 43
10.3. Views ...................................................................................................................................... 43
10.3.1. Select View Tab ...................................................................................................................... 43
10.3.2. New View Tab ........................................................................................................................ 44
10.4. Slideshows ............................................................................................................................. 45
10.4.1. Select Slideshow Tab ............................................................................................................. 45
10.4.2. New Slideshow Tab ................................................................................................................ 45
10.4.3. Edit Slideshow Tab ................................................................................................................. 45
10.5. Archive ................................................................................................................................... 46
Earth Networks, Inc. Proprietary and Confidential Page 4 of 46
EN.PM.UM37 20131113
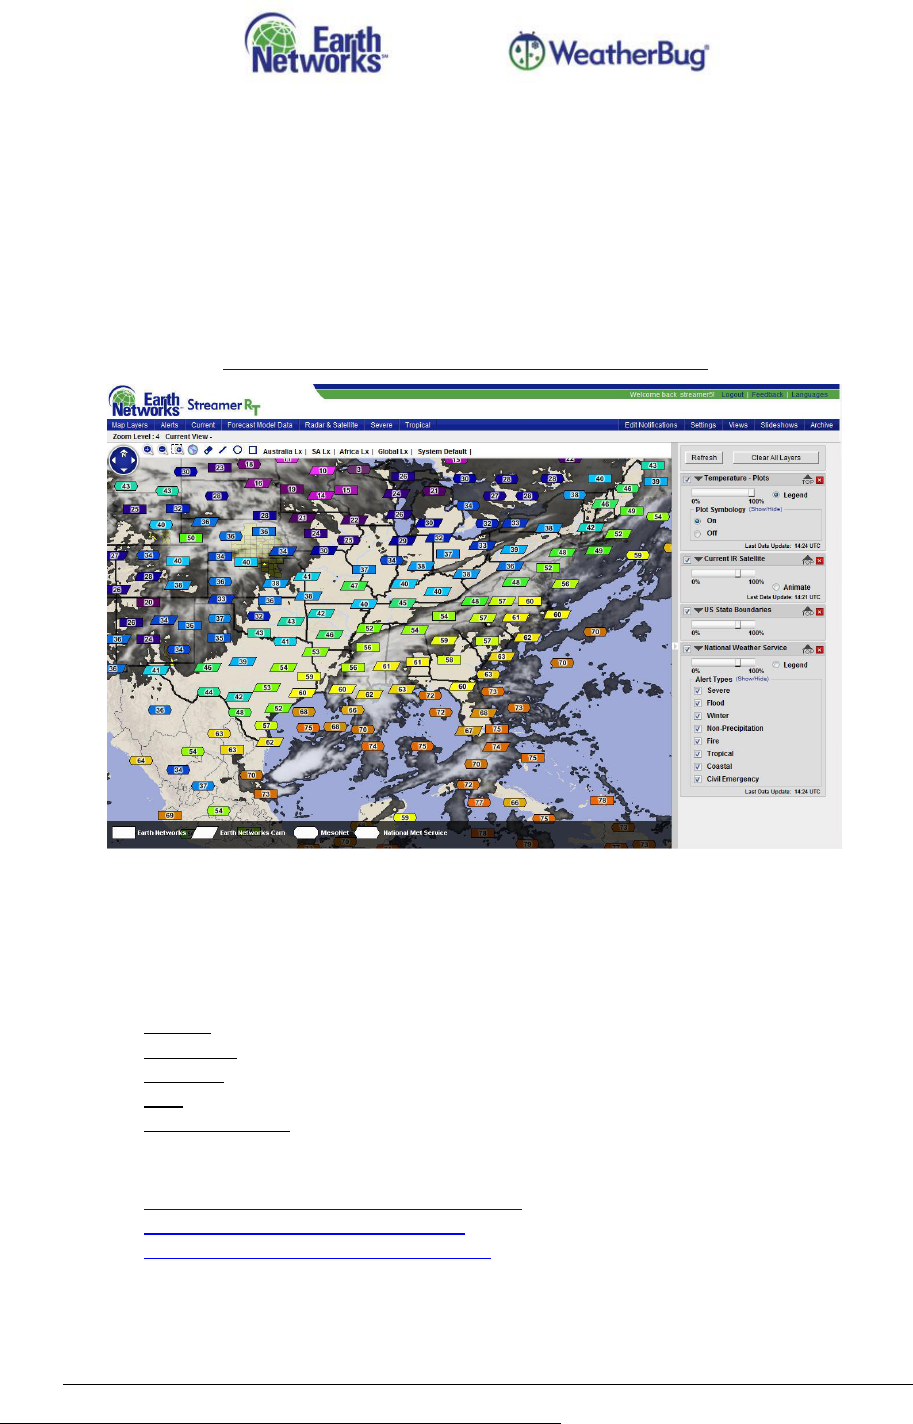
1. Overview
StreamerRT is a real-time weather decision system that provides a fully interactive mapping platform with
a comprehensive collection of weather data. Users have the ability to monitor real-time station
observation data from the WeatherBug network and overlay numerous enhanced data sets to stay up-to-
date with significant weather events before and after they develop.
Use StreamerRT to create the customized Views that are important to you and then monitor your
weather through easy access to your Views, Slideshows of Views and animations.
StreamerRT Login URL – http://professionalportal.weatherbug.com/login.asp
Example View of StreamerRT with Temperature contour, Temperature points and Current Radar Enabled
2. System Requirements
The following are the recommended system requirements to experience the optimal performance from
WeatherBug Professional StreamerRT:
Browser: IE 7.0 or IE 8.0
Connection: Broadband Connection (DSL, Cable Modem, T1 or T3)
Hardware: Pentium IV or better
RAM: 2 GB or greater for light users; 4 GB or greater for heavy users
Screen Resolution: 1024x768 or higher
Contact your IT Department to open security access to the following StreamerRT URLs:
http://dashboard.streamerrt.weatherbug.com
http://img.streamerrt.weatherbug.com
http://professionalportal.weatherbug.com
3. Map Tips
You can open map tips with station point or other data layer information by left-clicking on a data point
value. You must be at a minimum zoom level of 6 and the layer must be the top data layer in the Data
Pane to the right of the map to open a map tip for most layers. If the map tip does not open when the
data point is clicked, check to make sure you are at the correct zoom level and the point is the top data
Earth Networks, Inc. Proprietary and Confidential Page 5 of 46
EN.PM.UM37 20131113
layer in the Data Pane to the right of the map. Bring a layer to the top by left-clicking and dragging it to
the top of the Data Pane display.
Data layers with map tip information include Station Points, Weather Service and WeatherBug Dangerous
Thunderstorm Alerts, Custom Notifications, Current Observation Points, Forecast Model Data Points,
Single Site Radar Locations, Lightning, Storm Reports and Tropical Information.
Many map tips include additional details, which you can access by left-clicking on the “Details” link at the
bottom of the map tip if it is displayed.
You can move an open map tip anywhere within the map by left-clicking and dragging it to a new location.
Information about the map tips associated with point layers is provided in the details for each layer.
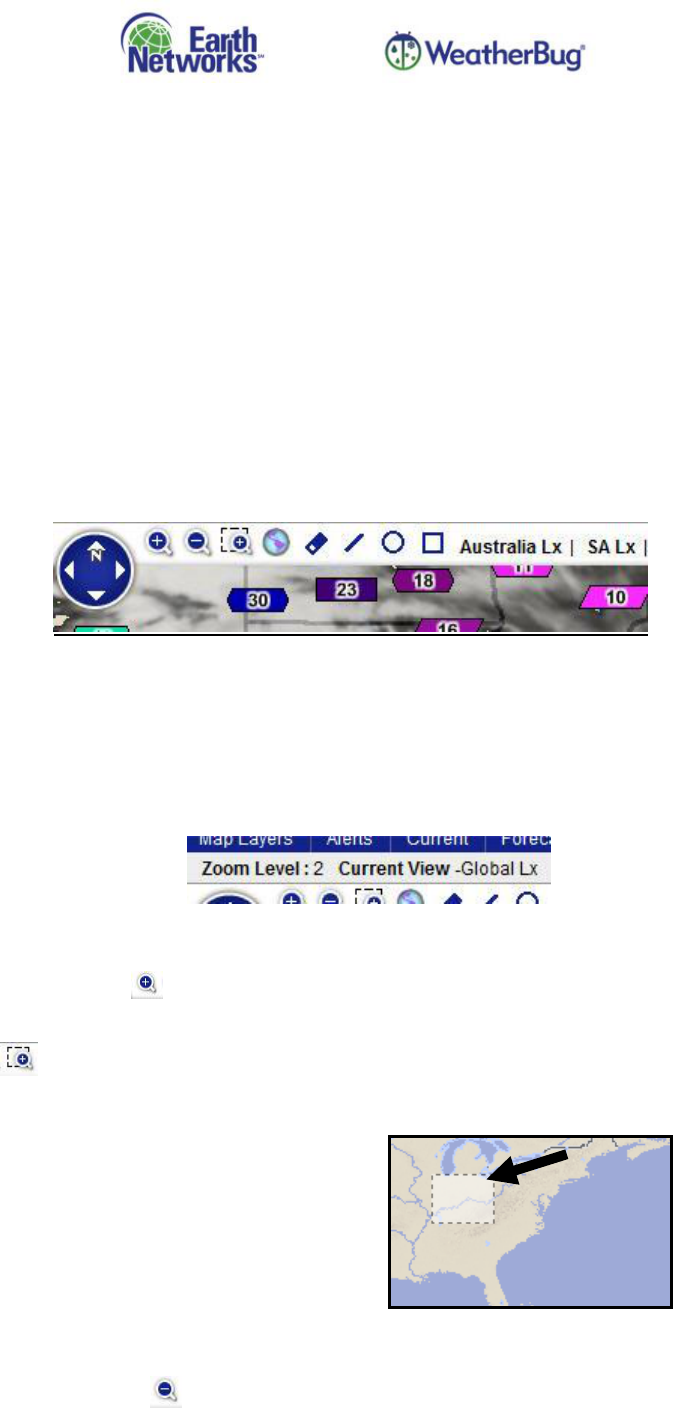
4. Map Controls
The map controls allow you to interact with the map as follows: zoom-in, zoom-out, pan and zoom-out to
full extent within the map.
Layers relocate and resize as the active map is zoomed and panned.
4.1. Zoom Levels
By using the map controls, you can zoom between zoom levels 2 (the world) and 11 (local streets).
Your current zoom level is displayed above the map controls along with your Current View or
Slideshow (if one is selected).
4.2. Zoom-In
Zoom-in by selecting the Zoom-in button, by double-clicking on the map or by moving the mouse
scroll wheel up. This will produce a zoom of 50%, centered on the middle of the map.
Select the Area Zoom button to zoom into a specific area by drawing a zoom box in the map. Left-
click and drag to create the box.
4.3. Zoom-Out
Zoom-out by selecting the Zoom-out button or by moving mouse scroll wheel down. The view
will zoom out 50%, centered on the middle of the map.
Earth Networks, Inc. Proprietary and Confidential Page 6 of 46
EN.PM.UM37 20131113
4.4. Pan
Pan the map in 8 directions by left-clicking on the Pan wheel or left-clicking anywhere on the map
and dragging the map in any direction.
4.5. Full Extent
Select the Full Extent button to make the map zoom out to the default full extent of the world
(zoom level 2).
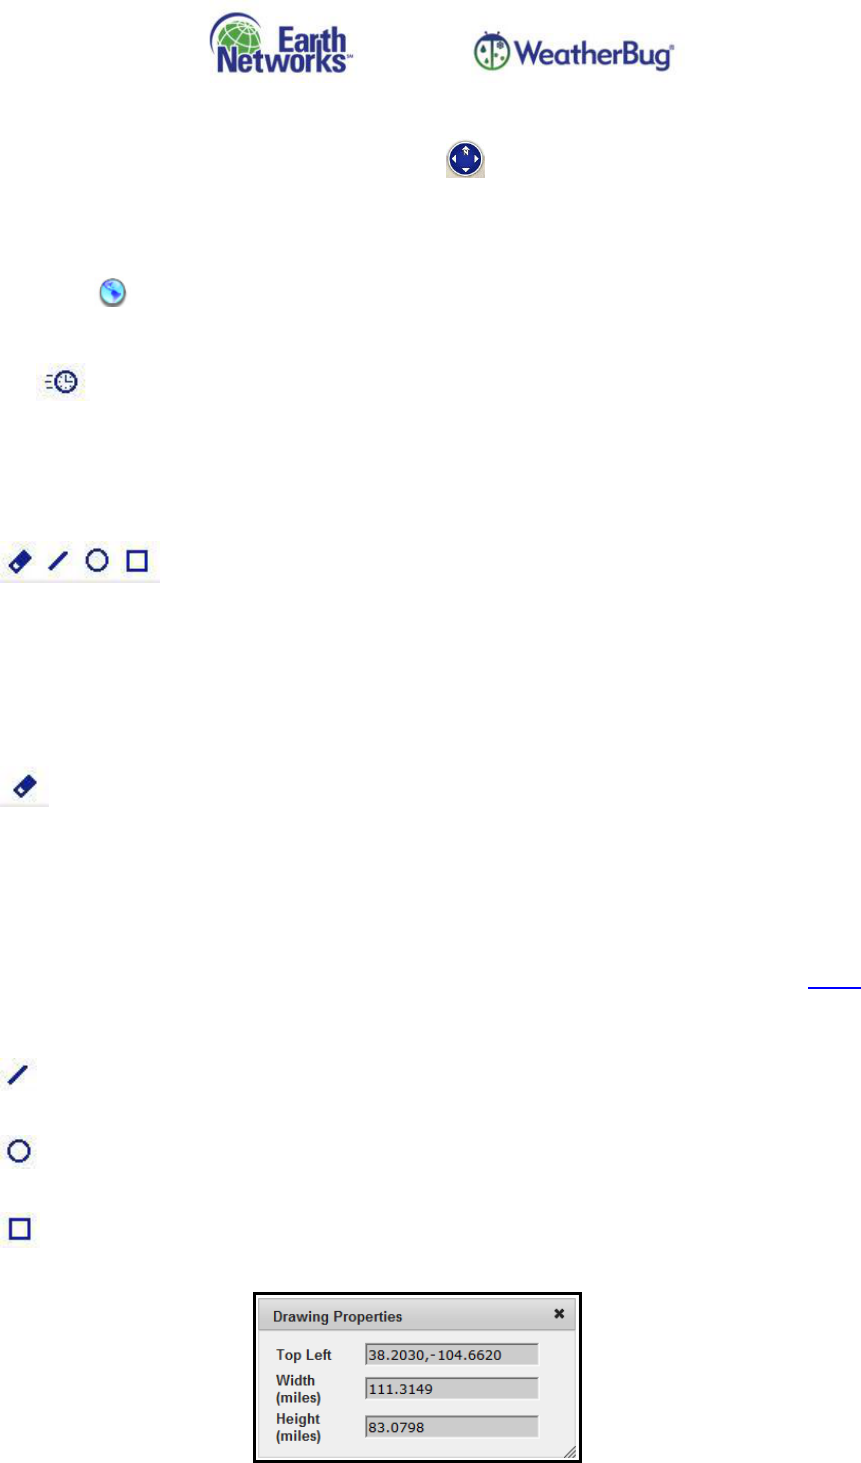
5. Tools
There are 4 drawing tools for distance measurement in StreamerRT. They are located on the lower menu
bar between the navigation tools and the saved Views. Multiple drawings can be added at once.
5.1. Line, Circle, Square Drawing Tools
Left-clicking on any of the drawing tools (line, circle or square) activates them for
drawing.
Left-click on the map to drop the location point you want to measure from and then drag the
mouse to the distance or point of interest.
Release the left mouse button to set the distance drawing on the map.
5.2. Eraser Tool
The eraser removes distance drawings.
Left-click on the eraser symbol to activate the eraser function.
Left-click on the drawing to remove it from the map.
5.3. Save Drawings
If a drawing is present when you save a new View or replace an existing View, it will be saved with the
View and will display every time the View is selected. See Section 10.3 for more details on Views.
5.4. Drawing Properties
When left-clicking on a line, the Drawing Properties window will open and display the lat/lon
points and the distance of the line.
When left-clicking on a circle, the Drawing Properties window will open and display the center
point lat/lon and the radius distance of the circle.
When left-clicking on a square, the Drawing Properties window will open and display the top left
point lat/lon and the height and width distances of the square.

Earth Networks, Inc. Proprietary and Confidential Page 7 of 46
EN.PM.UM37 20131113
5.5. Storm Tracking or Estimated Time of Arrival (ETA) Tool
When left-clicking on the ETA icon, the ETA calculator window will open and display in the
top left of the map display area.
The user should then follow the three step instructions in this window for using the tool.
Following the three steps will complete the ETA calculation and plot the start point, end point,
speed and ETA for the storm being tracked.
Earth Networks, Inc. Proprietary and Confidential Page 8 of 46
EN.PM.UM37 20131113
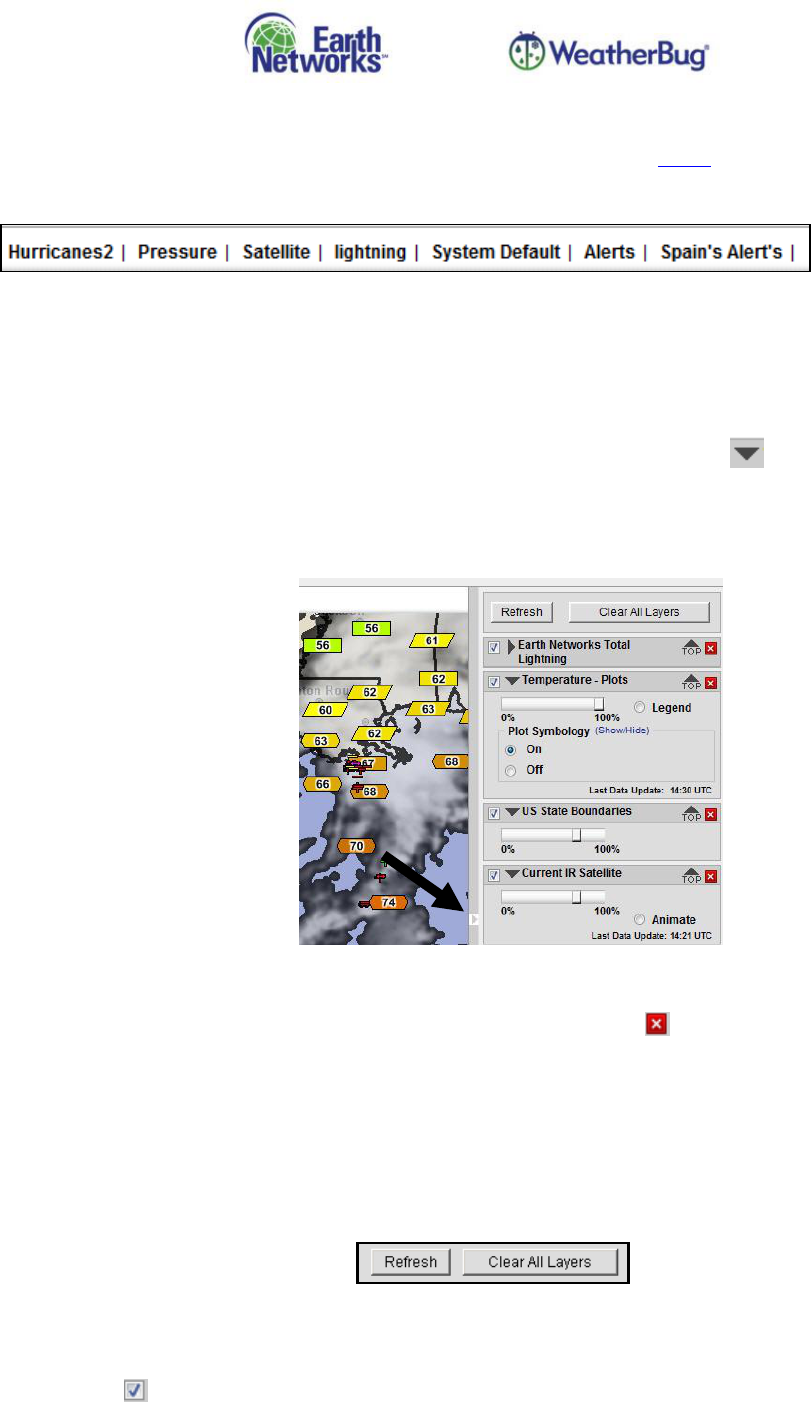
6. Displayed Views
Views are a saved set of data layer combinations. Please see Section 10.3 Views for more detail. The first 8
Views in your list are available for selection next to the map tools. Left-clicking on any View in the list
loads that View.
7. Data Pane
When a weather data layer is selected from the Data Menu, the data layer is displayed in the Data Pane to
the right of the map. The Data Pane provides easy access for you to view which data layers are displayed
on the map and provides additional functionality for that data.
Each layer in the Data Pane can be expanded and collapsed by left-clicking on the arrow to the left of
the name.
The entire Data Pane can be hidden by clicking on the arrow to the left, center of the Data Pane (the black
arrow in the screenshot below is pointing to the collapse button).
7.1. Remove Layers from Map
A data layer can be removed from the Data Pane by left-clicking the delete button to the right of
the layer name.
7.2. Refresh and Clear All Layers
When you select the Refresh button, the data for the data layers currently displayed on the map
refreshes.
When you select the Clear All Layers button, the map and Data Pane are cleared of all data layers.
7.3. View or Hide Data Layers
By default, data layers are on and visible once selected. Left-clicking to remove the check in the first
checkbox entry to the left of the data layer name allows you to turn off a layer from the map, but
keeps the data layer entry in the Data Pane for easy access to turn on when needed. A data layer will
not display on the map once it is turned off. To turn it back on, check the box.
Earth Networks, Inc. Proprietary and Confidential Page 9 of 46
EN.PM.UM37 20131113
7.4. Jump Data Layer to Top
Each layer added has an arrow labeled “Top” that allows the layer to jump a data layer to the
top position. A data layer must be in the top position for the map tip information to be queried. This is
an easy way to move a layer quickly into this position.
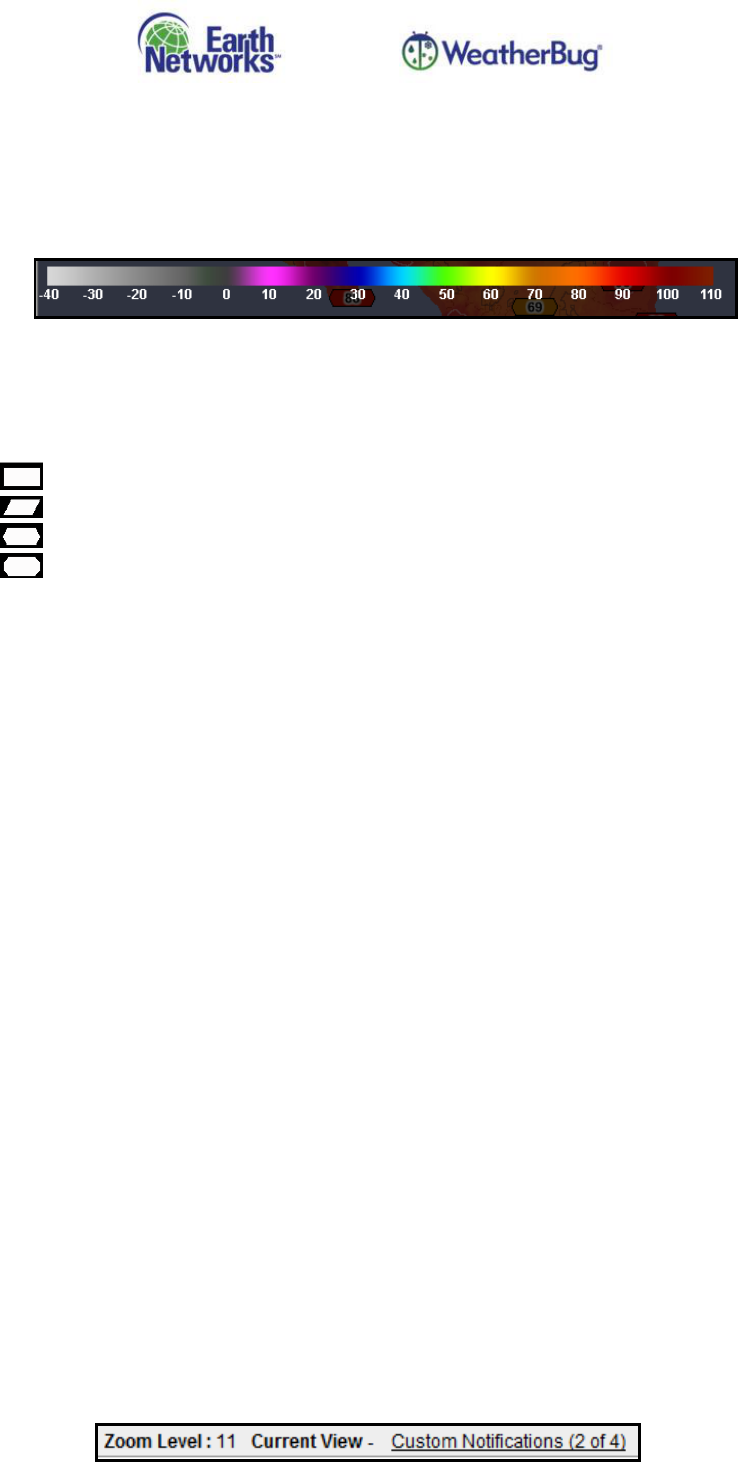
7.5. View Legends
The radio button allows you to turn on a legend for applicable data layers. The radio
button will not display for layers that do not have a legend. Only one legend can be displayed on the
map at a time. If the radio button is selected, the legend will display; if it is not selected, the legend
will be hidden (default).
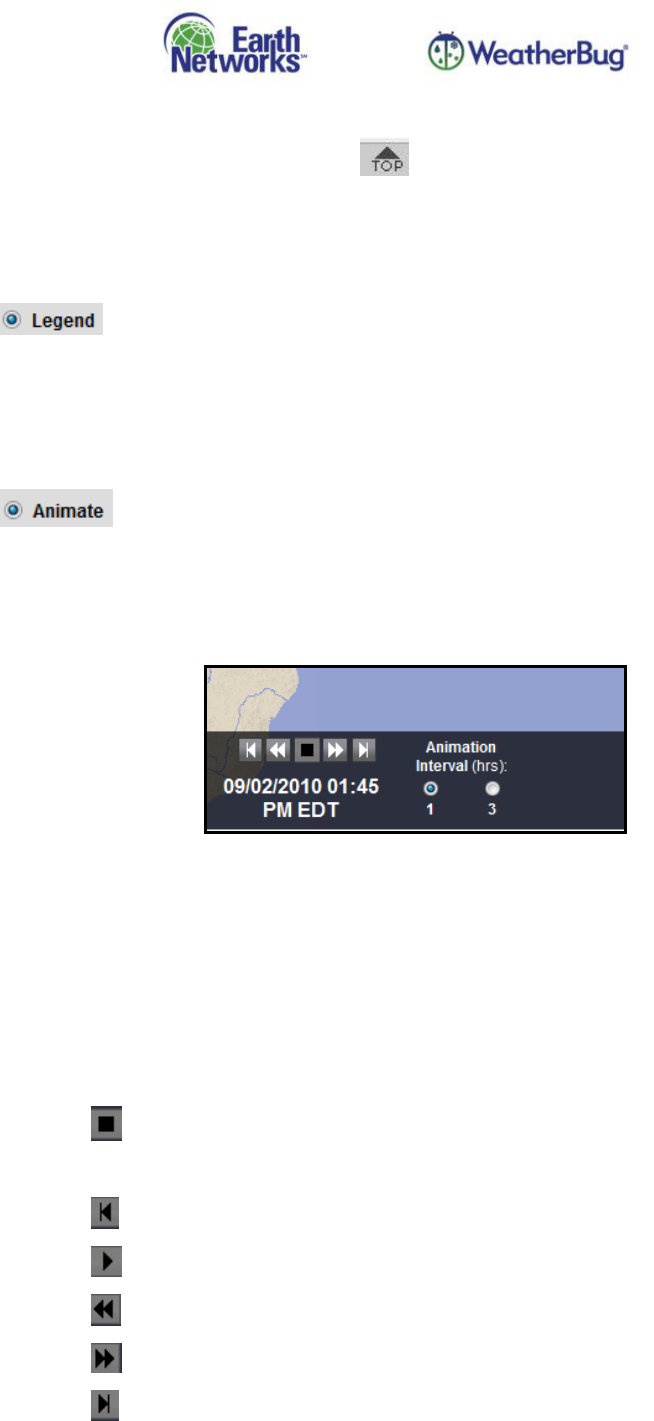
7.6. Animate Data Layers
The radio button allows you to animate the data layers on any map extent or View. The
radio button will not display for layers that do not animate. Only one data layer can be animated on
the map at a time. You must first select the Animate radio button in the Data Pane to turn on
animation.
You can then select the Animation Interval of 1 (default) or 3 hours at the bottom of the map.
While animating, the animation bar will display showing images for the period of 1 or 3 hours
depending on your selection. New images will automatically be added to the animation sequence.
Animation timestamps show the time for each frame in the animation.
Additional controls display for layers that have Animate selected.
If a layer is animating:
Allows you to stop animation.
If a layer is not animating:
Jumps you to the first animation frame.
Allows you to start animation.
Allows you advance backwards frame by frame.
Allows you to advance forward frame by frame.
Jumps you to the last animation frame.
Earth Networks, Inc. Proprietary and Confidential Page 10 of 46
EN.PM.UM37 20131113
7.7. Plot Symbology
All point data layers with numeric/point values (i.e. Temperature and Humidity) are able to display
within color-coded shapes, known as plot symbology. The colors match the palettes provided in the
contour maps. For instance, a point value of 100° F in Temperature will match the color palette used
for the Temperature contour layer as displayed in the legend below.
If the point layer does not have a matching contour layer, it will use the same color palette as a similar
contour layer. For instance, Daily High Temperature and Heat Index Depression will use the
Temperature contour color palette and Dew Point Rate will use the Dew Point contour color palette.
The shapes correspond to the station or data types as follows:
WeatherBug Location or gridded model data
Weather Bug Location with Camera
METAR
MesoNet
You may activate a legend that displays the shape keys for all layers other than the Days 1-6 NWS
Forecast Low/High Deviation. The Days 1-6 NWS Forecast Low/High Deviation layers display the color
keys instead. You may also turn the point data symbology on and off for each point layer in the Data
Pane. By default, the symbology is on. When you create Views, your plot symbology selection will be
saved with the View.
7.8. Move Layers to the Top of the Data Pane
Each data layer can be ordered by left-clicking on the layer and dragging and dropping it into the
order desired. Moving a data layer to the top of the list makes the layer the top overlay displayed on
the map and allows the map tips to be viewed for that layer.
7.9. Data Layer Update Time
Data layers show the time of the latest update performed in the map at the bottom of the individual
data layer entry in the Data Pane.
8. Viewing Custom Notifications
A Custom Notifications link appears to the right of the Current View or Current Slideshow on the zoom
level display bar. The display will vary based on the status of your Custom Notifications that have been
created using the Edit Notifications link in the menu bar:
Flashing, bold, red font: You have one or more new active Custom Notifications that you have not
yet viewed (you have not opened the Custom Notification List).
Bold, black font: You have one or more active Custom Notifications that have not been read (you
have not viewed the Custom Notification Details).
Non-bold, black font: All active Custom Notifications have been read or you do not have any
active Custom Notifications (you may have existing inactive Custom Notifications).
The numbers that appear in the link provide the number of active Custom Notifications out of the total
number of active and inactive Custom Notifications. For instance, (2 of 4) represents 2 active Custom
Notifications out of 4 total active and inactive Custom Notifications.
Earth Networks, Inc. Proprietary and Confidential Page 11 of 46
EN.PM.UM37 20131113
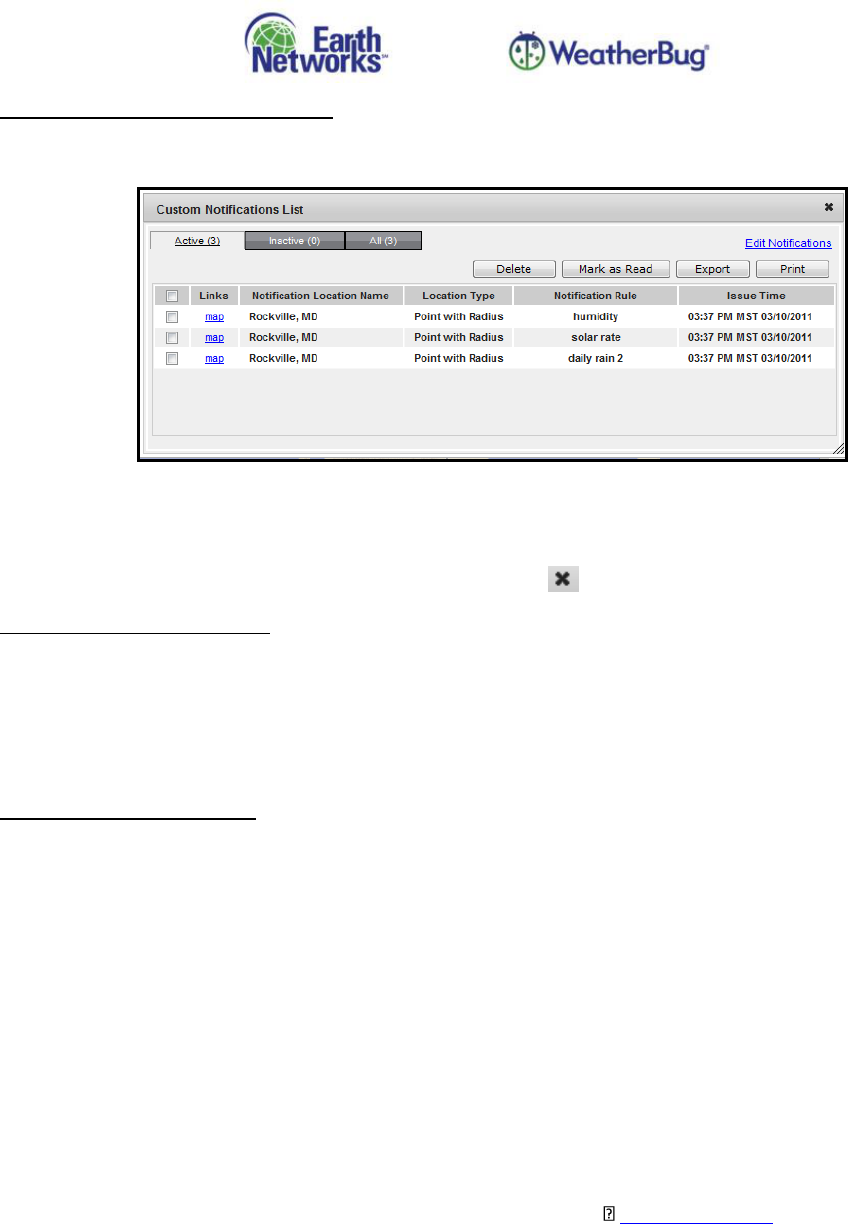
Viewing the Custom Notification List
Left-clicking on the Custom Notifications link opens the Custom Notifications List with the Active tab
selected. There are three Custom Notification tabs you may select: Active, Inactive and All.
Once the active Custom Notifications List is opened, the Custom Notifications link will no longer
display with blinking, red font. This is because all new notifications are considered “viewed” once the
list is opened.
Close the Custom Notifications List by left-clicking on the in the upper, right-hand corner.
Reading Custom Notifications
Custom Notifications in the list appear in bold text if they have not been read. Left-clicking on any
notification will open a window with additional information such as Station ID, observation details,
alert descriptions, stroke location, etc. Any notifications with bolded text will be made unbold after
they are opened, as they will be considered “read”.
Note: All lightning details represent the stroke that caused the Custom Notification.
Custom Notification Actions
You are able to Delete, Mark as Read, Export and Print the Custom Notifications in each list. To
perform each of these tasks:
1. Select the Custom Notifications by checking the box at the top of the list to select all or
checking the box beside individual notifications.
2. Left-click on the Delete, Mark as Read, Export or Print buttons.
Delete: Permanently deletes the Custom Notification(s) from all lists.
Mark as Read: Unbolds the font for all selected notifications.
Export: Exports the selected notifications to a CSV file.
Print: Opens a new window with the notifications in printable format.
You may center each Custom Notification’s location on the map (the zoom level will not change) by
left-clicking on the “map” link next to each notification.
You are able to manage your Custom Notifications (see Section Edit Notifications) by left-clicking on
the Edit Notifications link. This will cause the Custom Notifications List to close and the Notifications
Settings window to open.
8.1. Active Custom Notifications
Left-clicking on the Active tab displays only Custom Notifications that are active. Custom Notifications
are considered active from the point the event occurs until the event expires. The expiration rules are
determined by the type(s) of Data Elements comprising the Rule(s):
Weather Service Alerts: Weather Service Alerts follow the expire time in the alert.
Earth Networks, Inc. Proprietary and Confidential Page 12 of 46
EN.PM.UM37 20131113
Lightning: Lightning Custom Notifications expire after the duration time has elapsed from the
last lightning flash/stroke has occurred at the location.
Observations: Observations expire 15 minutes after the Threshold becomes false.
Invalid: When there are no available weather stations for your location, an Unavailable
Notification will display. This will expire once a weather station becomes available for that
location again.
* Custom Notifications with two data elements will follow the shorter of the expiration times.
Custom Notifications are moved the Inactive list when they expire. If they are deleted while in the
Active list, they are permanently removed and will not move to the Inactive list.
8.2. Inactive Custom Notifications
Left-clicking on the Inactive tab displays only Custom Notifications that are inactive. When
notifications are moved from the Active to the Inactive list, the notifications will be bolded again until
they are read.
Custom Notifications remain in the Inactive list until they are deleted or for 24-hours after they
expire.
8.3. All Custom Notifications
Left-clicking on the All tab displays both active and inactive Custom Notifications as they are displayed
in the Active or Inactive tabs (bolded or unbolded).
8.4. Audio Notifications
Every time a Custom Notification becomes active, you will receive an Audio Notification, which
consists of the sound you selected in Add/Edit Rules playing three times in quick succession. If you are
logged out when a Custom Notification becomes active, the Audio Notifications will sound when you
log in.
Note: The sound on your computer must be on for you to hear the Audio Notifications.
9. Data Menu (Map Layers)
The data menu allows you to select map layers and overlays for viewing. Each data menu category will
allow you to turn on a single layer using a radio button or multiple layers using one or more check boxes.
Generally, only one point layer and one contour layer can be enabled at a time using radio buttons and
multiple overlays can be selected using check boxes. When a layer/overlay is selected, it will become
visible on the map and an entry will be entered in the Data Pane on the right of the display.
As you select data layers and overlays from the menu options, the StreamerRT map display will refresh to
include the newly selected data.
All map layers are auto-updated every minute unless otherwise noted.
Layers and overlays available for selection are dependent on user accounts. Depending on access, you will
have the ability to view some or all of the following selections:
9.1. Map Layers
Depending on access, users can view map boundaries and other details. Map Layers include U.S.
County and State Boundries and International Borders and will overlay all map layers with black

Earth Networks, Inc. Proprietary and Confidential Page 13 of 46
EN.PM.UM37 20131113
borders. It is best to only use the U.S. County Boundries layer on close zoom, otherwise it may take
extra time to draw.
9.2. Alerts
Depending on access, users are able to view up to 3 different sources of alerts in StreamerRT:
national meteorological agency issued alerts (Met Services), WeatherBug Severe Weather Alerts
(WeatherBug) and Custom Notifications.
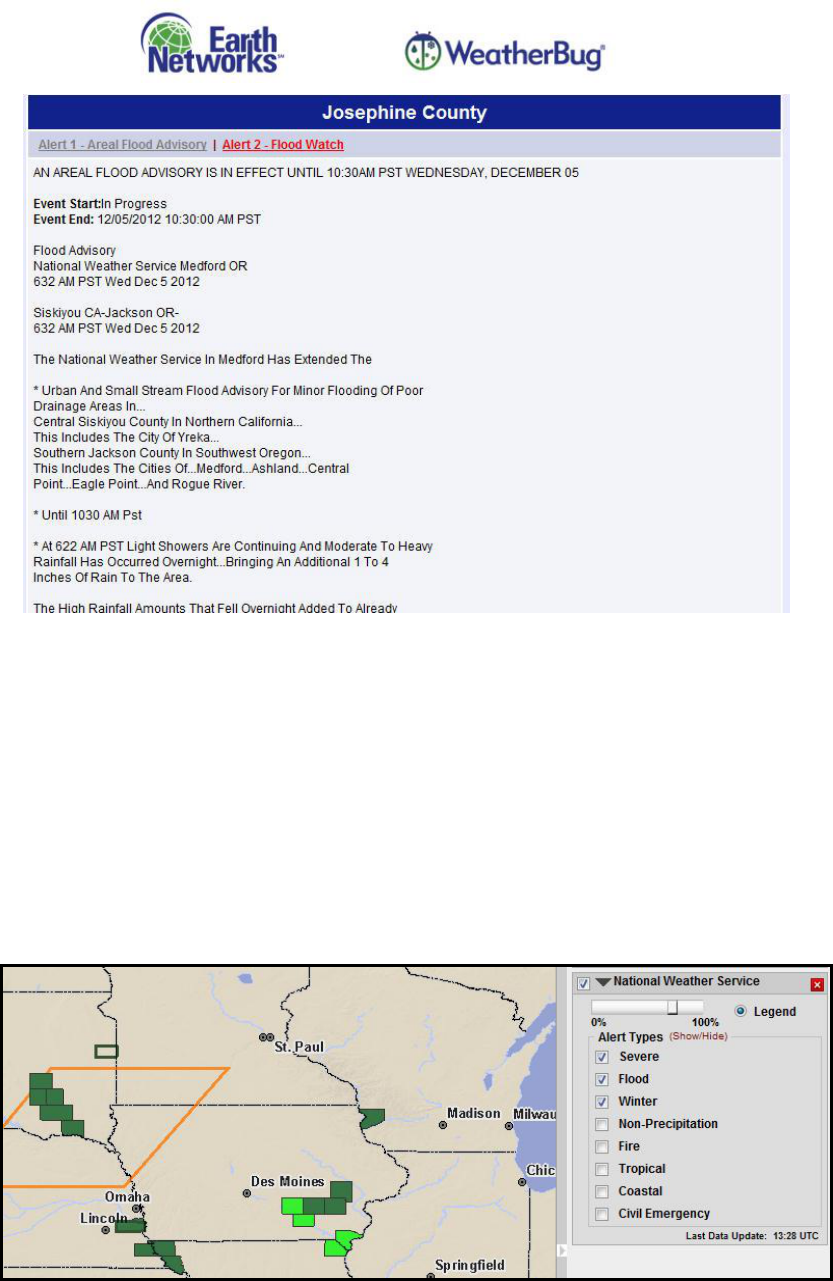
9.2.1. Met Services
Users are able to view alerts from the National Weather Service, State Meteorological Agency of
Spain, Environment Canada and United Kingdom Met Office depending upon access.
Met Services Alerts Map Tip
All Met Services alerts allow you to view the alert summary information for each
displayed alert on the map. Make sure the alert layer is the top layer in the Data Pane
and the zoom level is 3 or higher. Left-clicking on an alert box opens up the map tip.
Most Met Services alert map tips display a Details link at the bottom of the page. Left-
clicking on this link opens a new window or tab with detailed alert information. The first
alert is displayed by default. Additional alerts (if any) may be viewed by left-clicking the
links at the top of the page.
Earth Networks, Inc. Proprietary and Confidential Page 14 of 46
EN.PM.UM37 20131113
9.2.1.1. National Weather Service (NWS)
NWS Alerts include alerts for the Continental U.S., Alaska, Hawaii, Guam and Puerto Rico.
Users are able to select which alert types to view from the Data Pane.
Severe Weather - Tornado Warning, Severe Thunderstorm Warning, Tornado Watch, Severe
Thunderstorm Watch, Flash Flood Warning
Flood Warnings - Flash Flood Warning, Flood Warning, Coastal Flood Warning, Flash Flood
Watch, Flood Watch, Flood Statement
Winter Weather - Winter Storm Warning, Winter Storm Watch, Winter Weather Advisory
Non-Precipitation - Frost and Freeze Warning, Frost and Freeze Watch, High Wind Warning,
High Wind Advisory, High Wind Watch, Lake Wind Advisory, Dust Storm Warning, Air
Stagnation Alert, Wind Chill Advisory, Wind Chill Warning, Excessive Heat Warning, Dense Fog
Warning, Freezing Fog Warning
Fire Weather - Red Flag Warning
Earth Networks, Inc. Proprietary and Confidential Page 15 of 46
EN.PM.UM37 20131113
Tropical Weather - Hurricane Local Statement, Hurricane Warning, Hurricane Watch, Tropical
Storm Warning, Tropical Storm Watch, Extreme Wind Warning
Coastal Weather - Coastal Flood Warning, Coastal Flood Watch, Coastal Flood Statement,
Lake Shore Warning Statement, Tsunami Warning, Tsunami Watch
Civil Emergency - Civil Emergency Message, Civil Emergency Message, Avalanche Watch,
Avalanche Warning, Child Abduction Emergency
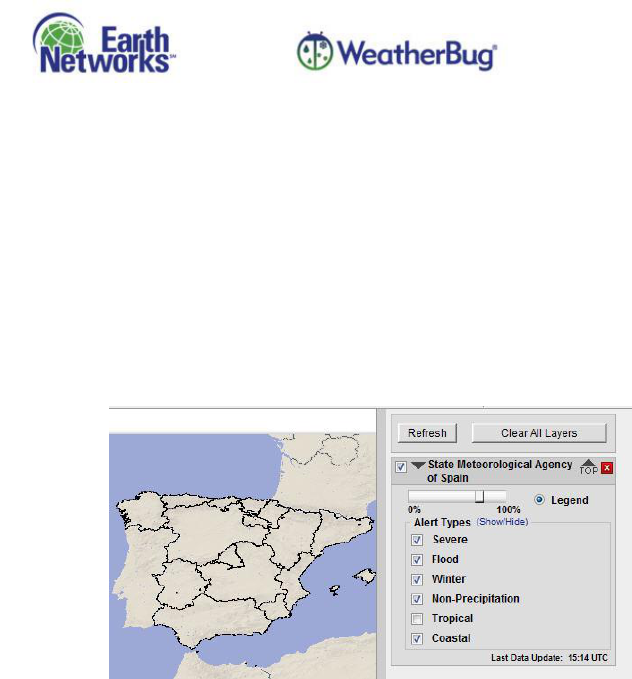
9.2.1.2. State Meteorological Agency of Spain
State Meteorological Agency of Spain Alerts includes alerts for Spain and its territories. You
may select which alert types to view in the Data Pane.
Selections include:
Severe Weather
Flood
Winter
Non-Precipitation
Tropical
Coastal
9.2.1.3. Environment Canada
Environment Canada Alerts include alerts for Canada provinces and territories. You may
select which alert types to view in the Data Pane.
Selections include:
Severe Weather
Flood
Winter
Non-Precipitation
Tropical
9.2.1.4. United Kingdom Met Office
United Kingdom Met Office Alerts include alerts for all U.K. countries. You may select which
alert types to view in the Data Pane.
Selections include:
Severe Weather
Flood
Winter
Non-Precipitation

Earth Networks, Inc. Proprietary and Confidential Page 16 of 46
EN.PM.UM37 20131113
9.2.2. Earth Networks (Dangerous Thunderstorm Alerts)
WeatherBug – WeatherBug Dangerous Thunderstorm Alert (WDTA) - issued when lighting rates
exceed 25 flashes/minute. The alert indicates an increased threat of heavy rain rates, dangerous
lightning, hail, strong winds and tornadic activity.
WDTA Map Tip
Left-clicking anywhere within the WDTA polygon will open up a map tip of all active national
weather service and WDTA alerts in the area. This is the same map tip described in the Met
Services section (8.2.1). Make sure the alert layer is the top layer on the map and the zoom level
is 3 or higher to view.
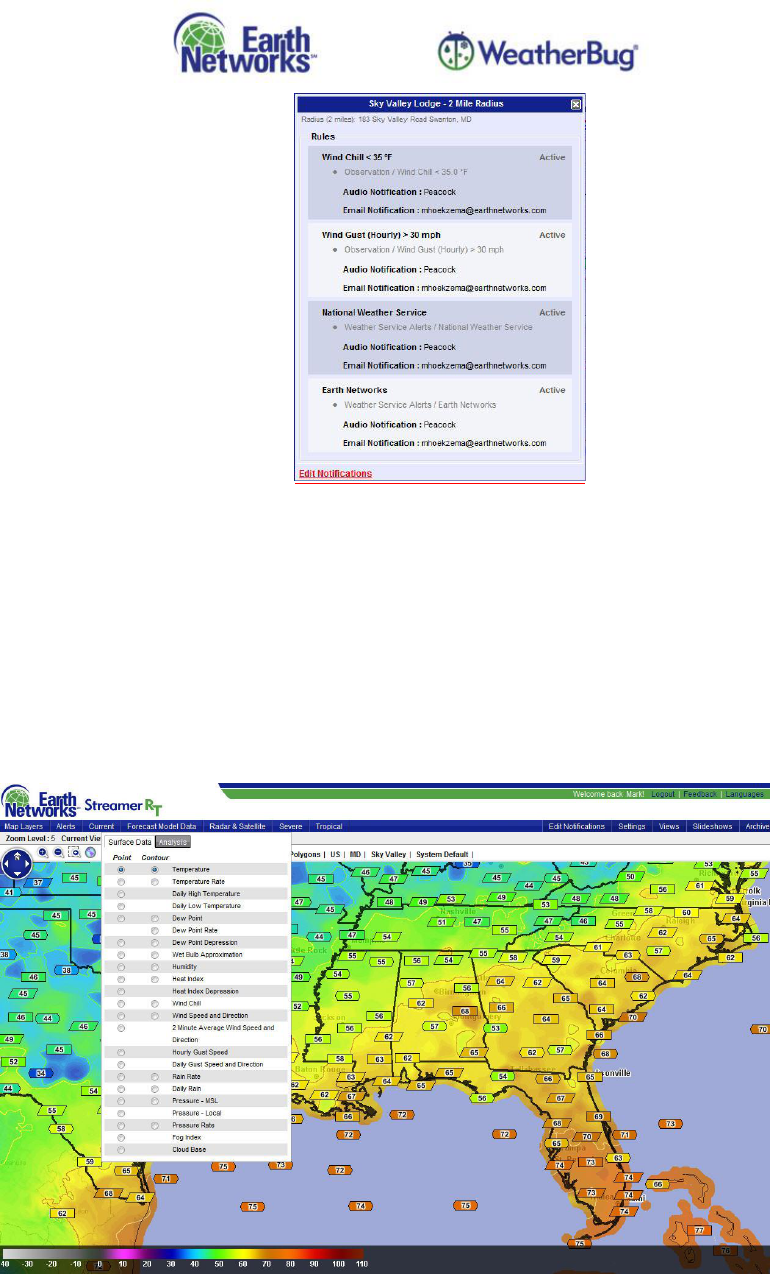
9.2.3. Custom Notifications
You are able to view the status for every location that has a Custom Notification by selecting the
Custom Notification Locations map layer. A color-coded star displays for each location:
Green: locations with rules that are turned on but are not active
Orange: locations with all rules turned off or no rules attached
Red: locations with rules that are turned on and currently active
Custom Notifications consist of the following elements:
Threshold: a value that is added to a data element to determine when the weather
observation becomes active—you input the threshold that will cause Observation data
elements to become active; Lightning and Weather Service Alert data elements become
active when lightning occurs or an alert is activated
Data Element: the Observation, Weather Service Alert or Lightning selection assigned to a
rule, up to two data elements may be assigned
Rule: the data element(s) assigned to a location, you may turn rules on and off (Custom
Notifications are never issued for rules that are off)
Location: the point, radius or zip code to which the rules are assigned
Custom Notification: the combination of a location and rule, a Custom Notification
becomes active when a threshold is met/occurs for at least one of the data elements
assigned to a rule and inactive when a threshold is not met
For details on creating, editing and deleting Custom Notifications, please see Section Edit
Notifications.
Custom Notifications Map Tip
Left-clicking on any of the stars opens a map tip that shows all rules associated with the alert
along with their status of active or inactive.
Note: A maximum of four rules will display. If you have additional rules that are not displayed a
“More” link will appear below the list of notifications. Left-clicking on this link to open the
Notification Settings window and view all attached rules.
Earth Networks, Inc. Proprietary and Confidential Page 17 of 46
EN.PM.UM37 20131113
9.3. Current
View worldwide station observation point data and/or detailed color contour images for numerous
station data attributes by leveraging the exclusive WeatherBug Network. Current map layers are
automatically refreshed every 5 minutes.
9.3.1. Surface Data
Allows you to select point or contour image for any of the data selections below:
Note: You may only view one point and one contour at a time.
Temperature – current surface temperatures in degrees Fahrenheit or Celsius
Temperature Rate – measured temperature change in the last six minutes expressed as an
extrapolated hourly temperature change rate (plus or minus) in degrees Fahrenheit or Celsius
Daily High Temperature – measured highest temperature in degrees Fahrenheit or Celsius for the
current day (midnight to midnight local time)

Earth Networks, Inc. Proprietary and Confidential Page 18 of 46
EN.PM.UM37 20131113
Daily Low Temperature – measured lowest temperature in degrees Fahrenheit or Celsius for the
current day (midnight to midnight local time)
Dew Point – current surface temperature to which the air must be cooled for water vapor to
condense into water (dew) in degrees Fahrenheit or Celsius
Dew Point Rate - measured dew point temperature change in the last six minutes expressed as an
extrapolated hourly temperature change rate (plus or minus) in degrees Fahrenheit or Celsius
Dew Point Depression – the difference between the temperature and the dew point
Humidity – the amount of water vapor in the air expressed as a percent of maximum saturation
Heat Index – index that combines the current temperature and humidity to determine an
apparent temperature in degrees Fahrenheit or Celsius
Heat Index Depression – difference between the Current Heat Index and the Current Outdoor
Temperature
Wind Chill – index that factors air temperature and wind speed to determine an apparent
temperature felt on exposed skin in degrees Fahrenheit or Celsius
Wind Speed and Direction – current wind speed and direction in miles or kilometers per hour
2 Minute Average Wind Speed and Direction – a moving two minute Average Wind Speed and
Average Wind Direction (the two minute window is defined as the two minutes prior to the
current observation time)
Hourly Gust Speed – peak instantaneous wind speed measurement for the past hour (hour is
defined as the 60 minutes before the current observation time)
Daily Gust Speed and Direction – highest wind gust speed in miles or kilometers per hour and
direction for the current 24 hour period
Rain Rate - measured rain total in the last six minutes expressed as an extrapolated hourly rain
rate in inches or millimeters
Daily Rain – measured amount of rain in inches or millimeters for the current day 24 hour period
Pressure - MSL - the pressure exerted by the atmosphere at sea level expressed in inches of
mercury or millibars
Pressure – Local – the pressure exerted by the atmosphere at the elevation of the location
expressed in inches of mercury or millibars
Pressure Rate – the measured pressure exerted by the atmosphere at sea level in the last six
minutes expressed as an extrapolated hourly pressure change rate expressed in inches of mercury
or millibars
Wet Bulb Approximation – the lowest temperature that can be obtained by evaporating water
into the air
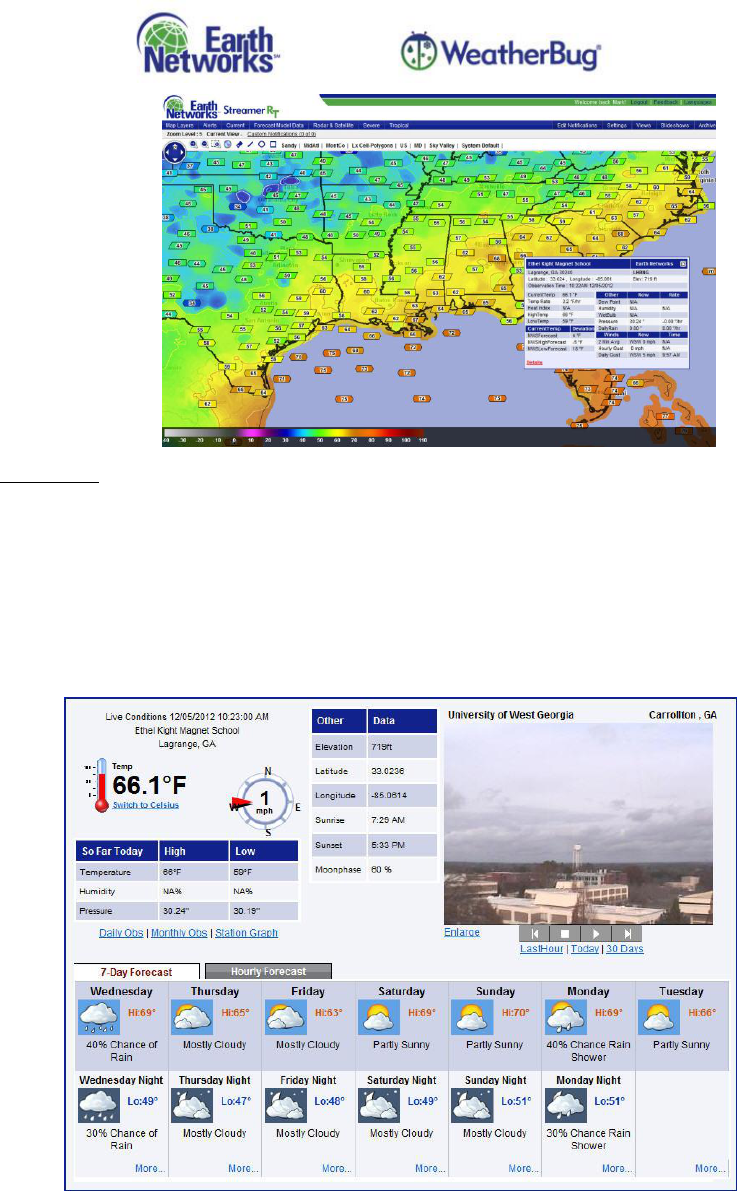
Point Map Tip (Station)
The Point Map Tip allows you to view a quick data summary of many critical real-time station
weather parameters and daily values. To enable a station map tip, left-click on the data point that
you want to view and the map tip will open.
Earth Networks, Inc. Proprietary and Confidential Page 19 of 46
EN.PM.UM37 20131113
Dashboard
In addition to the station map tip, you can left-click on the “Details” link found at the bottom
of the map tip to open the Dashboard in a new window or tab.
The Station Dashboard provides you with a comprehensive view of weather station
observations including camera images, daily and monthly observation summaries/graphs as
well as 7-day and hourly forecast information.
9.3.2. Analysis
Selecting Temperature Deviation from Yesterday displays the difference of the current
temperature from the temperature at the same time 24 hours ago as a contour and/or point
layer.
Earth Networks, Inc. Proprietary and Confidential Page 20 of 46
EN.PM.UM37 20131113
9.4. Forecast Model Data
National Weather Service NDFD forecast data such as current temperature and daily high/low
temperature is available based on user access. In addition, critical Forecast Deviation points and/or
contours which provide the immediate location where the weather is unexpectedly hot or cold are
available. (Includes Continental U.S.). Forecast Model Data map layers are automatically refreshed
every 5 minutes.
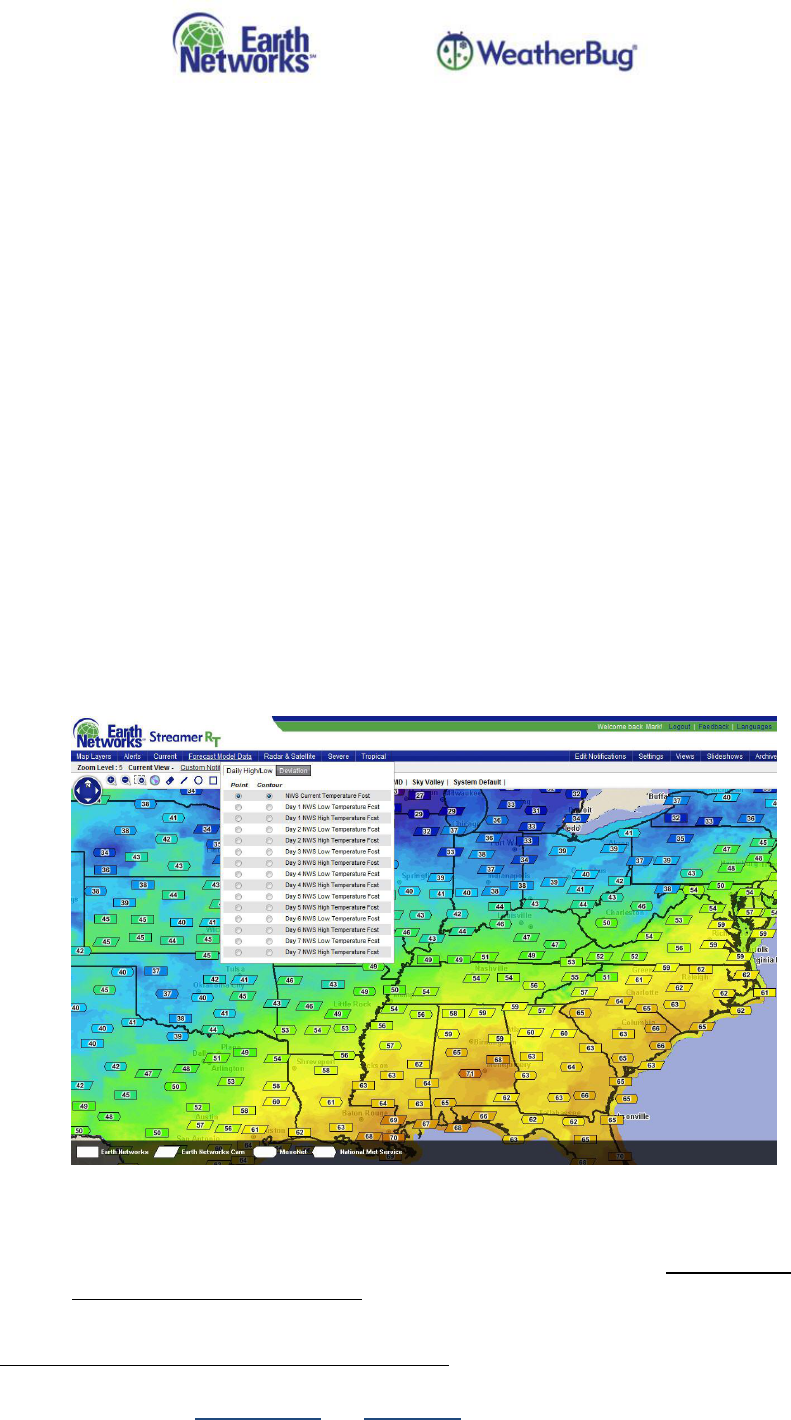
9.4.1. Daily High Low
Selections are:
NWS (NDFD) Current Temperature Forecast – NWS forecast information provided by the NDFD
available as point data and color contour
NWS (NDFD) Low/High Forecast Temperatures for Days 1-7 – NWS forecast information provided
by the NDFD available as point data and color contour (From 12 am local time to approximately 8
am local time, the Day 7 low temperature will be unavailable (N/A) until the overnight model run
is updated.)
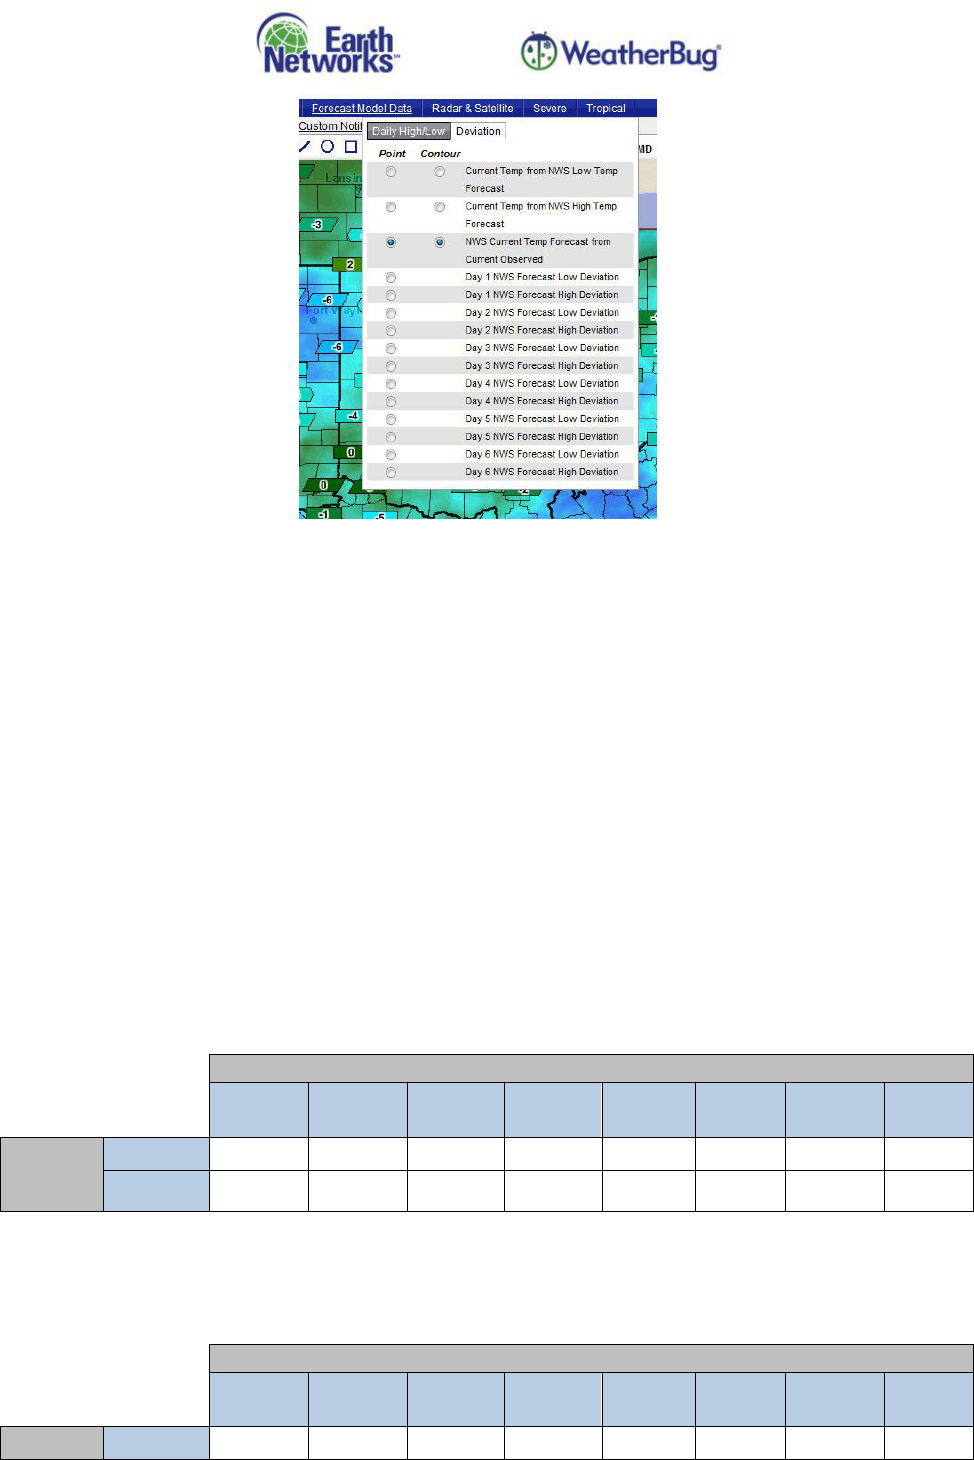
9.4.2. Deviation
Displays the deviation between forecast temperatures and current temperatures as point data
and color contour. Selections are:
Current Temp from NWS Low Temp Forecast
Current Temp from NWS High Temp Forecast
NWS Current Temp Forecast from Current Observed
NWS Forecast Low/High Deviation (Days 1-6)—see Section 9.4.2.1 NWS Forecast
Low/High Deviation Point Layers below for more details on the layer and associated map
tip
Point Map Tip/Dashboard and Deviation Map Tip
All Forecast Model point data other than the NWS Forecast Low/High Deviation (Days 1-6) layers
also display the same Point Map Tip and Dashboard as used for Current layers (Section 9.3) when
clicked.
Earth Networks, Inc. Proprietary and Confidential Page 21 of 46
EN.PM.UM37 20131113
9.4.2.1. NWS Forecast Low/High Deviation Point Layers
The NWS Forecast Low/High Deviation point layers display the difference between the first
forecast low or high issued in the NDFD forecast for the specified date and the first forecast
low or high issued in the NDFD forecast for the previous date. This allows observation of
forecast trends and uncertainty based on forecast spread, which will help assess risk and
confidence.
Forecast deviations are displayed on a 4km grid that will display at higher resolution as map
levels are zoomed in.
Forecast days will advance as forecasts update and NWS forecasts stop issuing high and low
forecasts for the current day. This will generally occur in the morning for lows and in the late
afternoon for highs.
You are able to select either the low or the high values for Days 1-6. For NWS Forecast High
Deviation point layers, Day 1 is always the current date, Day 2 is always tomorrow and Day 3
is always the day after tomorrow, etc. For NWS Forecast Low Deviation point layers, Day 1 is
always tomorrow, Day 2 is always the day after tomorrow, etc.
Example of Data (high forecast):
Forecast Date
13-Mar
14-Mar
Day 1
15-Mar
Day 2
16-Mar
Day 3
17-Mar
Day 4
18-Mar
Day 5
19-Mar
Day 6
20-Mar
Date
Forecast
Received
13-Mar
67
61
70
88
90
80
76
12-Mar
76
66
61
71
87
85
79
In the example above, the current day (Day 1) would be March 14
th
since both forecast values
are no longer available for March 13
th
and Day 6 would be March 19
th
.
Example of Data (low forecast):
Forecast Date
14-Mar
15-Mar
Day 1
16-Mar
Day 2
17-Mar
Day 3
18-Mar
Day 4
19-Mar
Day 5
20-Mar
Day 6
21-Mar
Date
14-Mar
47
41
50
58
50
50
N/A

Earth Networks, Inc. Proprietary and Confidential Page 22 of 46
EN.PM.UM37 20131113
Forecast
Received
13-Mar
56
46
41
51
57
55
49
In the example above, the current day (Day 1) would be March 15
th
since both forecast values
are no longer available for March 14
th
and Day 6 would be March 20
th
.
Point Map Tip/Dashboard and Deviation Map Tip
Left-clicking on any of the data points in any of the NWS Forecast Low Deviation point layers
opens the NDFD Low Temperature Forecast Trends map tip; left-clicking on any of the data
points in the NWS Forecast High Deviation point layers opens the NDFD High Temperature
Forecast Trends map tip. The map tip displays 7 days of full forecasts with 7 days of data in
both line graph and table format (the NDFD Low Temperature Forecast Trends map tip is
shown below).
Line Graph
The x-axis denotes the forecast date and the y-axis denotes the temperature. The line
colors, displayed in a legend at the top of the graph, denote the date the forecast was
received. You are able to mouse over the points to display a pop-up window with values.
The top line in the pop-up displays the date the forecast data was received and the
bottom line displays the forecast date and value. If points overlap, the most recent 7-day
forecast values will display in the pop-up by default. To display the pop-up for an
underlying point, right-click on the line belonging to the point to activate.
Chart
In the chart, the x-axis denotes that date the forecast was received and the y-axis denotes
the forecast date.
9.5. Radar & Satellite
Current radar, radar loops, radar reflectivity forecasts, satellite images and precipitation
accumulation totals are available.
Earth Networks, Inc. Proprietary and Confidential Page 23 of 46
EN.PM.UM37 20131113
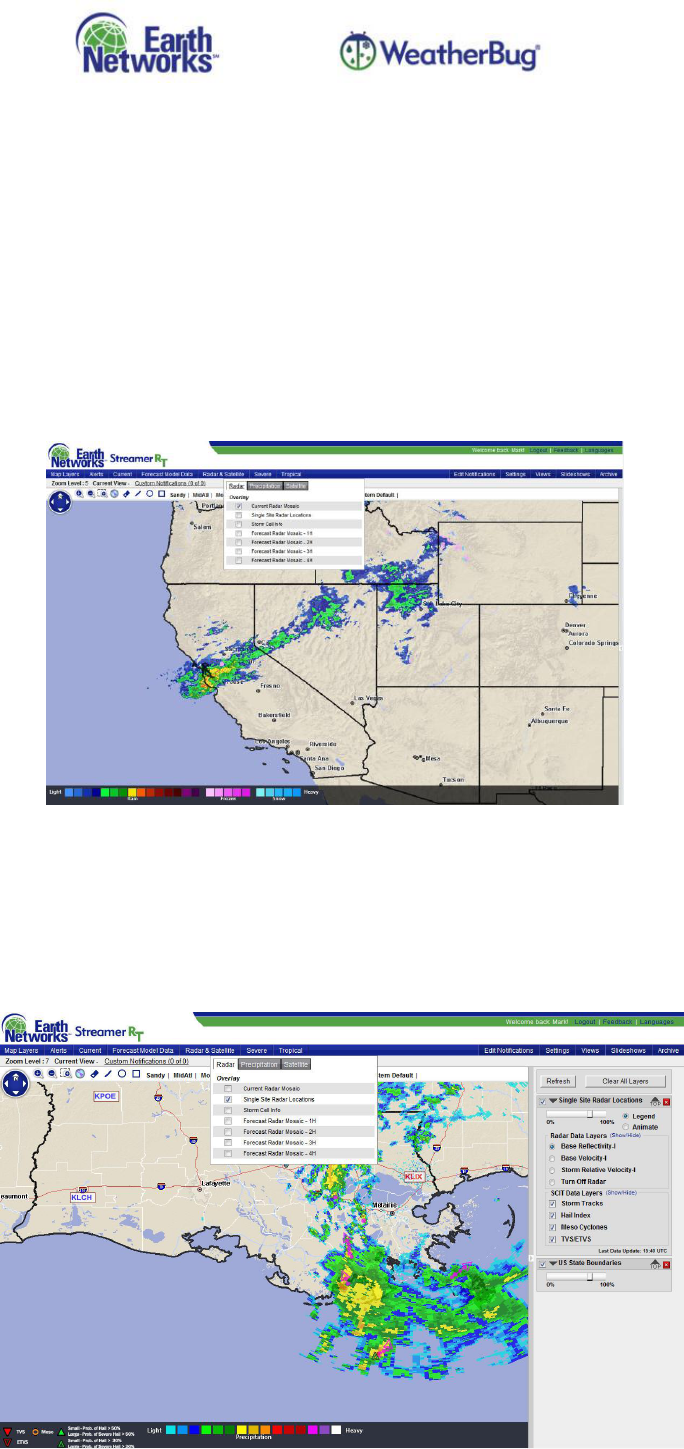
9.5.1. Radar
Current Radar and Forecast radar mosaics show where precipitation is and where it is headed.
(Includes Continental U.S., northern Mexico, southern Canada and adjacent coastal waters.)
9.5.1.1. Current Radar Mosaic
Doppler radar 1km composite radar image covering the Continental U.S. 15 radar dBZ
(decibels of Z, where Z represents the energy reflected back to the radar) levels are shown
covering 5 to 75+ dBZ and color coded each 5 dBZ. The layer is automatically refreshed every
5 minutes.
9.5.1.2. Single Site Radar Locations
Displays individual WSR-88D Doppler radar locations. (Includes Continental U.S., Alaska,
Hawaii, Guam and Puerto Rico.)
Checking the Single Site Data Location layer under Radar & Satellite adds the 4-letter Site IDs
of locations, plotted in a white box with blue text, to the map.
Earth Networks, Inc. Proprietary and Confidential Page 24 of 46
EN.PM.UM37 20131113
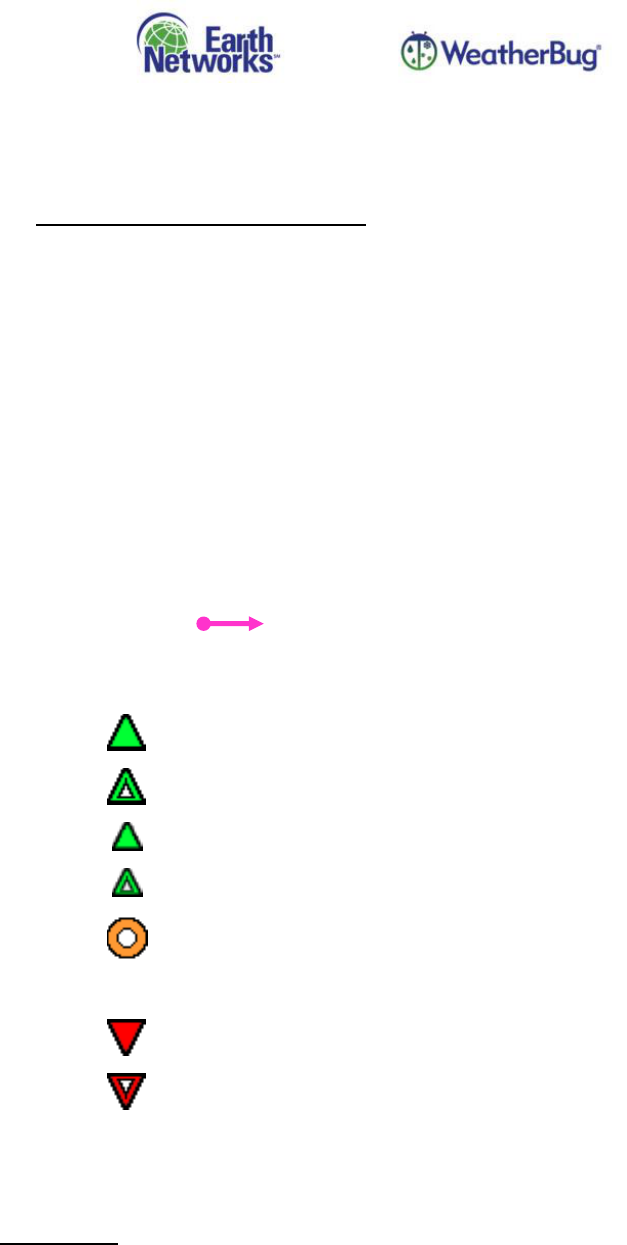
To select a single site location Left-click the desired location text, this will display the default
Base Reflectivity I data layer and will load the data layer into the Data Pane. The Site ID
marker will change to red to indicate it is the ‘active’ site being viewed.
Data Pane Selections for Single Sites
Radar Data Layers
The following Radar Data Layers are available for display by left-clicking on a radio button.
Base Reflectivity I - 124nmi range, angle = 0.5 degrees (selected by default)
Base Velocity I - 124nmi range, angle = 0.5 degrees
Storm Relative Velocity I - 124nmi range, angle = 0.5 degrees
Turn Off Radar
SCIT Data Layers
Left-clicking on a single site location from the Data Pane will also include the available
SCIT (Storm Cell Identification and Tracking) information. Checking the data layers will
display SCIT markers available from the selected radar site. Left-clicking the SCIT marker
will display a map tip window for the storm.
Storm Tracks – show motion and speed of cell over one hour with 15 min
markers
Hail Index –
If Prob of Severe Hail >or= 50%
If Prob of Severe Hail >or= 30%
If Prob. Of Hail >or= 50% and Prob of Severe Hail = 0%
If Prob. Of Hail >or= 30% and <or= 50% and Prob of Severe Hail = 0%
Meso Cyclones – orange donut
TVS – Tornado Vorticity Signature - upside down solid red triangle
ETVS – Elevated Tornado Vorticity Signature - upside down hollow red
triangle
SCIT data is not available for animation. The most recent SCIT information will plot
when selected.
SCIT Map Tip
Make sure the Single Site Radar Locations layer is the top layer on the map in the Data Pane.
Left-clicking on any of the SCIT markers will open up the map tip.
Earth Networks, Inc. Proprietary and Confidential Page 25 of 46
EN.PM.UM37 20131113
The information displayed in the map tip varies based on the SCIT marker. The map tip
displayed above ifs for Storm Tracks.
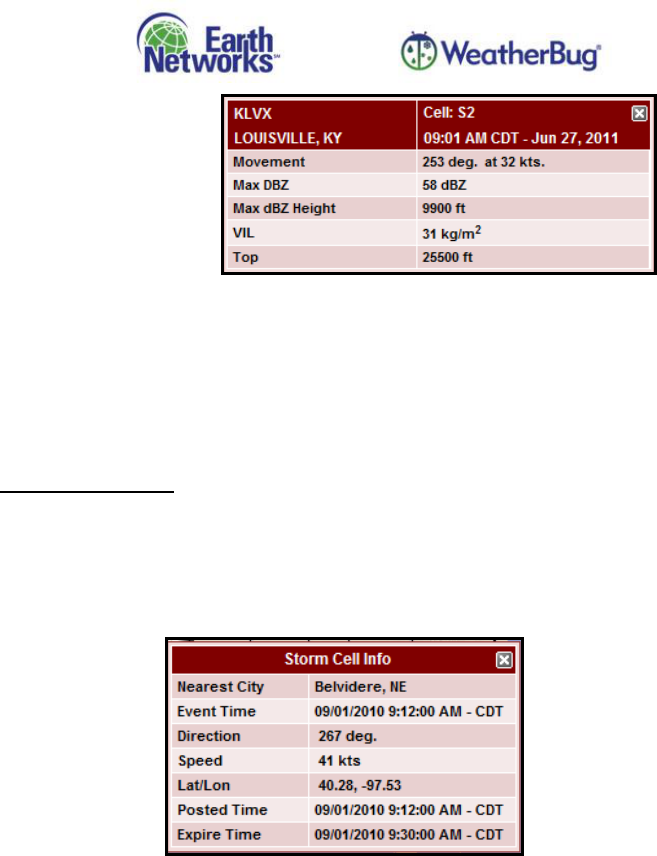
9.5.1.3. Storm Cell Info
Displays the speed in knots and direction of storm cells associated with NWS Severe
Thunderstorm and Tornado warnings. (Includes Continental U.S.)
Storm Cell Map Tip
Make sure the Storm Cell Info layer is the top layer on the map in the Data Pane. Left-clicking
will open up the map tip.
Forecast Radar
Displays a Forecast Doppler radar 1km composite radar image covering the Continental U.S.
15 radar dBZ levels are shown covering 5 to 75+ dBZ and color keyed each 5 dBZ. The data is
updated 4 times an hour. Selections are for 1, 2, 3 and 4 hours. (Includes Continental U.S.,
northern Mexico, southern Canada and adjacent coastal waters.)
9.5.2. Precipitation
Track precipitation accumulation totals over a 1, 3, 6, 12 and/or 24 hour period.
Rain Water Accumulation precipitation accumulation estimates are derived from the Nationwide
Level II mosaics (NMII) every 5 minutes retaining the high resolution 1km grid. Selections are
available for 1, 3, 6, 12 and 24 hours. (Includes Continental U.S.)
9.5.3. Satellite
View visible, infrared and international infrared satellite images.
Satellite Visible - Visible channel satellite image that displays cloud cover from 15-180 degrees
west and 0-90 degrees north. Cloud cover is depicted by reflected sunlight off the cloud tops.
Image will be black where the sun is not shining. Image is updated every 30 minutes.
Earth Networks, Inc. Proprietary and Confidential Page 26 of 46
EN.PM.UM37 20131113
Satellite IR - Infrared channel satellite image that displays cloud cover from 15-180 degrees west
and 0-90 degrees north. Cloud cover is depicted by assigning colors to a scale of water droplet
temperatures detected by satellite. Image is updated every 30 minutes.
International IR Satellite - Infrared channel satellite image that covers the world. Cloud cover is
depicted by assigning colors to a scale of water droplet temperatures detected by satellite. Image
is updated every 1 hour.
9.6. Severe Weather
Track lightning, flood conditions, fire, major snow forecast and accumulation areas and storm
reports.
9.6.1. Lightning
View lightning flashes or strokes, cell tracks and lightning polygons for >3 flashes/minute, >12
flashes/minute and >25 flashes per minute (WDTA—WeatherBug Dangerous Thunderstorm
Alert).
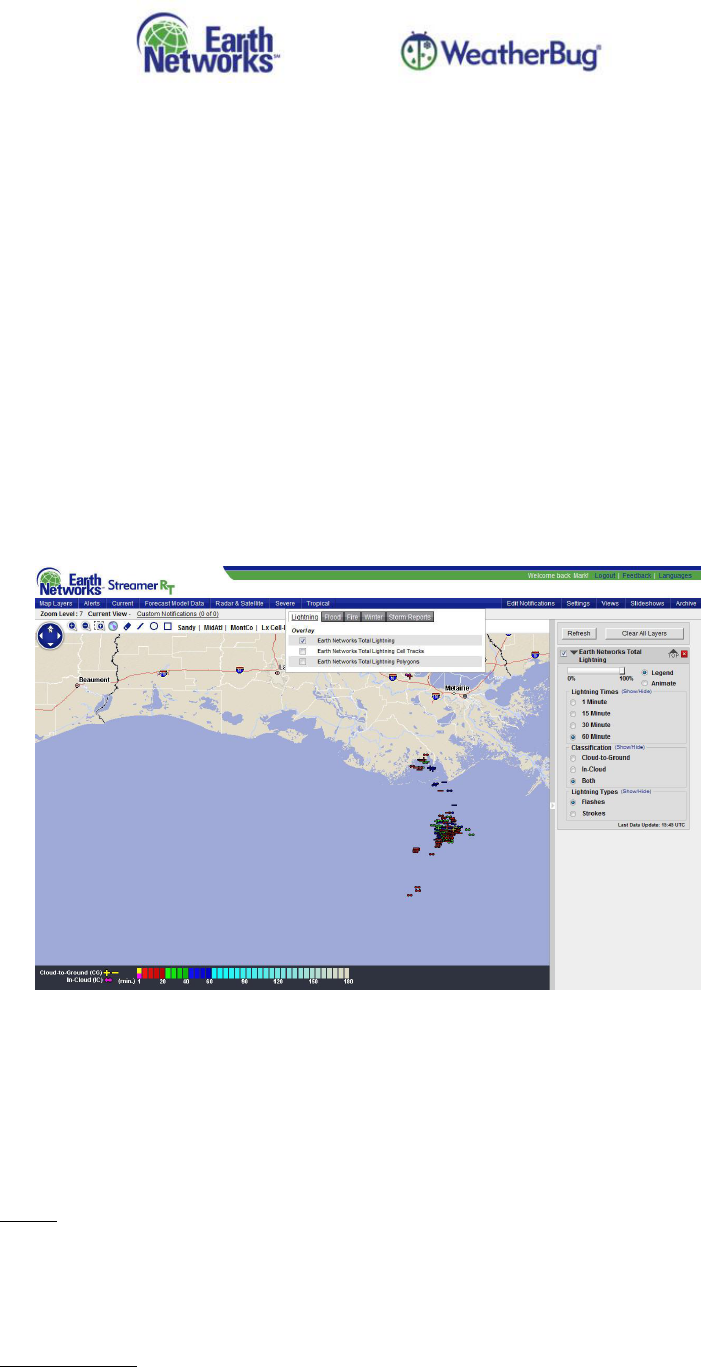
9.6.1.1. WeatherBug Total Lightning
The WeatherBug Total Lightning data layer has a number of options available in the Data Pane
for displaying lightning information. You are able to select Lightning Times (the last 1, 15, 30
or 60 minutes), Classification (Cloud-to-Ground, In-Cloud or both) and Lightning Types
(Flashes or Strokes). (Available worldwide.)
FLASH: the complete bolt of lightning including the many forked tentacles called
strokes/pulses
Cloud-to-Ground (CG) Flash: comes into contact with the ground
In-Cloud (IC) Flash: does NOT make contact with the ground
STROKE/PULSE: one of the many tentacles that comes out from a lightning flash. Many
strokes/pulses make up the composite flash.
Cloud-to-Ground (CG) Stroke: main pulse of strong electric current in a lightning
channel connecting to ground
Earth Networks, Inc. Proprietary and Confidential Page 27 of 46
EN.PM.UM37 20131113
In-Cloud (IC) Pulse: pulse of electric current in a lightning channel that does NOT
touch the ground
At this time, only CG flashes and strokes can have the polarity indicated by displaying the
location of the flash with a positive or negative symbol. The legend displays the type of stroke
or flash by color with the CG showing both positive and negative parameters.
(-) Negative CG strokes: negative charge flows from the cloud to the ground. These are
by far the most common type of CG stroke, occurring more than 95% of the time.
(+) Positive CG strokes: positive charge flows from the cloud to the ground. These are
rarer- occurring less than 5% of the time. Positive strokes are considerably more
dangerous and damaging than CG strokes as they often have a stronger current and last
longer.
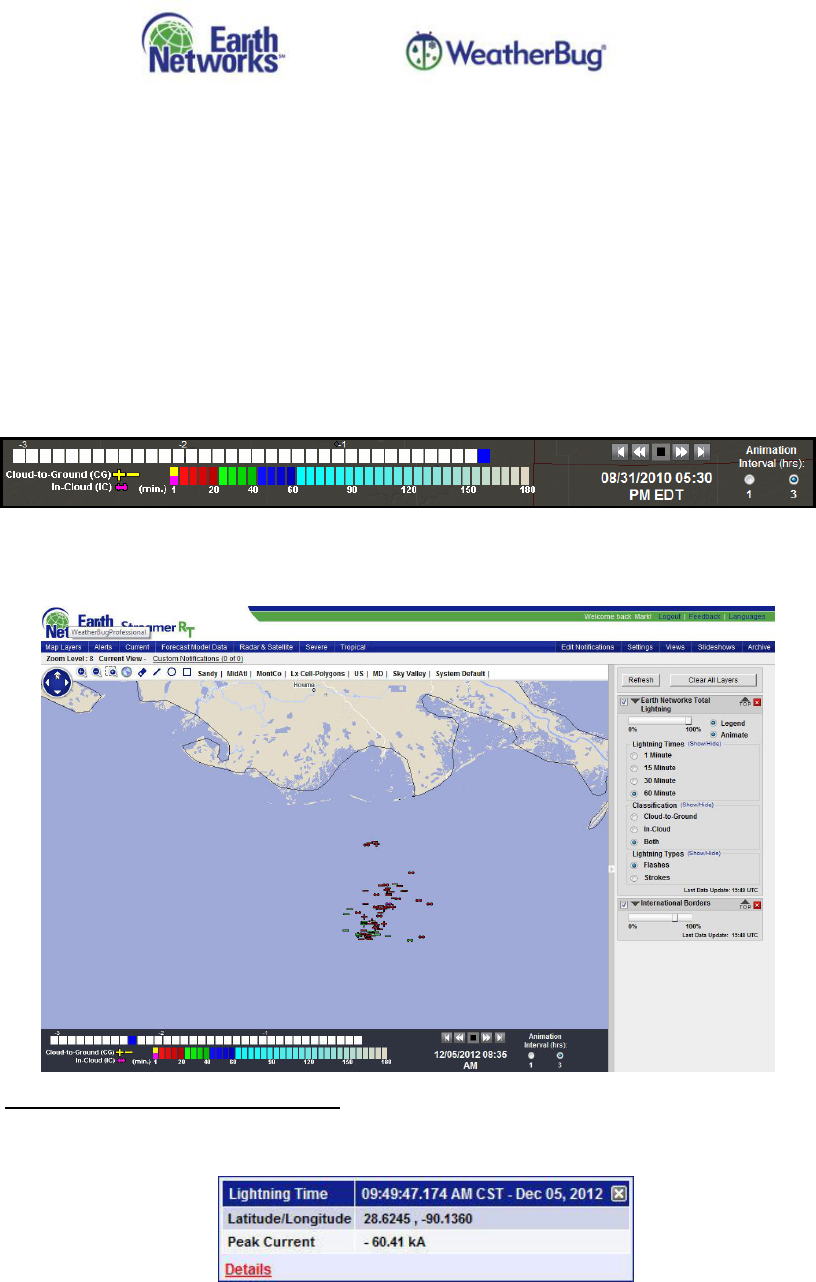
The age of the lightning stroke or flash is color coded as indicated in the legend on the
animation bar. When animating, the colors change as the lightning animation moves forward
in time. An example of a 3-hour animation is shown below.
WeatherBug Total Lightning Map Tip
You must be zoomed into zoom level 9, 10 or 11 to be able to access map-tip information on
the stroke or flash. The map tip for lightning displays the location, time and amperage.
Earth Networks, Inc. Proprietary and Confidential Page 28 of 46
EN.PM.UM37 20131113
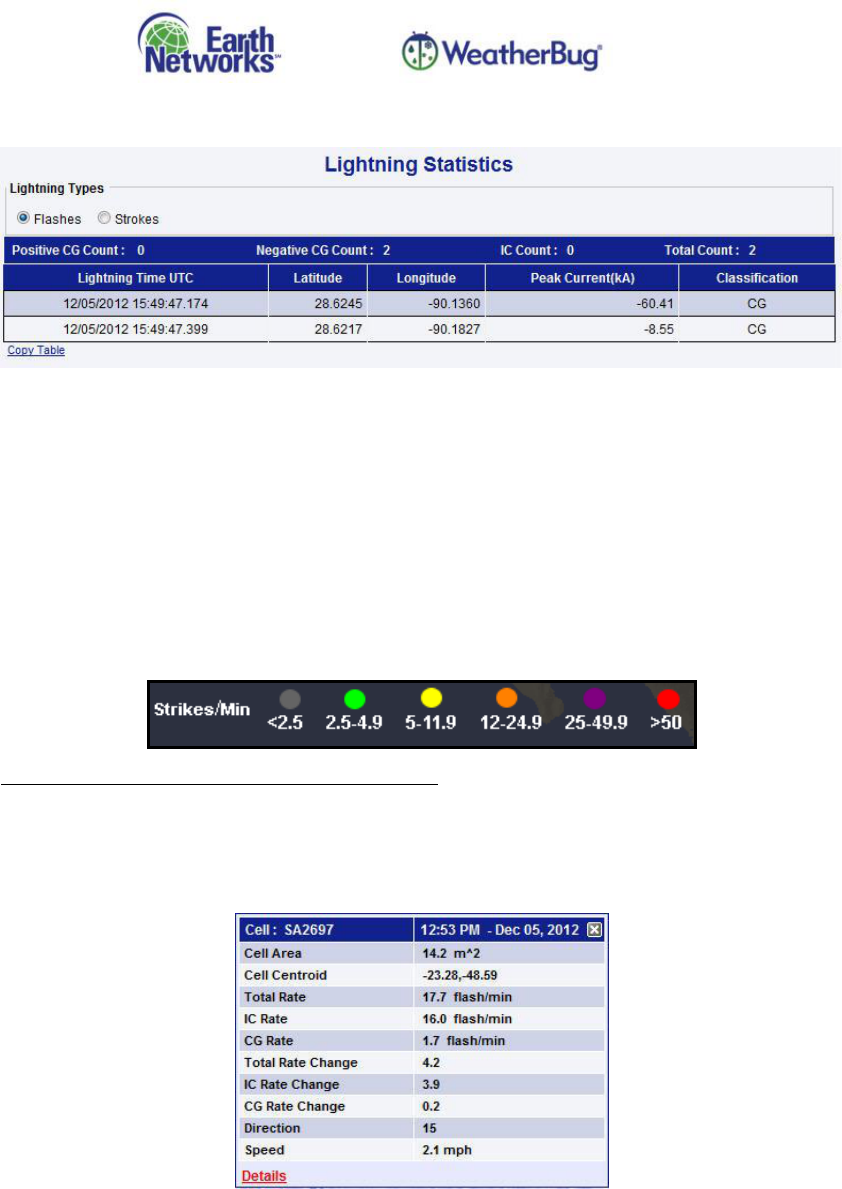
Left-clicking on Details displays a complete table of the lightning data that is visible within the
map pane in a new window.
You may left-click on the Copy Table link at the bottom of the table to copy the table data to
paste the data into another program.
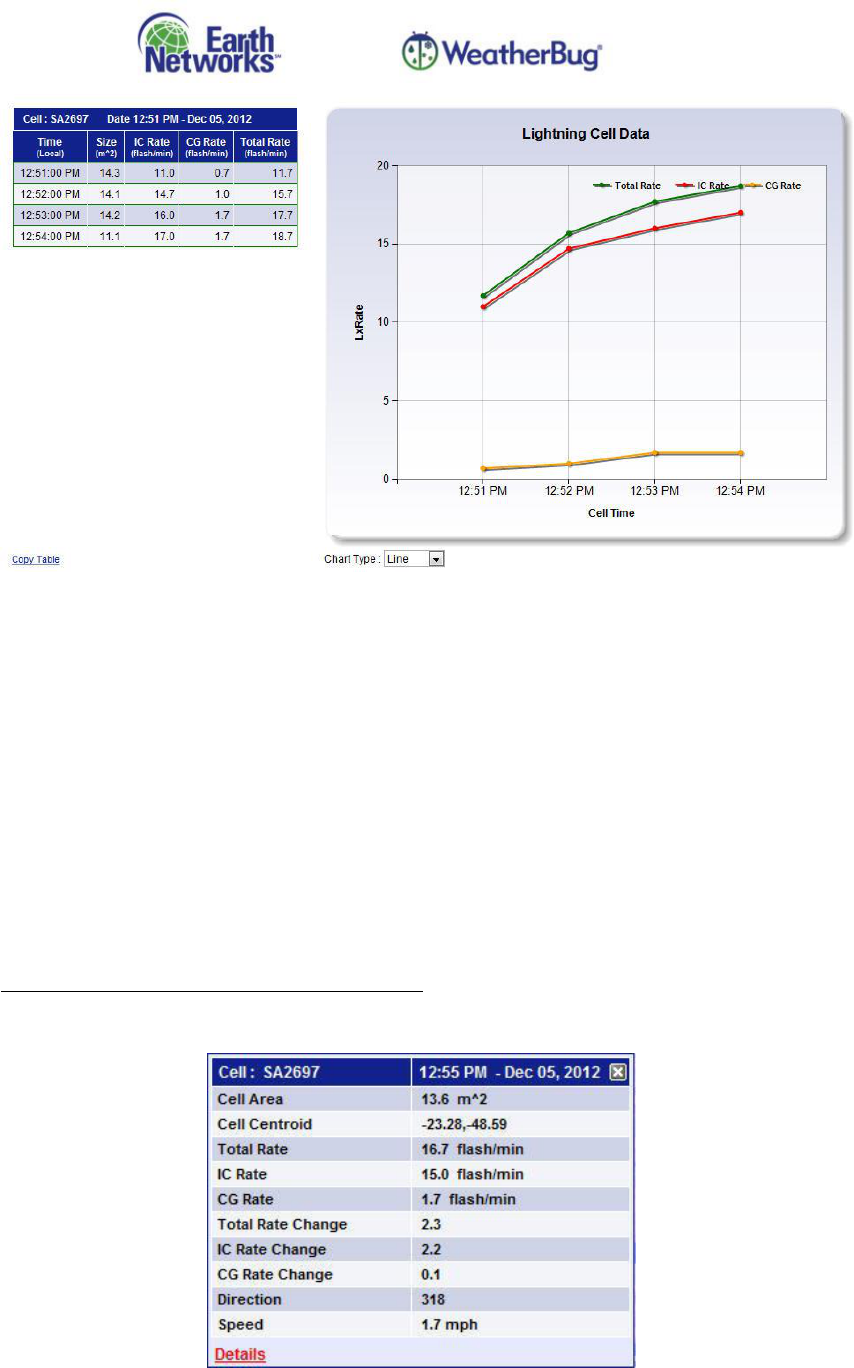
9.6.1.2. WeatherBug Total Lightning Cell Tracks
The WeatherBug Total Lightning Cell Tracks layer displays a connected line of individual
lightning cell center points indicating the track and location of individual lightning cells over
the last 3 hours or since the cell formed. The end-point displays an arrow indicating the
direction of movement. The most recent cell center point is surrounded by a polygon that is
color-coded based on the rate of lightning. Each line segment is also color coded based on
the rate of lightning at that instance in time. The legend for the layer provides color keys.
WeatherBug Total Lightning Cell Tracks Map Tip
Left-clicking on a displayed lightning cell on the map opens a map tip with the following
information: Cell Area, Cell Centroid, Total Rate (flashes/minute), IC Rate (flashes/minute), CG
Rate (flashes/minute), Total Rate Change, IC Rate Change, CG Rate Change, Direction and
Speed. You must be at zoom level 9 or above and the map must not be animated.
Left-clicking on the Details link opens an additional window that displays lightning cell data in
table and line or bar graph format. You are able to left-click on the Copy Table link to copy
and paste the table data into another program.
Earth Networks, Inc. Proprietary and Confidential Page 29 of 46
EN.PM.UM37 20131113
9.6.1.3. WeatherBug Total Lightning Polygons
The WeatherBug Total Lightning Polygons layer displays color-coded polygons based on your
selection in the Data Pane. You may select from one to all layers:
Level 1: the polygon color is green, flash rate of >3 flashes/minute
Level 2: the polygon color is orange, flash rate of >12 flashes/minute
WDTA: the polygon color is purple, this represents a WDTA—WeatherBug Dangerous
Thunderstorm Alert (flash rate of >25 flashes/minute)
One level must be selected in the Data Pane; by default, the WDTA level is selected.
There can only be one Level 1, Level 2 and/or WDTA issued for the cell at a given time, but
more than one polygon can display because they have 45 min valid times and the polygons
can be reissued every 15 minutes. Thus, there can be up to three Level 1, Level 2, and/or
WDTA polygons displayed on the cell.
WeatherBug Total Lightning Polygons Map Tip
Left-clicking anywhere within a displayed lightning polygon on the map opens a map tip with
the additional details. You must be at zoom level 9 or above.
9.6.2. Flood
Selections include the following for Continental U.S. locations:

Earth Networks, Inc. Proprietary and Confidential Page 30 of 46
EN.PM.UM37 20131113
Flash Flood Guidance - Flash Flood Guidance estimates the average number of inches of rainfall
for given durations required to produce flash flooding in the indicated county issued by the
National Weather Service (NWS) River Forecast Centers. These estimates are based on current soil
moisture conditions. Note: In urban areas, less rainfall is required to produce flash flooding.
Selections are available for 1, 3, 6, 12 and 24 hours.
Significant River Flood Outlook - This Flood Outlook is intended to provide a general outlook for
significant river flooding provided by the NWS Hydrometeorological Prediction Center
Flood map layers are automatically refreshed every 5 minutes.
9.6.3. Fire
Selecting the Current Fire Perimeters layer displays the location of active fire perimeters provided
by the Geospatial Multi-Agency Coordination Group (GeoMAC). (Includes Continental U.S.)
The Fire map layer is automatically refreshed every 5 minutes.
9.6.4. Winter
Allows you to track snowfall amount and forecasts. (Includes Continental U.S.)
Snowfall Amount – Accumulated snowfall amount (in inches) for the past 1, 3, 6, 12 and 24 hours
on a 1km grid. The 1 hour snowfall amount is updated every 5 minutes; all others are updated
hourly.
Snow Amount Forecast—The Snow Amount Forecast contains 4-6 hour options and is broken into
6 hour increments as follows: 8AM-2PM, 2PM-8PM, 8PM-2AM and 2AM-8AM EST. Each forecast
period falls into one of those periods based on the current EST. Let’s pretend it is 3:00 PM EST:
8AM-2PM: 18-24 hours forecast
o The expected total accumulation of new snow (in inches) in a 6 hour period.
2PM-8PM: 0- 6 hours forecast (falls in current timeframe)
o The expected total accumulation of new snow (in inches) in a 6 hour period. The 6
Hour periods correspond to either 8AM – 2PM, 2PM – 8PM, 8PM – 2AM, 2AM – 8AM
represented in EST. The valid time of the Snow Amount (0 - 6 hours) data layer will
represent the 6 Hour period that corresponds to the current EST.
8PM-2AM: 6-12 hours forecast
o The expected total accumulation of new snow (in inches) in a 6 hour period.
2AM-8AM: 12-18 hours forecast
o The expected total accumulation of new snow (in inches) in a 6 hour period.
Snow Probability Forecast– The probability of new snow. Values are slight (10%), moderate (40%)
and high (70%). You may select among the following choices:
Days 1-3- 4 inches: indicates the chance that 4 inches of snow could accumulate
Days 1-3- 8 inches: indicates the chance that 8 inches of snow could accumulate
Days 1-3- 12 inches: indicates the chance that 12 inches of snow could accumulate
Freezing Rain (0.25”) Probability Forecast: User may view this overlay for Days 1, 2 and 3.
Represents the probability that at least .25 inches of freezing rain or drizzle will fall in the period
selected.
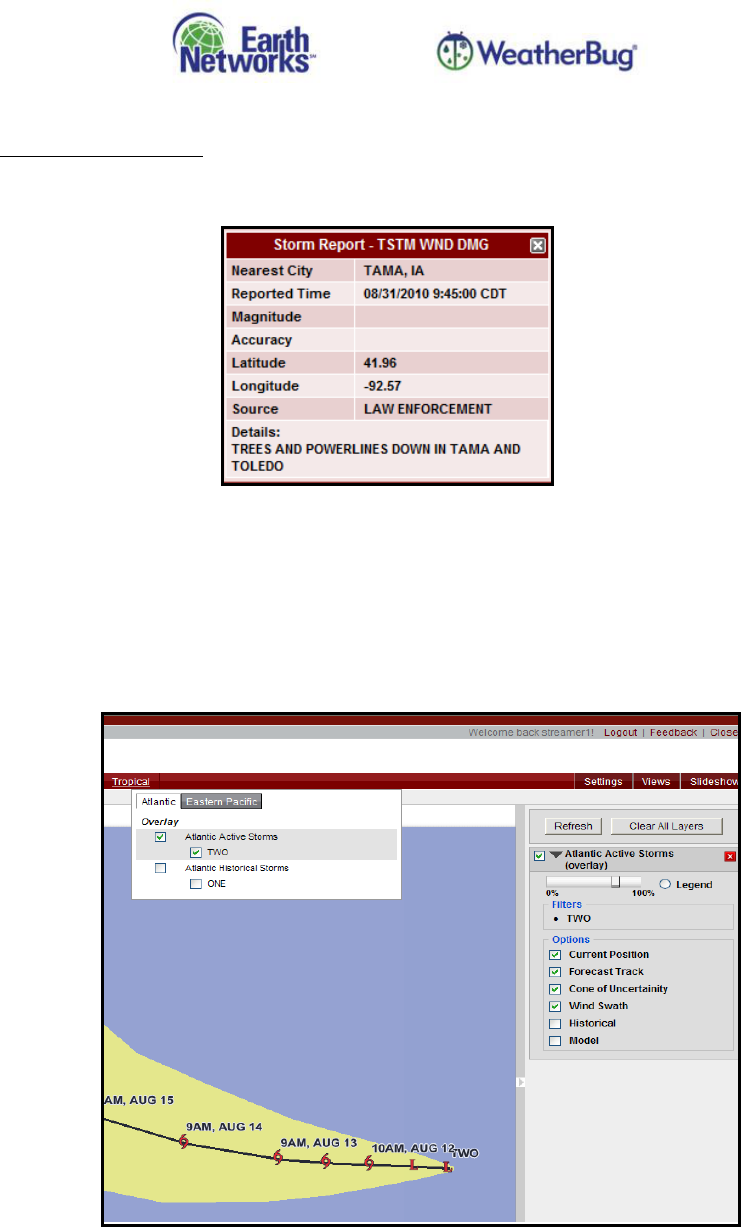
9.6.5. Storm Reports
Selecting the Storm Reports layer displays all significant weather events reported to the NWS
since midnight. (Includes Continental U.S., Puerto Rico, Alaska and Hawaii.)
Earth Networks, Inc. Proprietary and Confidential Page 31 of 46
EN.PM.UM37 20131113
The Local Storm Reports map layer is automatically refreshed every 5 minutes.
Storm Report Map Tip
Make sure the Storm Report layer is the top layer on the map. Left-clicking on a point will open up
the map tip with report details.
9.7. Tropical
The Tropical data is separated by the Atlantic and Eastern Pacific basins. Each active storm allows for
selecting options in the Data Pane. Historical storms display the Forecast Track and do not allow any
additional selections.
Note: You may only select an overlay if it contains a storm. If multiple storms exist, all will be selected
by default. Left-click in a checkbox to select/deselect a storm.
You are able to select the following options for active storms in the Data Pane:
Forecast Track - Official NHC tropical forecast track for active storms. Forecast points are every 12
hours for 0 - 72 hours. Date and time are given in UTC. Number at forecast point is the forecast
sustained wind speed at that forecast interval. Data updates 4 times a day, roughly 3, 9, 15 and 21
UTC
Earth Networks, Inc. Proprietary and Confidential Page 32 of 46
EN.PM.UM37 20131113
Cone of Uncertainty - Defines the uncertainty of the official NHC forecast track. Error in track
forecasts dictates that the line of the track is the best estimate, but the cone gives the potential
area the storm could actually fall into. Data updates 4 times a day, roughly 3, 9, 15 and 21 UTC.
Wind Swath - Wind swath information is derived from the NHC advisories for the current position
report and shows the forecasted extent of 34, 50 and 64 KT (39, 58 and 74 MPH) winds.
Historical – Displays past storm positions.
Model -
Tropical model forecast tracks for active tropical cyclones. Forecast tracks are for the available
National Hurricane Center Operational Track Guidance Models, which are for 12-hour forecast
intervals from 0-120 hours. Data updates 4 times a day, roughly at 3, 9, 15 and 21 UTC.
AVNI (Interpolated Aviation Model)
BAMD (Beta and advection model; deep layer)
BAMM (Beta and advection model; medium layer)
CEMN (Canadian Ensemble Mean)
CLIP (Climatology and Persistence Model)
COAI (Coupled Ocean/Atmosphere Mesoscale Prediction System (COAMPS) - Atlantic grid
interpolated 06 hours)
DSHP (Statistical Hurricane Intensity Prediction Scheme (SHIPS) with inland decay)
GFDI (interpolated NWS Geophysical Fluid Dynamics Model)
LBAR (Limited Area Sine Transform Barotropic Model)
NGPI (Interpolated Navy Operational Global Prediction System)
OFCI (Interpolated Official National Hurricane Center Forecast)
XTRP (Extrapolated forecast of current track)
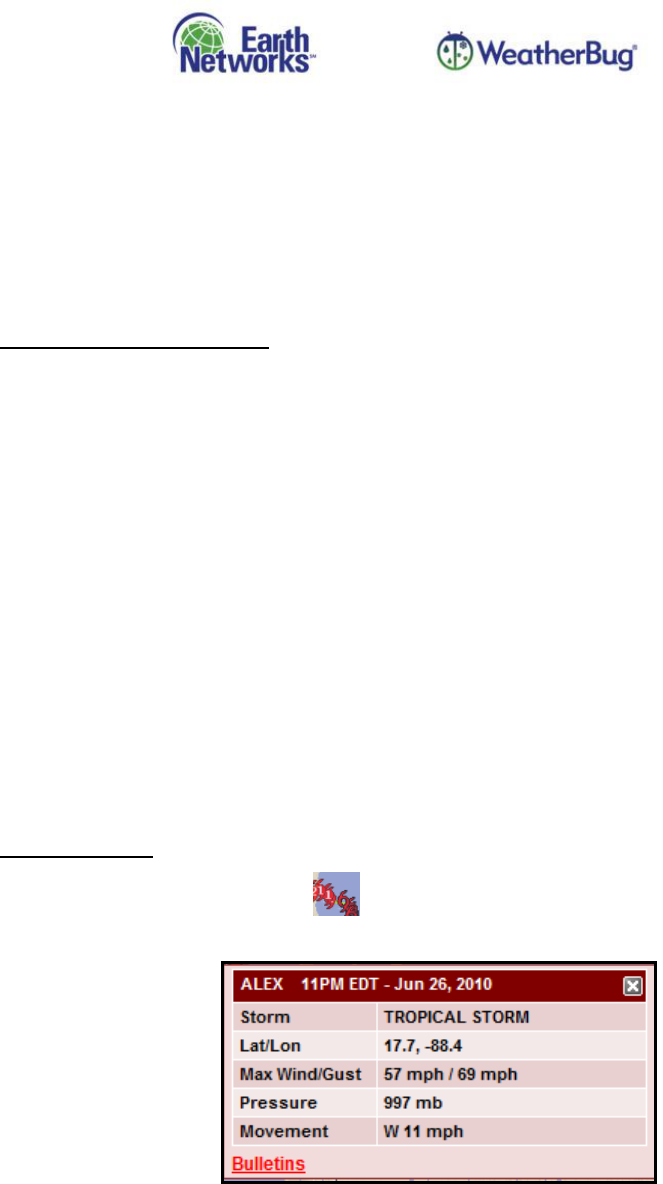
Tropical Map Tip
Left-clicking on the Historical track for an active or historical storm produces a map tip with
storm, latitude/longitude, wind/gust, pressure and movement details.
Earth Networks, Inc. Proprietary and Confidential Page 33 of 46
EN.PM.UM37 20131113
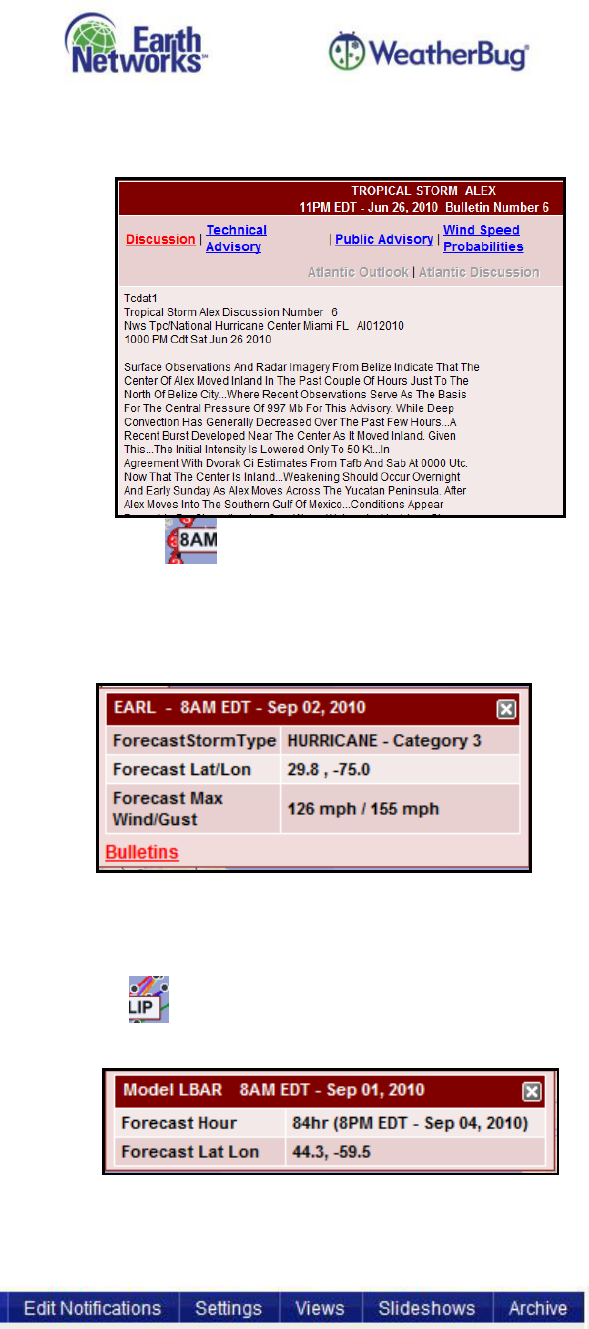
Left-clicking on the “Bulletins” link in the map tip opens a window displaying further information
and discussion on the tropical event.
Left-clicking on Forecast Track for an active storm produces a map tip with storm type,
latitude/longitude and wind/gust details.
Left-clicking on the “Bulletins” link in the map tip opens the same window that opens from the
Historical track map tip.
Left-clicking on the Model for an active storm produces a map tip with forecast hour and
latitude/longitude information.
10. Settings
The Settings options are located to the right of the data menu in the toolbar.
You may use these buttons to:
Mange Custom Notifications (Edit Notifications)
Adjust the settings for unit and date formats (Settings)
Manage Views (Views)

Earth Networks, Inc. Proprietary and Confidential Page 34 of 46
EN.PM.UM37 20131113
Manage Slideshows (Slideshows)
Export Lightning Archives (Archive)
10.1. Edit Notifications
Custom Notifications consist of the following elements:
Threshold: a value that is added to a data element to determine when the weather
observation becomes active—you input the threshold that will cause Observation data
elements to become active; Lightning and Weather Service Alert data elements become
active when lightning occurs or an alert is activated
Data Element: the Observation, Weather Service Alert or Lightning selection assigned to a
rule, up to two data elements may be assigned
Rule: the data element(s) assigned to a location
Location: the point, radius or zip code to which the rules are assigned
o Point: Custom Notifications are issued when a data element occurs at the weather station
closest to your point. Note: Lightning data elements may not be assigned to point
locations.
o
o Radius: Custom Notifications are issued when a data element occurs at any of the
weather stations located within your radius.
o Zip Code: Custom Notifications are issued when a data element occurs at any of the
weather stations located within the specified zip code.
Custom Notification: the combination of a location and rule, a Custom Notification becomes
active when a threshold is met/occurs for at least one of the data elements assigned to a rule
and inactive when a threshold is not met
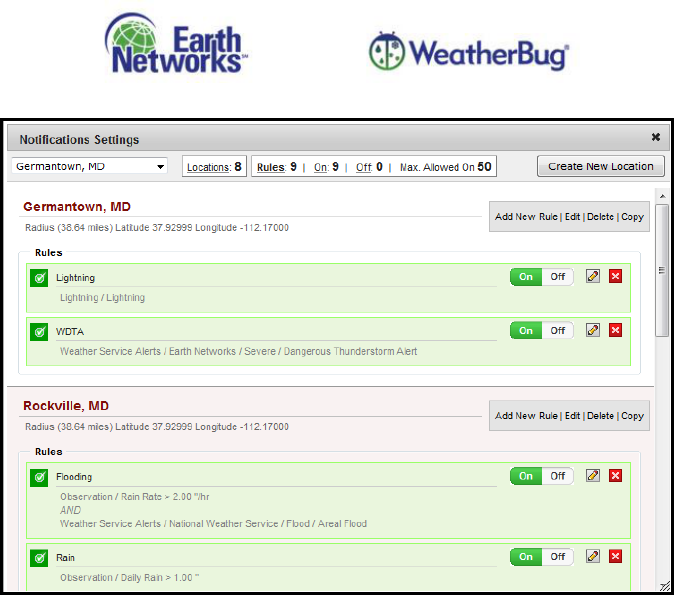
Left-click on the Edit Notifications link on the right side of the toolbar to access the Notification
Settings window.
The Notification Settings Window allows you to perform the following tasks for locations:
create new locations
copy locations
add new rules to locations
edit locations and rules
delete locations and rules
turn rules on or off
You are able to add unlimited locations to your list and unlimited rules to each location. However, you
may not have more than 50 rules turned on at one time.
You may navigate directly to a location by selecting a location from the drop down field on the top,
left of the screen or by using the scroll bar to the right of the window. In the drop down list all
locations appear in alphabetical order based on the first letters of the name; whereas, the locations
appear in the order added in the detailed view.
You can easily modify the view of your locations by left-clicking on the links at the top of the window.
Locations: Displays all of your saved locations but does not show the attached rules.
Rules: Displays all of your saved locations with all attached rules. This is the default display.
On: Displays all of your saved locations with only attached rules that are turned on.
Off: Displays all of your saved locations with only attached rules that are turned off.
Earth Networks, Inc. Proprietary and Confidential Page 35 of 46
EN.PM.UM37 20131113
10.1.1. Create New Locations
The starting point for each Custom Notification is the location. You must have an existing location
in order to create the rules that will generate a Custom Notification.
In order to create a new location:
1. Left-click the Create New Location button at the top of the Notification Settings window.
2. The Add Custom Notification Location window will open.
3. Select the radio button for the Location Type you wish to add: Street Address, Lat/Lon or
Zip Code. Lat/Lon is the only available option for international locations.
4. You must enter a name for the location. The other fields vary per location type:
Street Address (U.S. Only):
o Street Address Custom Notifications are applied either to a specific point or to a
radius, based on your Type selection of Point or Radius. Selecting Point will cause
Custom Notifications to be issued for the closest weather station to your point;
selecting Radius will cause Custom Notifications to be issued for any weather
stations located within the radius area.
o You must enter the values for the location and cannot populate them from the
map.
a. Enter the (Street) Address, City, State, Country (United States only) and Zip
Code.
b. Select the correct radio button for Type. Selecting Point will cause your
Custom Notification to be applied only to that point. Selecting Radius will
open a new field that allows you to enter a radius of 1-50 miles (1-80
kilometers).
Lat/Lon (International):
o Lat/Lon Custom Notifications are applied either to a specific point or to a radius,
based on your Type selection of Point or Radius. Selecting Point will cause Custom
Notifications to be issued for the closest weather station to your point; selecting
Radius will cause Custom Notifications to be issued for any weather stations
located within the radius area.
Earth Networks, Inc. Proprietary and Confidential Page 36 of 46
EN.PM.UM37 20131113
o You are able to enter the values or left-click on the map to populate the values.
o If entering the values:
a. Enter the Latitude and Longitude.
b. Select the correct radio button for Type. Selecting Point will cause your
Custom Notification to be applied only to that point. Selecting Radius will
open a new field that allows you to enter a radius of 1-50 miles (1-80
kilometers).
o If left-clicking on map:
a. Click once to select the location as a point or click and drag to draw a radius.
b. The Latitude and Longitude values will be populated, the correct radio button
for Type (Point or Radius) will be selected and the Radius value will be
populated if you drew a radius.
Zip Code (U.S. Only):
o Zip Code Custom Notifications are always applied to the entire zip code region. All
Custom Notifications will be issued for any weather stations within the region.
o You are able to enter the Zip Code value or left-click on the map to populate the
Zip Code value.
5. Left-click the Save button to save the location or the Cancel button to cancel the entry.
6. The Add Custom Notification Location window will close and the Notification Settings
window will display with the new location added (if saved).
10.1.1.1. Tips
It is helpful to have a point layer (i.e. CurrentSurface DataTemperature point) to ensure
there is a station for your selected point, radius or zip code if you are attaching rules based on
Observation data elements. The Observation rules rely on weather station data.
Note: The Lightning and Weather Service Alert rules do not rely on weather station
data so a weather station is not required to be in the point, radius or zip code.
Keep in mind that, when editing a location, you are unable to change the location type (i.e.
point to radius).
10.1.2. Edit Locations
To edit a location:
1. Left-click on the Edit link to the right of the location name.
2. The Edit Custom Notification Location window will open. You may not change the type of
location (such as changing a Street Address to a Zip Code). Additionally, you may not
change between Point or Radius if you are editing a Street Address or Lat/Lon location
type. The fields you may change vary by location type:
Street Address (U.S. Only):
o You may change the Name, (Street) Address, City, State, Zip Code and Radius (if
location is a radius) values by entering new or modifying existing values. You may
not click on the map.
Lat/Lon (International):
o You may change the Name by entering a new or modifying the existing Name.

Earth Networks, Inc. Proprietary and Confidential Page 37 of 46
EN.PM.UM37 20131113
o You may change the Latitude, Longitude and Radius (if location is a radius) values
by either typing the new values or left-clicking on the map. Left-click and drag to
adjust the radius size.
Zip Code (U.S. Only):
o You may change the Name by entering a new or modifying the existing Name.
o You may change the Zip Code by either typing in the new value or left-clicking on
the map.
3. Left-click the Save button to save the changes or the Cancel button to cancel the entry.
4. The Edit Custom Notification Location window will close and the Notification Settings
window will display with the changes (if saved).
10.1.3. Delete Locations
To delete a location:
1. Left-click on the Delete link to the right of the location name.
2. A confirmation message will appear.
3. Left-click OK to delete the location or Cancel to cancel the action.
4. The Edit Custom Notification Location window will close and the Notification Settings
window will repopulate.
Note: All attached rules will be deleted with the location.
10.1.4. Copy Locations
Copying a location will copy all of the location details and all attached rules. To copy a location:
1. Left-click on the Copy link to the right of the location name. The location will be copied
without changing any of the location values except Name, which will be appended with a
“1”.
2. The Edit Custom Notification Location window will open.
3. Edit your location as instructed in the Editing a Location section above.
4. Select OK to save changes or Cancel to cancel changes.
5. The Edit Custom Notification Location window will close and the Notification Settings
window will display with the copied location.
Note: All rules attached to the copied location will be turned off by default. You must turn them
on in order to receive Custom Notifications.
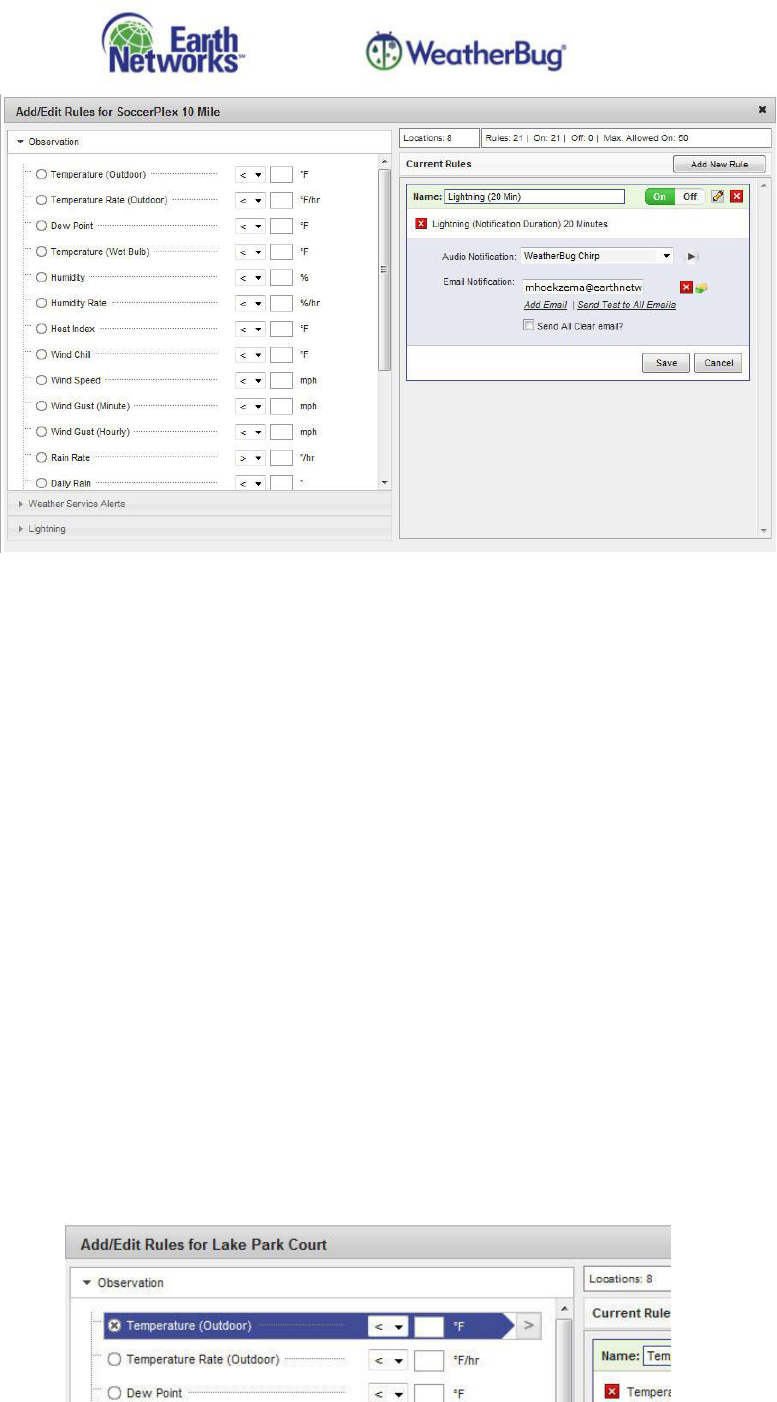
10.1.5. Add New Rules to Locations
You must have an existing location in order to add a new rule. A rule consists of one or two data
elements. Rules are added in the Add/Edit Rules window, which consists of two panes: the Data
Elements pane (left) contains the data elements available for selection; the Current Rules pane
(right) displays existing rules with a data entry box for the new rule. There are three types of data
elements: Observations, Weather Service Alerts and Lightning.
Earth Networks, Inc. Proprietary and Confidential Page 38 of 46
EN.PM.UM37 20131113
To add a new rule:
1. Open the Notification Settings window.
2. Left-click on the Add New Rule link beside an existing location to open the Add/Edit Rules
window with a new rule displayed in edit mode.
3. Left-click on the category name in the Data Elements pane to show the available data
elements.
4. Left-click on the data element you are adding to the rule to highlight.
a. If you are adding an Observation data element, you will add the threshold value (the
point at which the Custom Notification will become active).
b. If you are adding an Alerts data element, you may select from various alert levels—
from an entire category down to an individual alert.
c. There are no additional selections for the Lightning data element. However, you may
not select the Lightning data element for point locations—your location must be a
radius or zip code.
* Explanations and detailed instructions for each data element are provided in the sections
below.
5. Left-click on the arrow to the far right of the rule to add the data element to the new rule
in the Current Rules pane.
A single left-click will transfer the data element and threshold values. Remember, only
Observation data elements have defined threshold values.
A double left-click will also create a Name based on the selection. You are able to
modify the Name.
6. If you are adding a second data element, repeat steps 3-5.
Earth Networks, Inc. Proprietary and Confidential Page 39 of 46
EN.PM.UM37 20131113
7. Enter or modify the Name for the rule.
8. The rule will be on by default. Left-click “off” to turn it off.
9. The Audio Notification for the rule will be set to the WeatherBug Chirp. You may select
other sounds by left-clicking on the drop down arrow to the right of the Audio
Notification sound. You may preview the sound by left-clicking on the play button to
the far right of the Audio Notification value.
10. Left-click on the Save or Cancel button to turn off edit mode.
Save will save the new rule to the list of rules for the location.
Cancel will cancel the addition.
11. The Add/Edit Rules window will refresh. The new rule (if saved) will display at the bottom
of the list of rules for the location.
* Exception: If you already have 50 rules that are on, a message will display providing
the option to either save the rule in an “off” state or cancel the addition.
12. To close the Add/Edit Rules window, left-click on the “x” in the upper, right-hand corner
of the window.
13. You may also add additional rules by left-clicking the Add New Rule button in the upper,
right-hand corner of the Current Rules pane.
10.1.5.1. Observation Data Elements
Rules with Observation data elements become active when the thresholds you assign are
met.
The additional steps for adding Observation data elements to a rule are:
1. Left-click on the Observation category in the Data Elements pane.
2. Left-click on the data element/observation you want to add to highlight it.
3. Select a greater than or less than value to the right of the data element using the drop
down arrow. (Some Observations will only allow the greater than value.)
4. Enter the threshold. The threshold is the value at which the Custom Notification will
become active. All thresholds allow both positive and negative integers with up to five
whole numbers and four decimal places.
Available Data Elements
All Threshold units are based on your selection of Unit Type in Settings. The Data Elements
available in Observations are:
Daily Rain: Rainfall amounts since midnight for the current day, expressed in inches (“) or
millimeters (mm).

Earth Networks, Inc. Proprietary and Confidential Page 40 of 46
EN.PM.UM37 20131113
Dew Point: The temperature to which air must be cooled to condense, expressed in °F or
°C.
Heat Index: The temperature felt when the air temperature is combined with the relative
humidity (any measurement greater than or equal to 70 °F), expressed in °F or °C.
Humidity: The air’s water vapor content, expressed as a percentage.
Humidity Rate: The change of the air’s water vapor content averaged over the last hour,
expressed in percentage per hour (%/hr).
Pressure: The pressure exerted by the weight of air above a certain point, expressed in
mb (millibars) or “(inches of mercury).
Pressure Rate: The change in pressure averaged over the last hour, expressed in inches
per hour (“/hr) or millibars per hour (mb/hr).
Rain Rate: The rate of rainfall averaged over the past hour, expressed in inches per hour
(“/hr) or millimeters per hour (mm/hr).
Solar: The percentage of possible light.
Solar Rate: The change in the percentage of possible light over the last hour, expressed in
percentage per hour (%/hr).
Temperature (Indoor): The indoor temperature at the weather station, expressed in °F or
°C.
Temperature (Outdoor): The outdoor temperature at the weather station, expressed in
°F or °C.
Temperature (Wet Bulb): The temperature at which no more evaporation will occur, and
thus no further decrease in temperature, expressed in °F or °C.
Temperature Rate (Indoor): The change in indoor temperature averaged over the last
hour, expressed in °F (°F/hr) per hour or °C per hour (°C/hr).
Temperature Rate (Outdoor): The change in outdoor temperature averaged over the last
hour, expressed in °F per hour (°F/hr) or °C per hour (°C/hr).
Wind Chill: The perceived cooling felt due to the loss of body heat as wind passes over
exposed skin (any measurement below 70 °F), expressed in °F or °C.
Wind Gust (Hourly): Peak instantaneous wind speed in the last hour, expressed in mph or
km/h.
Wind Gust (Minute): Peak instantaneous wind speed in the last minute, expressed in mph
or km/h.
Wind Speed: Two-minute average of instantaneous wind measurements, expressed in
mph or km/h.
You are able to enter a negative sign (-) in front of any value for observations that require
negative values.
10.1.5.2. Weather Service Alerts Data Elements
Rules with Weather Service Alert data elements become active when the assigned alert is
issued. The alerts available for selection depend on the location. StreamerRT currently offers
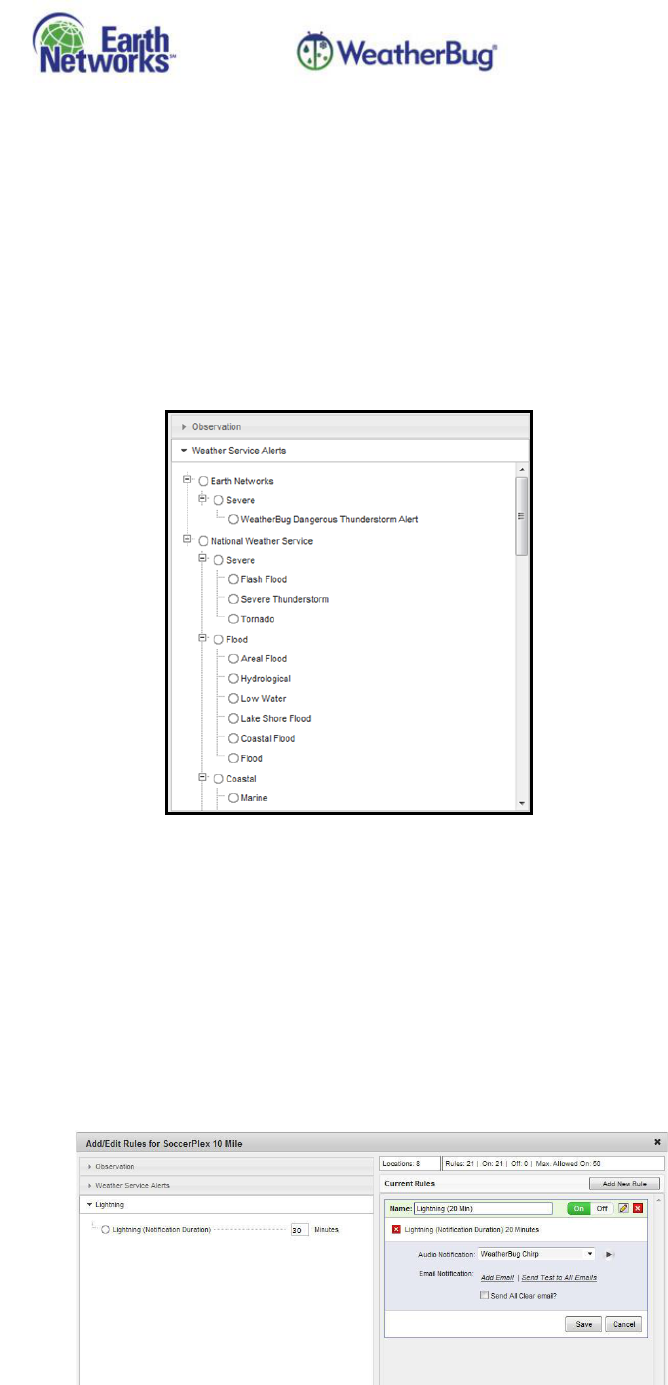
Earth Networks, Inc. Proprietary and Confidential Page 41 of 46
EN.PM.UM37 20131113
meteorological service alerting for the United States, Canada, France and Spain. The
WeatherBug Dangerous Thunderstorm Alert (WDTA) is available for all locations.
The additional steps for adding Weather Service Alert data elements to a rule are:
1. Left-click on the Weather Service Alerts category in the Data Elements pane.
2. Left-click on the data element/alert type you want to add to highlight it.
Alerts appear in a hierarchical format. You may left-click on any level to check the
box/highlight. Clicking on the top level will cause all alerts within the level to be
part of the threshold. Clicking on a single alert will cause only that alert to be a
threshold.
Left-click on the + or – to the left of the header to expand or collapse categories.
10.1.5.3. Lightning Data Elements
Rules with the Lightning data element become active when lightning strokes occur. The
Lightning data element may only be used for radius or zip code locations. It cannot be used
with point locations.
The additional steps for adding the Lightning data element to a rule are:
1. Left-click on the Lightning category in the Data Elements pane.
2. Type in the notification duration in the window. This duration is the time you set for
how much time you want to pass between the last stroke before considering the alert
expired or “all clear”.
3. Left-click on the Lightning data element to highlight it.
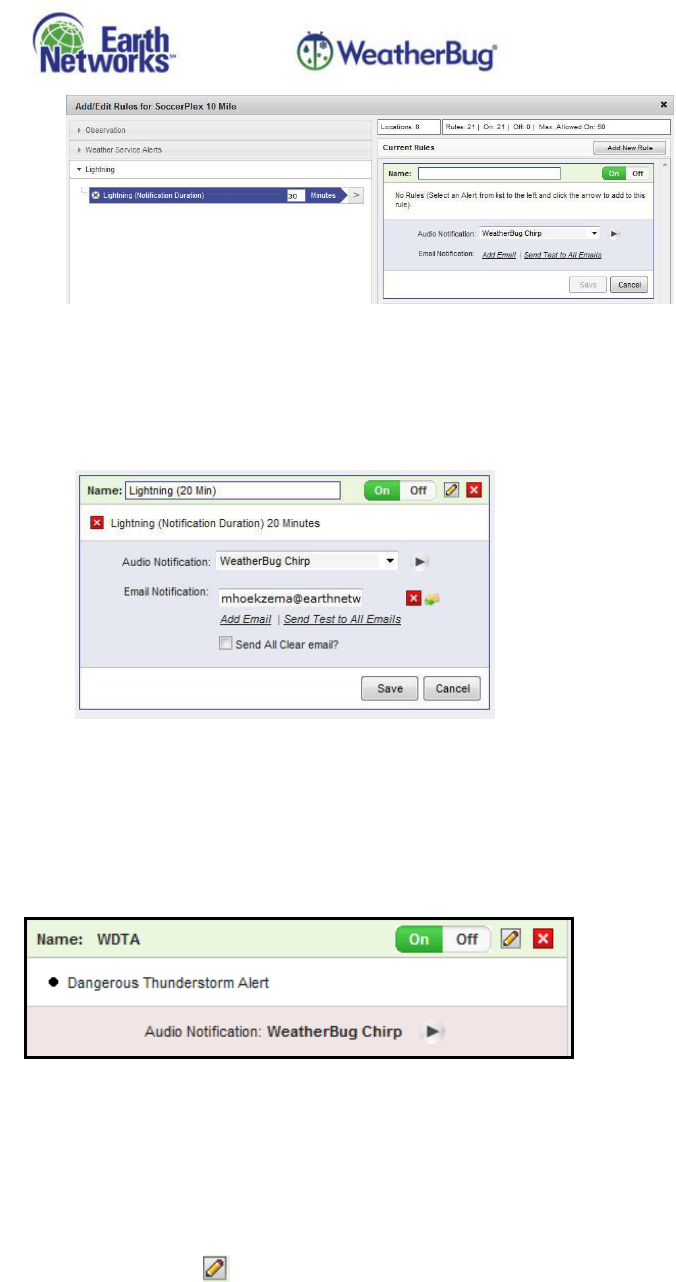
Earth Networks, Inc. Proprietary and Confidential Page 42 of 46
EN.PM.UM37 20131113
When a lighting rule is set up, a user can also set the rule to have the user be notified
when the rule becomes null, or “all clear” as no lightning has occurred over the duration
of time set by the user. This is done by selecting the check box below the rule on the right
side of the edit page.
10.1.6. Turn Rules On or Off
You are able to turn a rule on or off. Once you have turned a rule off, Custom Notifications will
never be issued for that rule. Once a rule is turned on, it will not be considered active until a
threshold is met.
To turn a rule on or off, left-click on the on or off button to the right of the rule.
Reminder: You may only have 50 rules turned on at a time.
10.1.7. Edit Rules
You may change the name or audio notification sound and delete/add new data elements when
editing a rule. You must save or cancel any new rules you are adding or editing before you can
edit a different rule.
1. To edit a rule, left-click on the edit icon to the right of the rule.
2. The rule will display in edit mode.
3. Left-click Save or Cancel when you are done.
Save will turn off edit mode and update the Current Rules pane with the changes.
Cancel will turn off edit mode and cancel all changes.
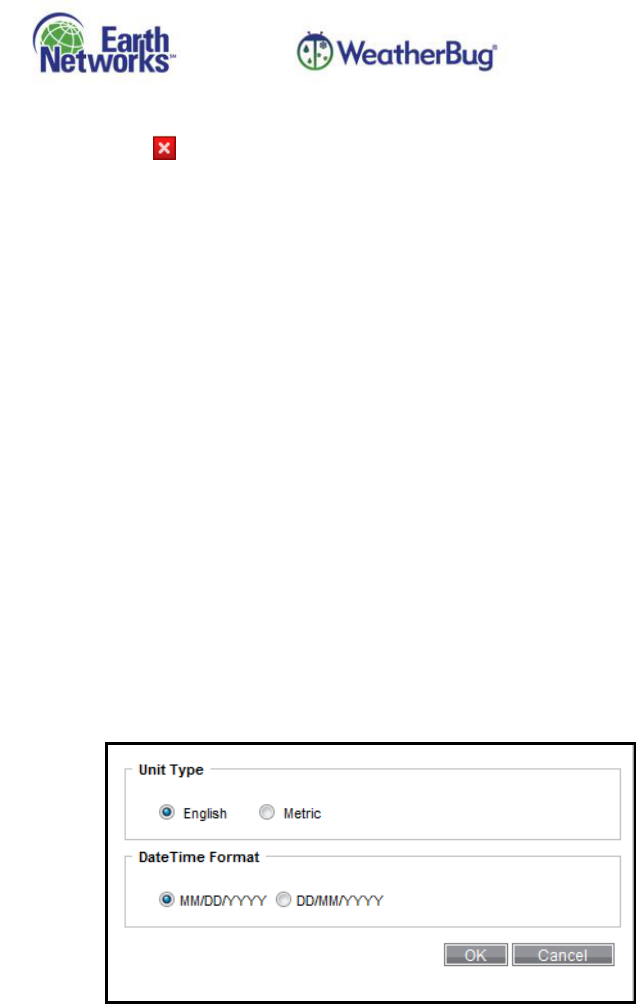
Earth Networks, Inc. Proprietary and Confidential Page 43 of 46
EN.PM.UM37 20131113
10.1.8. Delete Rules
To delete a rule, left-click on the delete icon to the right of the rule. Answer OK to the
confirmation message to delete.
10.1.9. Email Notifications
For each rule for each location it is possible to have emails sent to up to five email addresses
notifying the user that a rule has been triggered.
This is set up by clicking the “Add Email” link displayed with each rule. Clicking the link will display
a window to enter an email address you wish to have the notification delivered. Clicking the link
additional times allows the process to be repeated for up to five emails or group email addresses.
The user can test this function by clicking the “Send Test to All Emails” link.
A check box also exists when a lightning proximity notification is set up. The user can select this
box to have an “all clear” email sent for any lightning based notifications.
10.2. Settings
You are able to select your Unit Type or DateTime Format within Settings. Please note that the overlay
names will still display measurement values in English (for example, Snow Probability Forecast – Day 1
– 4”) and data will be converted to Metric only where available and may not apply to all layers or
legends.
10.3. Views
A View is a combination of data layers that you save, including your map extent, plot symbology,
animation, legend and opacity selections for each layer and any drawings you have added to the map
using the Drawing Tools.
You can quickly switch between any View for rapid visualization of changing weather conditions.
10.3.1. Select View Tab
Select, delete, make a Default View or reorder Views in this section.
Earth Networks, Inc. Proprietary and Confidential Page 44 of 46
EN.PM.UM37 20131113
10.3.1.1. Select a View
Switch to a new View by left-clicking on the View Name, which is a link to the View.
10.3.1.2. Delete a View
Select the Delete Views checkbox and left-click OK to permanently delete a View.
10.3.1.3. Set View to Default
Select the Default on Login radio button next to the View Name so your View will
automatically be loaded every time you login. There may only be one Default View
designated.
10.3.1.4. Reorder Views
Hold down the left mouse button and drag and drop the View Name into the desired order.
10.3.2. New View Tab
Save a new View or replace an existing View to save the current map extent, drawings, plot
symbology and active layers.
10.3.2.1. Create a New View
Select the Save New View radio button, type in a View Name (you may not edit the name
after the View is saved) and left-click OK to create a new View. Check the Default on Login
checkbox only if you want to set this to the Default View and have it automatically loaded at
login.
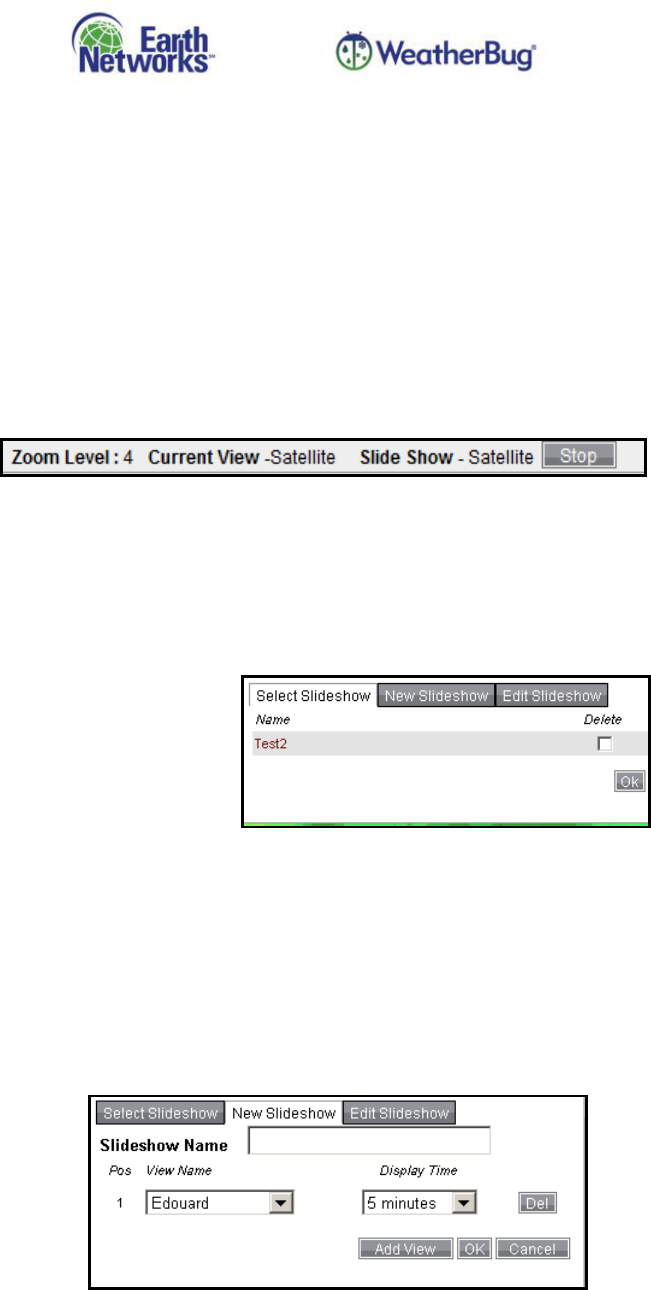
Earth Networks, Inc. Proprietary and Confidential Page 45 of 46
EN.PM.UM37 20131113
10.3.2.2. Replace an Existing View
Select the Replace an Existing View radio button, highlight the View you wish to replace in the
List of Views drop down and left-click OK. Check the Default on Login checkbox only if you
want to set this to the Default View and have it automatically loaded at login.
10.4. Slideshows
Views can be grouped into a Slideshow presentation. You can configure which Views to add into a
Slideshow and which order the Views will display as well as how long each View will display.
When a Slideshow is running, the Current View used for the slideshow, the Slideshow Name and a
“stop” button will be displayed to the right of the zoom level display bar. (If there are multiple Views
in a Slideshow, only the top View value will display in the display bar.)
10.4.1. Select Slideshow Tab
Slideshows are available for easy selection and will begin playing immediately once you left-click
on the Slideshow you wish to view.
You may also delete Slideshows from within this window by selecting the Delete checkbox and
left-clicking OK.
10.4.2. New Slideshow Tab
Create a new Slideshow using the following steps:
1. Enter a Slideshow Name. If you enter a name that already exists, StreamerRT will
overwrite the existing Slideshow with the new Slideshow.
2. Select a View Name and Display Time from the lists.
a. The Add View button allows you to add additional Views to the Slideshow.
b. The Del button deletes the row from the list of Views in the Slideshow.
3. Left-click OK to save the Slideshow.
10.4.3. Edit Slideshow Tab
The Edit Slideshow tab allows you to modify a Slideshow’s content, View Name and Display Time
or to delete a View. To edit:
1. Select the Slideshow you wish to edit in the Edit Slideshow dropdown.
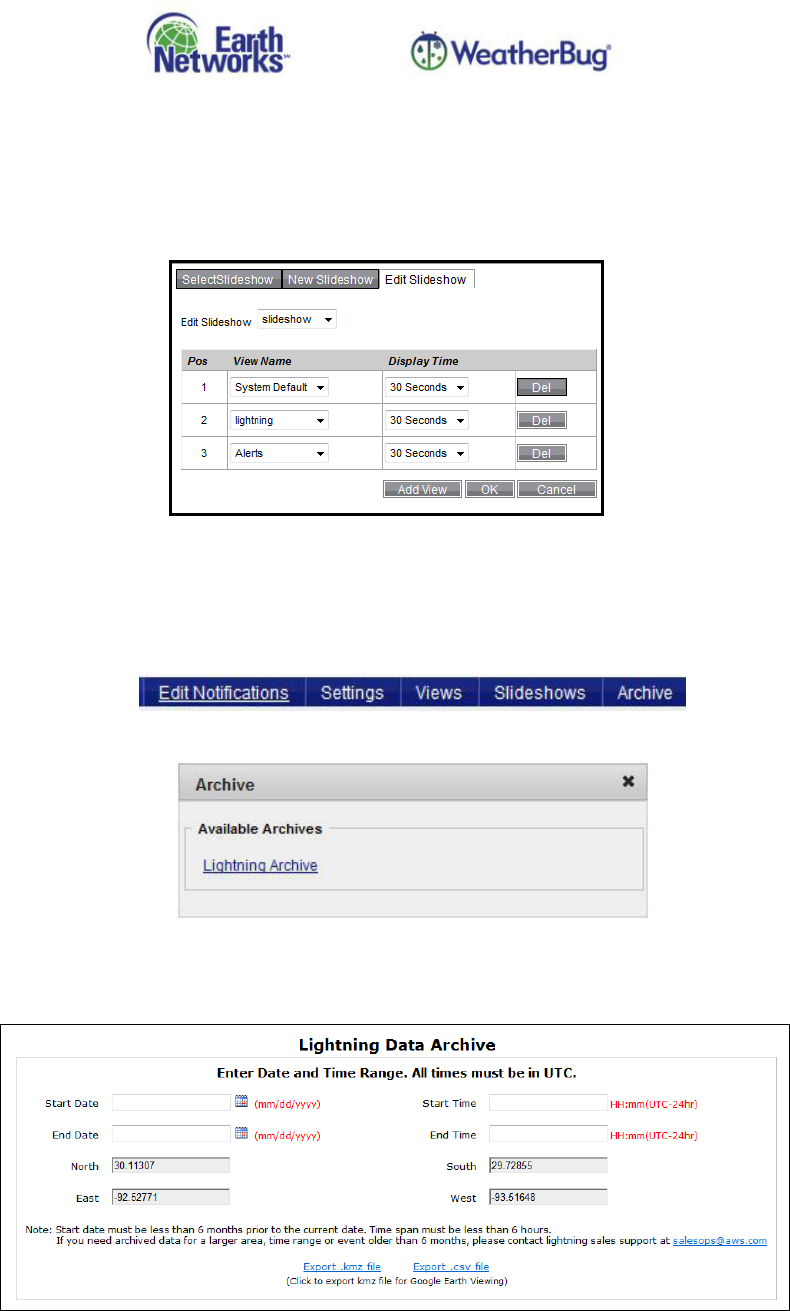
Earth Networks, Inc. Proprietary and Confidential Page 46 of 46
EN.PM.UM37 20131113
2. Add, delete or adjust selected Views.
a. The Add View button allows you to add additional Views to the Slideshow.
b. The Del button deletes the row from the list of Views in the Slideshow.
c. Use the dropdown lists to change either the existing View Name or Display Time.
3. Left-click OK to save the Slideshow.
10.5. Archive
Left-clicking the Archive link to the right of Slideshows in the data menu will open a pop-up window
that will allow you to select from available Archives.
Left-click on the Lightning Archive link to open the Lightning Data Archive page in a new window.
Left-clicking on the Lightning Archive link opens the Lightning Data Archive window, which allows you
to export a CSV or KMZ file with data from up to 6 months in the past. Follow the directions that
appear in the window carefully, as attempting to download too much data will not be allowed.
Important: The data is displayed through Google Earth when you open the KMZ file. This application
must downloaded and operational on your desktop in order to view Lightning Archive data.
