GARD
TM
skin Assay Protocol
Genomic Allergen Rapid Detection (GARD) assay for assessment of skin
sensitizers (GARDskin) assay protocol
The Genomic Allergen Rapid Detection skin (GARDskin) is an in vitro assay that provides
binary hazard identification of skin sensitizers (i.e. UN GHS Category 1) versus non-
sensitizers). The method evaluates the transcriptional patterns of a specific genomic
biomarker signature, the GARDskin prediction signature (GPS), in the SenzaCell cell line
exposed to test chemicals.
Résumé
The purpose of the test method is to contribute to the identification of skin sensitisers and
non-sensitisers by providing information on the chemical-induced alteration of gene expression
of mechanistically relevant genomic biomarkers associated with the activation of dendritic cells
(DC). The activation process through which DC change from antigen processing to antigen
presenting cells addresses the third key event of the skin sensitisation Adverse Outcome
Pathway (AOP).
Experimental Description
Endpoint Measurement
After test chemical exposure of SenzaCell cells, the expression of the GPS, comprising 196
gene transcripts, is quantified utilizing the nanoString technology.
Endpoint Value(s)
The gene expression of the GPS is analysed with a fixed SVM algorithm that generates
“Decision Values” (DVs). From triplicate replicate experiments the mean DV is calculated. If
the mean DV is ≥0 the test chemical is classified as a skin sensitizer. If the mean DV is <0 the
test chemical is classified as a non-sensitizer.
Experimental System
The biological Test System is a human myeloid dendritic like cell line, SenzaCell, which is a
subclone from the MUTZ-3 cell line. SenzaCells are deposited at ATCC and can be purchased
from SenzaGen AB.
GARDskin Page 2 of 41
Discussion
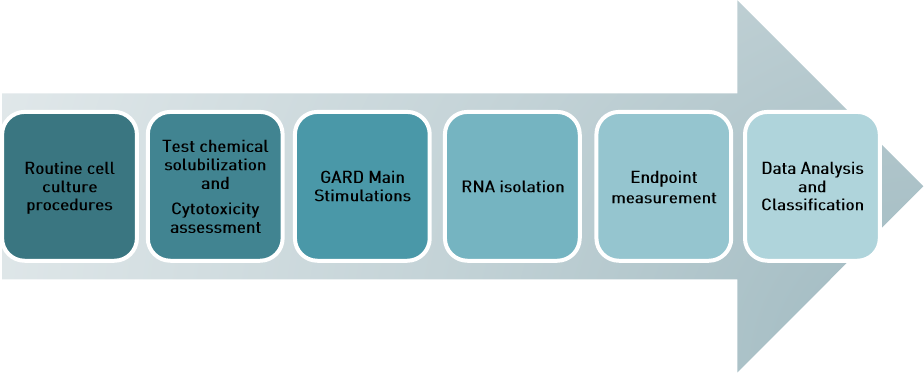
GARDskin assay overview
Figure 1 GARDskin assay workflow. First the SenzaCells are cultured according to standard procedures. Then the Test Item is
solubilized and the Test Item cytotoxicity is assessed . Main stimulations follow to generate RNA samples which are the basis
for the endpoint measurement, data analysis and classification.
Figure 1 describes the workflow of the GARDskin assay, starting with routine cell culturing of
SenzaCell cell line. In the GARDskin assay, cell stimulations with a test chemical are
performed for two reasons: 1) cytotoxicity assessment to identify a relevant stimulation
concentration, and 2) for the GARDskin Main Stimulation to harvest RNA.
In the cytotoxicity assessment, the test chemical is screened for cytotoxic effects, to identify an
appropriate concentration (i.e. the concentration that yields a Relative viability of ~90%, Rv90)
to be used as the input concentration in the GARDskin Main Stimulations. The cells are
exposed to a range of concentrations of the test chemical, originating from a serial dilution.
Once the input concentration of the test chemical is found, cells are exposed to the test
chemical again in the GARDskin Main Stimulations with the concentration identified during the
cytotoxicity assessment. Main stimulations are repeated three times to achieve three biological
replicate samples. Thus, every GARDskin assessment of a test chemical is based on three
replicate GARDskin Main Stimulations.
The endpoint measurements of GARDskin, i.e. the quantification of the GARDskin biomarker
signature mRNA transcripts, is performed on total RNA purified from cells from the GARDskin
Main Stimulation. The quantification is performed using the NanoString nCounter instrument
and endpoint specific biomarker CodeSets. The result is analyzed with the GARD Data
Analysis Application (GDAA) and the test chemical is classified as a sensitizer or non-
sensitizer.
GARDskin Page 3 of 41
Status
Development
Lund University (Sweden)
SenzaGen AB (Sweden)
Known Laboratory Use
EuroFins GB
BRT
MB Research laboratory
SenzaGen AB
Participation in Validation Studies
SenzaGen has organized and completed an inter-laboratory validation study in which the
method was transferred to 2 laboratories (see below) and the predictive capacity was also
evaluated in each laboratory (Johansson et al.
Toxicological Sciences, 2019).
Burleson Research Technologies Inc, 120 First Flight Lane, Morrisville, NC, USA.a.
Eurofins BioPharma Product Testing Munich GmbH, 82152 Planegg/Munich Germany
An independent peer review by the EURL ECVAM Scientific Advisory Committee (ESAC)
regarding the SenzaGen-coordinated Performance Standards-based validation of the
GARDskin method for skin sensitisation testing has been published in July 2021 (ESAC,
2021).
Regulatory Acceptance
The test method is under review by the OECD (2021).
Proprietary and/or Confidentiality Issues
Intellectual property rights
The SenzaCell cell line is available under a license agreement upon request. The IP rights of
the GARD biomarker signatures and any assay utilizing the signatures, in its entirety or parts
thereof, are owned by SenzaGen AB.
This Document, its contents and any other intellectual property rights referred to in this
document, are the property of SenzaGen AB and are intended solely for guidance concerning
performing the GARDskin assay and shall belong to and vest in SenzaGen AB absolutely to
the fullest extent permitted by law.
Any patent, registered trademarks, copyright and/or other intellectual property right of
SenzaGen AB shall belong to and vest in SenzaGen AB absolutely to the fullest extent
permitted by the applicable laws. To SenzaGen knowledge, none of the offered products sold,
nor any process or know-how used, by SenzaGen infringes or is alleged to infringe any patent
or other intellectual property rights of any other Person.
GARDskin Page 4 of 41
This document and translations of it may be copied and furnished to others, and derivative
works that comment on or otherwise explain it or assist in its implementation may be prepared,
copied, published and distributed, in whole or in part, without restriction of any kind, provided
that the copyright notice “©2019 SenzaGen AB. All rights reserved “ and this paragraph are
included on all such copies and derivative works. However, this document itself may not be
modified in any way, such as by removing the copyright notice.
Disclaimer
To the maximum extent permitted by law, SenzaGen (on behalf of itself and SenzaGen
affiliates, licensors, distributors, agents, consultants, supplier, subcontractors and employees)
expressly disclaim all representations and warranties concerning the scope or validity of the
intellectual property rights, and expressly disclaim any warranty that the contents of any
documents or the developed products referred to herein in connection with any add on content
or the use of the intellectual property rights by licensee will not infringe upon patent, copyright,
trademark or other proprietary rights of a third party. Any warranty that may be provided in any
applicable laws, statute or regulation governing commercial activities is explicitly disclaimed.
Health and Safety Issues
The human myeloid leukemia cell line (SenzaCell) is a cell line of Biosafety level I. As such, no
extraordinary safety issues are considered necessary, beyond those considered common for
sterile work with mammalian cell lines in laboratories dedicated for such purposes.
The testing laboratory should have in place routines for risk assessment of chemicals. This
routine should take into account the information in the SDS and state safe ways of working
and waste handling of chemical substanses.
The positive control, proficiency chemicals, and vehicles used in the GARDskin assay need to
be handled according to available information, such as SDS, since these can be e.g.
sensitizing, acutely toxic, and environmentally hazardous etc. The safe handling of a test
chemical in the GARDskin assay need to be assessed on a case to case basis. In the case of
an unknown test chemical it is recommended to consider it as a sensitizer and a highly toxic
compound and use appropriate protection.
The TRIzol or equivalent reagents are corrosive and carcinogenic and should be handled
according to instructions provided by the supplier and according to available safety data sheet
(SDS).
Propidium iodide is suspected to cause genetically defects and is a known irritant compound
which should be used with care according to SDS.
General precautions
Always wear protective clothing and gloves and work in a fume hood when handling chemical
substances and the TRIzol reagent. Wear protective glasses and breathing mask when
handling the original stocks (powder or liquid) of the chemical substances, and preferably also
disposable arm cuffs to avoid contact with the chemical substances.
MSDS Information
Positive control and solvents (negative controls), see CAS number and Catalog number in
Table 3, read available MSDS.
GARDskin Page 5 of 41
Abbreviations and Definitions
Annotation file A text file used by the digital analyzer during the endpoint analysis to
map individual RCC files to substance names and gene signatures.
BSA Bovine Serum Albumin (used to prepare flow cytometry buffer)
CDF Cartridge Definition File (defines sample specific data to associate with
the data output and defines the parameters for the imaging instrument
to use during image collection and processing)
Cell batch Within the context of this protocol, a unique cell batch is defined as:
- cells originating from different frozen vials, or…
- cells originating from the same frozen vial, which have been
cultivated separately. A division of cell cultures for the purpose of
achieving separate cell batches should be done no sooner than
passage 3 after thawing, and no later than at least 2 passages prior to
exposure experiments.
DMF Dimethylformamide (may be used to solubilize test chemicals)
DMSO Dimethyl Sulfoxide (may be used to solubilize test chemicals)
D-PBS Dulbecco’s Phosphate Buffered Saline (used to prepare flow cytometry
wash buffer)
DV Decision Value (the assay readout)
FBS Fetal Bovine Serum (a supplement to the cell culture medium)
FITC Fluorescein isothiocyanate (a derivate of fluorescein which can be
conjugated to antibodies. Its fluorescence is detected by flow cytometry
analysis)
FSC-A The Forward Scatter (Area) of the particle population is a parameter that
can be detected by a flow cytometry. A higher value corresponds to
larger particles.
GARD Genomic Allergen Rapid Detection
GDAA GARD Data Analysis Application (a web interferace used to analyse the
GARDskin end-point)
GHS Globally Harmonized System
GM-CSF Granulocyte Macrophage Colony Stimulating Factor (a growth factor
supplemented to the cell culture medium)
GPS GARD Prediction Signature (the transcripts measured in the GARDskin
assay)
GARDskin Page 6 of 41
In-well concentration The test and/or control chemical concentration in the exposed
SenzaCell cell culture during a stimulation
mAbs Monoclonal antibodies (used for the phenotype control)
Main Stimulation Cell stimulation performed to generate RNA. Each GARDskin test
consists of three Main Stimulations
PI Propidium Iodide (PI is a fluorescent substance that intercalates in DNA.
Since viable cells have an intact cell membrane, those will not be
stained. The fluorescent signal can be detected by flow cytometry and is
used to assess cell viability)
PE Phycoerythrin (a fluorochrome that can be conjugated to antibodies. Its
fluorescence can be detected by flow cytometry analysis).
PPD p-Phenylenediamine (the GARDskin positive control chemical)
RCC Reporter Code Count (the file type that is generated by the nCounter
System)
RLF Reporter Library File (a file that contains the code key information used
during image processing in the digital analyzer to assign target identities
to the barcode)
Rv90 90% relative viability (the concentration of a test chemical or positive
control chemical inducing 90 % relative viability. Calculated after flow
cytometry analysis of PI stained cell cultures)
SVM Support Vector Machine
SSC-A The Side Scatter (Area) of the particle population is a parameter that
can be detected by flow cytometry. A higher value corresponds to more
granular particles.
TC flask Tissue Culture flask
PROCEDURE DETAILS
Materials and Preparations
Cell or Experimental system
The human myeloid leukemia cell line SenzaCell is provided by SenzaGen AB and sent to the
licensed CRO on dry ice. The provided vial should be stored in liquid nitrogen or a cryogenic
freezer. The vial should be expanded and frozen in liquid nitrogen or a cryogenic freezer as a
homogenous cell bank according to instructions from the developing laboratory.

GARDskin Page 7 of 41
Equipment and Consumables
Listed in Table 1-3 are the equipment, consumables, and reagents needed to perform the
GARDskin assay.
Table 1 Equipment. Listed are the equipment used at the laboratory of the test method developers. Equipment for which a
specific manufacturer is not listed, the source of the equipment is considered arbitrary.
Equipment
Manufacturer
Sterile (LAF) hood for cell culture work, Class II
-
Fume hood for handling of chemicals
-
Heating block for small tubes (operating at 37°C±5°C)
-
Laboratory grade scale, capacity of weighing a minimum of 10 mg with reproducibility
-
Vials for long-term storage of cells in liquid nitrogen
-
2 separate CO
2
incubators (one for cell line culturing and one for chemical stimulation)
-
Benchtop centrifuge, swing-out rotor, 2-8°C, including adapters for 5/15/50 ml tubes
and adapters for 96 well plates
-
Freezer (operating at-18°C to -22°C)
-
Ultra-low freezer (operating at -70°C to -90°C)
-
Refrigerator (operating at 2-8°C)
-
Flow cytometer (minimum equipped with a blue laser, e.g. FACSVerse)*
E.g. BD
Microcentrifuge for 1.5 ml micro tubes
-
Minicentrifuge for 0.2 ml tubes
-
BioAnalyzer 2100*
E.g. Agilent
nCounter MAX, FLEX or sprint system**
NanoString
Thermocycler
-
Centrifuge adapters for 96 well plates
-
Pipetting controller
-
Pipettes 0.1-1000 µl
-
Good to have: Electronic multi-dispenser pipette 1 µl-50 ml
Good to have: Vacuum system for aspiration of cell supernatant and other liquid waste.
-
* The flow cytometer and BioAnalyzer could be exchanged for an equivalent instrument.
**The endpoint analysis is performed with an nCounter instrument, either at the Test Faciliy or at a NanoString
Facility if not available in-house.

GARDskin Page 8 of 41
Table 2. Consumables Listed are the consumables used at the laboratory of the test method developers. The exchange of any
of these articles for an equivalent product should not interfere with the protocols and/or results, but needs to be assessed to
ensure equivalence, especially the cell culture plastics.
Product
Company*
Catalog Number
TC Flask, 175 cm
2
Corning
431080
TC Flask, 75 cm
2
Corning
430641U
TC Flask, 25 cm
2
Corning
430372
Centrifuge tube, 15 ml
Corning
Sarstedt
430791
62.554.502
Centrifuge tube, 50 ml
Corning
Sarstedt
430829
62.547.254
12-well plate
Corning
3512
24-well plate
Corning
3524
Stripettes, 5 ml
Corning
Sarstedt
4051
86.1253.001
Stripettes, 10 ml
Corning
Sarstedt
4101
86.1254.001
Stripettes, 25 ml
Corning
Sarstedt
4251
86.1685.001
Stripettes, 50 ml
Corning
Sarstedt
4501
86.1256.001
Positive displacement pipette tips, 1 ml
Eppendorf
0030089642
Positive displacement pipette tips, 5 ml
Eppendorf
0030089669
Positive displacement pipette tips, 10 ml
Eppendorf
0030089677
Positive displacement pipette tips, 25 ml
Eppendorf
0030089685
Positive displacement pipette tips, 50 ml
Eppendorf
0030089693
Sterile and RNase-free filter tips 0.1-1000 µl
Sartorius (SafetySpace)
Biotix (uTIP)
Several
Cryogenic Vial
Corning
430488
Sample tubes for Flow cytometry
Corning
352052
(Deep 96 well plate if used for flow cytometry)
Corning
3960
0.2 µm sterile filter
Sarstedt
83.1826.001
Syringe Luer, 50 ml
Henke-Sass Wolf
8300006680
1.5 ml micro tubes
Sarstedt
72.690.001
RNase-free 1.5 ml micro tubes
Axygen
311-09-051
(RNase-free 2 ml vials in 96 racks if used for
homogenized cell samples)
Micronic
MP42150
RNase-free 0.2 ml tubes
Sarstedt
72.991.002
Nitrile gloves, thickness 0.14 mm
Shieldskin
67625

GARDskin Page 9 of 41
Table 3. Reagents. The listed producers are made available as a guidance for quality of listed reagents. The exchange of any of
these articles for an equivalent product should not interfere with the GARDskin assay, but needs to be assessed to ensure
equivalence. The NanoString products, are specifically required in this protocol and equivalent reagents do not, at this time,
exist.
Product
Company
Catalog Number
Cell Medium
MEM/Alpha Modification with L-glut, Ribo-& Deoxyribo
Cytiva
SH30265.01
Fetal Bovine Serum (FBS)** (Gibco)
Life Technologies
10270106
rhGM-CSF (Premium grade. Purity >97%, endotoxin
level <0.1 EU/μg cytokine, and activity of ≥5x10
6
IU/mg)
Miltenyi Biotec
130-093-868
Buffers & Solvents
D-PBS, HyClone
or D-PBS, Gibco
Cytiva
Life Technologies
SH30028.02
14190144
Bovine Serum Albumin (BSA), Cohn fraction V
Saveen & Werner AB
B2000
TRIzol Reagent
or TRI Reagent
Ambion
Thermo Fisher Scientific
15596018
AM9738
Ethanol, 95-100%, Undenatured
Solveco
1065
Antibodies & Staining
Mouse anti-human CD86-FITC
BD
555657
Mouse anti-human HLA-DR-FITC
BD
347400
Mouse anti-human CD34-FITC
BD
555821
Mouse anti-human CD1a-FITC
Agilent Dako
F714101-2
Mouse anti-human CD54-PE
BD
555511
Mouse anti-human CD14-PE
Agilent Dako
R086401-2
Mouse anti-human CD80-PE
BD
340294
Mouse polyclonal anti-IgG1-FITC
BD
555748
Mouse polyclonal anti-IgG1-PE
BD
555749
Propidium Iodide, 50 µg/ml
BD
556463
Trypan Blue Solution, 0.4%
Thermo Scientific
15250061
Reagents & Kits
Direct-zol RNA MiniPrep
Zymo Research
R2052
RNA 6000 Nano Kit
Agilent
5067-1511
nCounter MAX or Sprint consumables
NanoString
See nanostring product
information.
GPS200_v2 CodeSet (GARDskin)
NanoString
(Contact SenzaGen)
Chemicals and solvents
CAS no
Catalog no**
p-Phenylenediamine (PPD)
106-50-3
965106
DMSO ≥99.5%
67-68-5
D5879
Acetone
67-64-1
34850
Ethanol, 95-100%
64-17-5
-
Dimethylformamide
68-12-2
1.03053
Isopropanol
67-63-0
I9516
Glycerol
56-81-5
G5516
* Each lot of FBS needs to be assessed for cell culture compatibility.
** Catalog numbers at Sigma-Aldrich for guidance of e.g. purity of each chemical.

GARDskin Page 10 of 41
Media and Endpoint Assay Solutions
Serum, GM-CSF and antibodies
Prior to performing a GARDskin assay, FBS needs to be assessed and antibodies need to be
titrated (see Annex 1. FBS assessment and Annex 2. Antibody titration). The FBS can be
aliquoted and stored long-term at -18°C or below. The GM-CSF working stock (150 µg/ml)
should be prepared, aliquoted, and stored long-term at -18°C or below. The GM-CSF working
stock can be stored short-term at 2-8°C for maximum 1 week.
Cell mediumCell culture medium is prepared in two steps and referred to as follows:
1) Semi-complete medium
MEM/Alpha supplemented with FBS (20%).
Use within 30 days from supplementing FBS. Store at 2-8°C.
2) Complete medium
Semi-complete medium supplemented with GM-CSF (40 ng/ml).
0.26 µl GM-CSF(150 µg/ml) is added per ml semi-complete medium.
Complete medium cannot be stored and should be used directly.
See Table 3 for GM-CSF purity, endotoxin level and activity.
Medium for freezing cells
The SenzaCell cell line is frozen and stored in liquid nitrogen (or in a cryogenic freezer) in
complete medium supplemented with DMSO to a final DMSO concentration of 10%.
Flow cytometry Wash buffer
For all washing and staining steps and for suspension of cells prior to flow cytometry run, use
flow cytometry wash bugger: D-PBS supplemented with ~0.5-1% (w/w) BSA. The BSA is
dissolved in a smaller volume of D-PBS, which is filtered using a 0.2 µm filter prior addition to
the D-PBS. The prepared Wash buffer can be stored at 2-8°C for 30 days.
Summary of storage conditions for cell reagents.
Table 4: Storage conditions of routine cell culture and flow cytometry reagents.
Reagent
Storage long term
Storage short term
Assessment/titration
FBS
-18 °C or below until
expiry date.
2-8 °C for at least 30
days.
yes
GM-CSF
-18 °C or below until
expiry date.
2-8 °C for at least 7
days.
no
Antibodies
2-8 °C until expiry date.
Not applicable
yes
MEM/alpha
2-8 °C until expiry date.
Not applicable
no
Semi-
complete
medium
2-8 °C for 30 days
2-8 °C for 30 days
no
Complete
medium
Not applicable
Use same day as
mixing.
no
Flow
cytometry
wash buffer
Not applicable
2-8 °C for 30 days
no

GARDskin Page 11 of 41
Flow cytometer instrument setup
Prior to performing the GARDskin assay for the first time, a fluorescence compensation of the
flow cytometer should be performed. The compensation should be performed according to the
specific instrument . In flowcytometry, “Compensation” is a mathematical correction of a signal
overlap between the channels of the emission spectra of different fluorochromes. In the
GARDskin assay , the compensation should preferably be performed using the SenzaCell cell
linesingle stained with the mAbs HLA-DR-FITC and CD54-PE. For flow cytometry analysis,
appropriate flow rate should be set (FACSVerse 60-120 µl/min).
Controls
For each GARDskin test, relevant controls are analyzed in each of the three replicate GARD
Main Stimulations. The controls are listed in Table 5, with relevant information for the
laboratory work. The GARDskin input concentration of the positive control,
p-Phenylenediamine (PPD), should be determined in a cytotoxicity assessment while
establishing the method in the laboratory. The input concentration for PPD should be the same
independent of operator at the same laboratory.
Table 5. List of controls used in the GARDskin assay.
Substance ID
Control
GARDskin
classificatio
n
Solvent
GARD Input
conc (µM)
Viability
pos ctrl
p-Phenylenediamine
(PPD)
Sensitizer
DMSO
As determined
in cytotoxicity
assessment.
84.5 - 95.4%
(Relative
Viability)
neg ctrl
Test chemical
vehicle*
Non-sensitizer
Not
applicable
Concentration
corresponding
to vehicle
concentration in
test chemical
stimulation well*
≥95.5%
(Relative
Viability)
unstim ctrl
No stimulant added
beside complete cell
culture medium
Not applicable
Not
applicable
Not applicable
≥84.5%
(Absolute
Viability)
*See Table 8 on page 18 for available vehicles and corresponding maximum concentration.
Unstimulated controls
The unstimulated control is used for determination of absolute and relative cell viability of cell
batches and for normalization purposes in the Data analysis workflow.
Negative controls
The negative control is a vehicle control to verify that cells have not become activated in any
steps of the method’s experimental procedures, i.e. the vehicle shall not induce cytotox and
shall be classified as a non-sensitizer.
Positive controls
The positive control shall verify that the cells are responsive and can become activated upon
exposure of a skin sensitizer, i.e. the positive control shall induce cell cytotoxicity and be
classified as a sensitizer

GARDskin Page 12 of 41
Demonstration of Proficiency
According to OECD TG 442E GARDskin assay laboratories should demonstrate technical
proficiency in using the test method prior to routine use of GARDskin. Proficiency is
demonstrated by testing of a specified set of proficiency chemicals with known sensitising
properties, as listed in Table 6.
Table 6. Substances for demonstrating technical proficiency with GARDskin.
Proficiency substances
CASRN
Reference value
1
GARDskin
prediction
4-nitrobenzyl bromide
100-11-8
Sensitiser
Sensitiser
Propyl gallate
121-79-9
Sensitiser
Sensitiser
Isoeugenol
97-54-1
Sensitiser
Sensitiser
3-(Dimethylamino)-1-
propylamine
109-55-7
Sensitiser
Sensitiser
Eugenol
97-53-0
Sensitiser
Sensitiser
Ethylene glycol dimethacrylate
97-90-5
Sensitiser
Sensitiser
Glycerol
56-81-5
Non-sensitiser
Non-Sensitiser
Hexane
110-54-3
Non-sensitiser
Non-Sensitiser
1-Butanol
71-36-3
Non-sensitiser
Non-Sensitiser
1
NICEATM LLNA database 2010.
Method
Routine Procedures
All cell work should be performed under sterile conditions free of antibiotics; work in a
laboratory designed for growth of mammalian cells, use LAF-workbenches and sterile
consumables.
All cell centrifugation steps are performed at 300-315xg, 5 min, 2-8°C. All cell incubations are
performed in cell incubators at 37°C1°C and 5%0.5% CO
2
at saturated humidity.
Cell cultures should not be grown for more than 16 passages (~ 2 months) after thawing. A
cell passage is defined for SenzaCell cells as each time the cell culture is counted and split,
independently of how the cells has grown i.e. its doubling time (see below sections Thawing of
cells for details about cell passage numbering, and Cell seeding for test chemical stimulation
for details about the range of cell passages used in cell stimulation).
For cell maintenance, grow cells in cell culture flasks. For volumes up to 10 ml, use TC Flask
25 cm
2
. For volumes of 10-45 ml, use TC Flask 75 cm
2
. For volumes of 40-120 ml, use TC
Flask 162-175 cm
2
. Note that for large cultures, more than one TC 162-175 cm
2
may be
required.
Thawing cells
The SenzaCells are stored in liquid nitrogen (liquid phase) or in a cryogenic freezer, 7 million
cells /ml complete medium supplemented with 10% v/v DMSO.
- Thaw the cells by submerging the bottom half of the frozen vial in a ~37°C
water.
GARDskin Page 13 of 41
- Add 10 ml semi-complete medium to a 15 ml tube and transfer the thawed cells
to the tube. Centrifuge the cells.
- Remove supernatant by decantation. Resuspend the cell pellet in 5 ml semi-
complete medium. Add 0.26 µl GM-CSF per 1 ml of cell suspension to the cell
culture.
- Move the cells to a small cell culture flask (TC Flask 25 cm
2
) and incubate the
cell culture (i.e. cell passage number P0).
- The next day, transfer the cell culture from the cell culture flask to a 50 ml tube.
Centrifuge.
- Remove supernatant by decantation. Resuspend in 1 ml semi-complete
medium.
- Count the cells. Resuspend the cell culture in semi-complete medium to a
volume corresponding to a cell concentration of 2 x 10
5
cells /ml.
- Add 0.26 µl GM-CSF per 1 ml of cell suspension to the cell culture. Incubate the
cell culture (i.e. cell passage number P1).
Cell batches
For convenience, it is preferred to run three cell batches in parallel. Within the GARDassay, a
unique cell batch is defined as follows.
- cells originating from different frozen vials, or,
- cells originating from the same frozen vial, which have been cultivated
separately. A division of cell cultures for the purpose of achieving separate cell
batches should be done no sooner than passage 3 after thawing, and no later
than at least 2 passages prior to exposure experiments.
Cell Propagation
Every 3-4 days the cells are counted and propagated to 2 x 10
5
cells /ml in fresh medium. The
cell propagation is preferably performed on Mondays and Thursdays to coincide with cell
stimulations (see Cell seeding for test chemical stimulation).
- To split the cells, transfer the cell culture from cell culture flasks to appropriate
tubes. Centrifuge.
- Remove supernatant by decantation. Resuspend the cells in an appropriate
volume of semi-complete medium (the volume is dependent on the system used
for counting the cells).
- Count the cells.
- Resuspend the cell culture in semi-complete medium to a volume corresponding
to a cell concentration of 2 x 10
5
cells /ml.
- Add 0.26 µl GM-CSF (150 µg/ml) per 1 ml of cell suspension to the cell culture.
- Incubate in cell culture flasks.
Cryopreservations
- To freeze the cells, transfer the cell culture from cell culture flasks to 50 ml tubes
and centrifuge.
- Remove supernatant by decantation. Resuspend the cells in an appropriate
volume of semi-complete medium.
- Count the cells. Resuspend the cell culture in semi-complete medium to a
volume corresponding to a cell concentration of 14 million cells /ml.
- Add 0.26 µl GM-CSF (150 µg/ml) per 1 ml of cell suspension to the cell culture
(final GM-CSF is 40 ng/µl)
- Prepare a solution of complete medium supplemented with 20% v/v DMSO.
GARDskin Page 14 of 41
- Transfer 0.5 ml of cell suspension to cryogenic vials (marked with cell bank
identity, i.e. name of cells, date of freezing, type of cell bank stock).
- Add 0.5 ml of DMSO-supplemented complete medium to each of the cell-
containing cryogenic vials, close the lids and invert the vials to mix.
- Immediately freeze the cells slowly in a temperature-controlled manner (-
1°C/min down to -70 – -90°C).
- Vials are submerged into liquid nitrogen for long-term storage.
Preparing Flow cytometry samples
All washing steps are performed in Wash buffer. All centrifugations are performed at 300-
315xg, 5 min, 2-8°C. All incubations are performed in dark at 2-8°C. Each lot of mAbs needs to
be titrated to determine antibody concentration giving saturation (see Annex 2. Antibody
titration).
Phenotypic Quality Control
The same day as performing a chemical stimulation, the cells are quality controlled with a
phenotypic analysis. This is done to ensure cells are maintained in an inactivated state and to
detect phenotypic drift.
Count cells and prepare 6 flow cytometry samples, with 2 x 10
5
cells in each sample.
- Wash the cells by adding 1 ml Wash buffer and centrifuge at 300-315xg, 5 min,
2-8°C.
- Remove the supernatant by aspiration and repeat the washing step. Resuspend
in 50 µl Wash buffer.
- Stain cells as indicated in Table 5 by adding titrated mAbs or viability stain to
each sample.
Table 5. Antibodies and viability stain used in the Phenotypic Quality Control.
Sample 1
Isotype FITC
Isotype PE
Sample 2
CD86-FITC
CD54-PE
Sample 3
HLA-DR-FITC
CD80-PE
Sample 4
CD34-FITC
CD14-PE
Sample 5
CD1a-FITC
Sample 6
Propidium Iodide (PI)
- Incubate in dark at 2-8°C for 15 min.
- Wash the cells by adding 1 ml Wash buffer and centrifuge the samples at 300-
315xg, 5 min, 2-8°C.
- Remove the supernatant by aspiration, resuspend in appropriate volume Wash
buffer (using the mAbs and flow cytometer suggested in this protocol, 200 µl is
used).
Analyze the samples on a flow cytometer according to manufacturer’s instructions (for
FACSVerse, use flow rate 60-120 µl/min) Record approximately and at least 10,000 events
and analyze using the gating instructions below.
Note:
• Removal of supernatant during preparation of flow cytometry samples is done by
aspiration, e.g. by pipetting or by using a vacuum system, not by decantation.
GARDskin Page 15 of 41
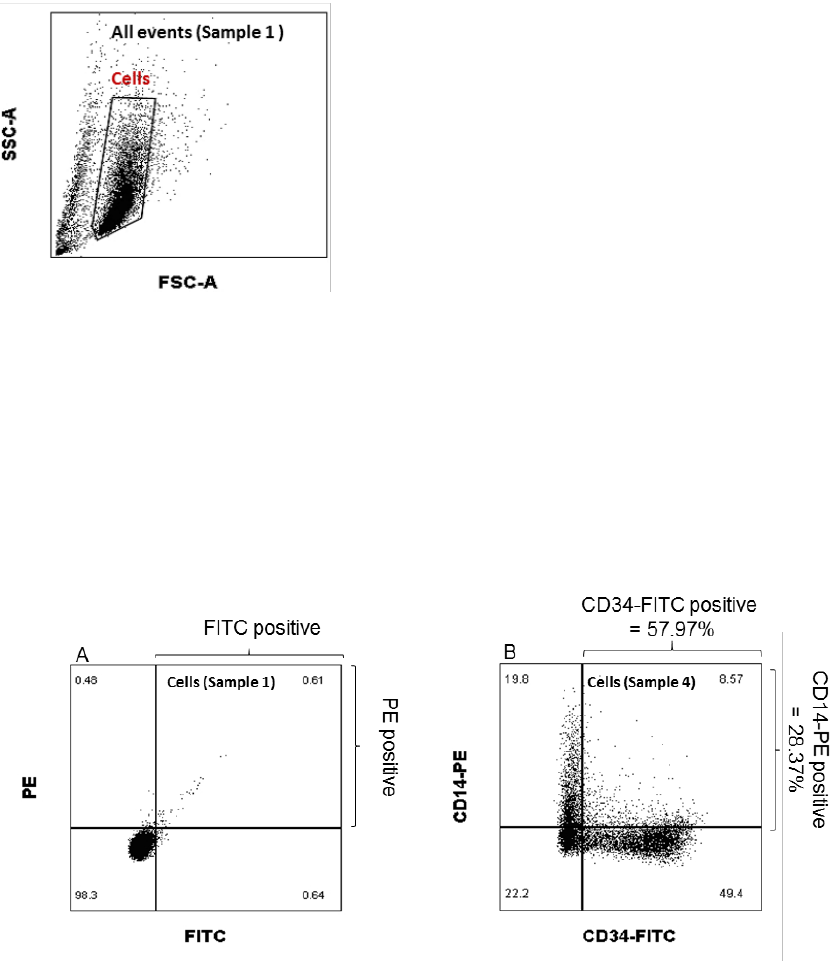
Analysis of Cell population
Exclude dead cells and cell debris by setting the “Cells” gate in the FSC-A/SSC-A scatter plot
using Sample 1 (Isotype control), see Figure 2. Apply the “Cells” gate on Sample 2-6.
Figure 2. Instructions for setting the gate for the SenzaCell cell population.
Analysis of Phenotypic Quality Control markers
Show the gated “Cells” population in a PE/FITC scatter plot. Set quadrants for PE and FITC
positive and negative cells using Sample 1 (isotype controls) as Figure 3A. Apply the quadrant
from the isotype control sample in a PE/FITC scatter plot showing the “Cells” population of
Sample 2-5 (mAb stained). Calculate and record the fraction of PE and FITC positive cells for
each phenotypic marker, see example of Sample 4 below in Figure 3B, and compare with the
accepted range in Table 6.
Figure 3.. Instructions for setting the quadrants for PE and FITC positive cells (A). Apply the preset gate and quadrants to
record the fraction of positive cells for each phenotypic marker (B).
Analysis of Absolute viability (PI negative cells)
Set the gate for “Absolute viability”, in the PE/FITC scatter plot showing “All events” on Sample
1 (Figure 4A). Apply the “Absolute viability” gate on Sample 6 (PI stained), as in Figure 4B.
Record the fraction of “Absolute viability” in % (PI negative cells) from Sample 6 and compare
with the accepted range in Table 9.
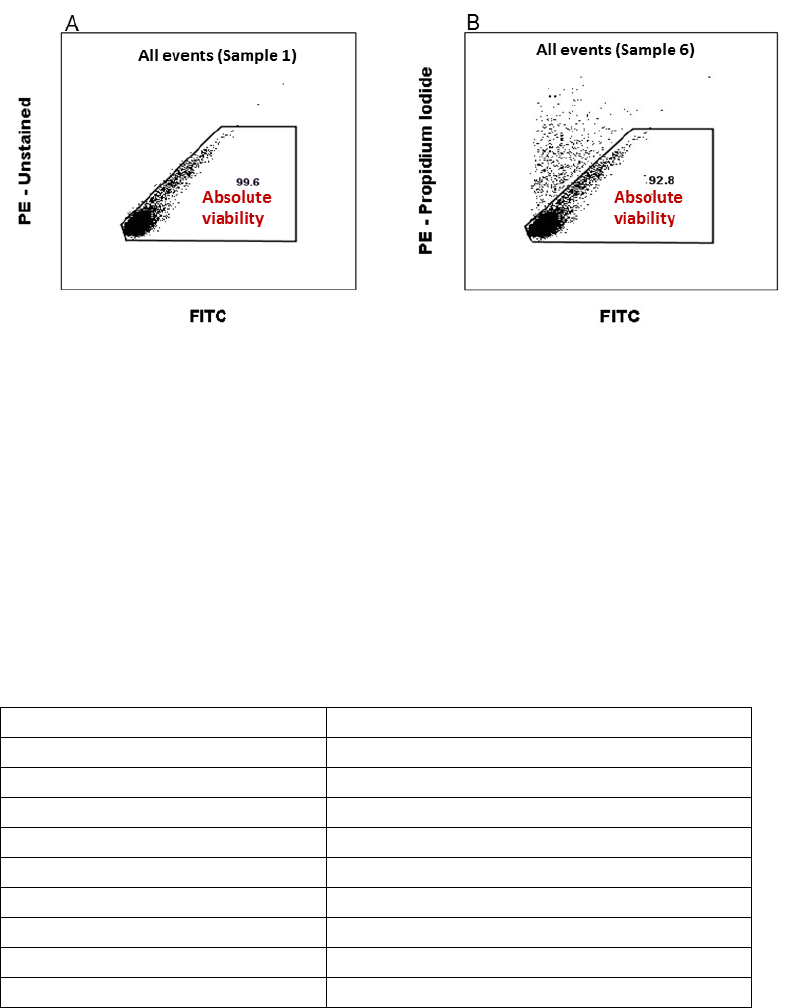
GARDskin Page 16 of 41
Figure 4 Instructions for setting the gate for “Absolute viability”on the Isotype stained sample (A). Apply the gate “Absolute
viability” on Sample 6 (B).
Phenotypic Quality Control acceptance criteria
The accepted range of phenotypic biomarker expression (Table 7) is based on observations
made in the developing laboratory during assay development. Variations within these ranges
are to be considered normal. However, if any of the biomarkers are out of the specified
ranges, it is recommended that the cell batch is not used for cell stimulations at that timepoint.
A representative example of a typical SenzaCell phenotype is presented in Annex 3.
SenzaCell Phenotype. Note that the cell line is known to be heterogenous, and variations
within the accepted ranges from given examples are expected.
Table 7. Accepted range for phenotypic markers of the SenzaCell cells.
Phenotypic biomarker
Accepted range of positive cells (%) *
CD86
10-40
CD54
>0
HLA-DR
>0
CD80
<10
CD34
>0
CD14
>0
CD1a
>0
Phenotypic biomarker
Accepted range of PI negative cells (%)
Absolute viability (PI negative cells)
≥84.5
Cell seeding for Test chemical stimulations
Cells are seeded for stimulation directly following a cell split, i.e. test chemical stimulations are
to be scheduled to coincide with routine cell culture maintenance. This has been noted by the
GARDskin assay developers to be an important factor. The cell stimulations are initiated when
a stable cell culture is established i.e. when at least a duplication of the cells between cell
passages is seen, and depending on the purpose of the cell stimulation, at specific cell
passage ranges:
- For cytotoxicity assessment, cells at passage number P4-P16 are used.
- For GARD Main Stimulation, cells at passage number P6-P12 are used.

GARDskin Page 17 of 41
Test Chemical Stimulation Procedures
Handling of the test chemical
A chemical that is to be tested for sensitization in the GARDskin assay is referred to as a “test
chemical”. The test chemical should be stored according to instructions from the supplier, in
order to ensure its stability. Weighing of the test chemical can be performed prior to the day of
cell stimulation if stored correctly and the stability of the substance can be ensured. Dissolved
test chemical should be prepared fresh on the day of cell stimulation. Test chemicals should
be dissolved in a compatible vehicle as appropriate stocks of target in-well concentration, in
this document referred to as a Stock A concentration, depending on maximum possible
solvent in-well concentration.
To prepare a solid test chemical, calculate the weight (see Note below about minimum weight
of the scale) needed for an appropriate volume according to Equation 1. The test chemical is
weighed into a pre-tared micro tube or appropriate vessel. Based on the weighed amount,
calculate the exact volume of solvent needed to reach the c
T
, according to Equation 1.
(Equation 1)
Where
V is the volume to be added in L
m is the exact weight added to the tube in g
M is the molecular weight of the test chemical in g/mol
p is the purity of the test chemical in %
c
T
is the desired target concentration in mol/L
To prepare a liquid test chemical, use Equation 2 to calculate a dilution factor and calculate
the volume of the test chemical and solvent needed for an appropriate volume of the test
chemical of Stock A. Dilute the stock by the dilution factor into a 1.5 ml micro tube in the
appropriate solvent.
(Equation 2)
Where
df is the dilution factor
c
S
is the concentration of the stock in mol/L
c
T
is the desired target concentration in mol/L
Note:
• A test chemical is preferably to be defined by a known molecular weight, as appropriate
GARD Input Concentration are defined by molar concentrations. However for complex
mixtures of unknown composition, substances of unknown or variable composition, complex
reaction products or biological materials this may not be possible. However, this limitation
may be circumvented by a) the use of weight-based concentrations (ppm), since the vast
majority of sensitizers are detected at <100 ppm of the GARDskin assay (Gradin et al..), or b)
by an approximation of the mean molar weight of the complex mixture.
• If the molar concentration of a liquid test chemical is not given by the customer, calculate the
molar concentration using the molecular weight, density and purity of the test chemical.
• If the density of a liquid test chemical is not available, weigh the test chemical.
• If the substance is too viscous for pipetting, weigh the test chemical.

GARDskin Page 18 of 41
Solubility assessment
Consider the physiochemical properties of the test chemical and use the GARDskin
compatible solvents and their maximum in-well concentrations listed in Table 7.
DMSO or water is the preferred vehicle. If neither is suitable, e.g. the test chemical is not
dissolved, unfavourable reactions are expected, or other reasons, then a different vehicle can
be tested. Independent of vehicle, a 2-step dilution is tested first, if not suitable then the 1-step
dilution is tested. In some cases, where the test chemical has high reactivity with water or
other unfavourable reactions are expected, a 1-step dilution can be tested first. Solubility of
Test Items should be evaluated at least by a visual inspection of the solution. The Test Item is
considered dissolved when the solution is without precipitate or phase separations. Other
solubility approaches may also be used to reach dissolved test chemicals.
2-step dilution
Stock A
- Prepare a Stock A with a c
T
(desired target concentration of the test chemical) of 500
mM.
- Vortex extensively and apply heat (37 ±5 °C), if necessary, to dissolve the test
chemical.
- Sonication may also be used if necessary and if compatible with the substance.
- If not soluble: The stock A 500 mM maximum limit is specified for a vehicle
concentration of 0.1% in well, if a higher vehicle concentration can be used (see
Table 4) then lower the concentration accordingly (see Table 2) to achieve an in
well concentration of 500 μM. If soluble, proceed to the last step below. If the
Test Item is not soluble at a concentration corresponding to 500 μM in-well in
any vehicle, identify the highest possible concentration where the Test Item is
soluble in a suitable vehicle. Use the highest soluble concentration as a starting
point in the dilution range.
- Perform a serial dilution in the chosen vehicle to get a suitable range of stock A
concentrations. Vortex well between each step. An example dilution scheme
when working with a substance freely soluble at 500 mM in vehicle and at 500
μM in medium is seen in Figure 5 on page 21.
Table 8 . The GARDskin compatible vehicles and the highest in-well concentrations. In the validation study only
water and DMSO at 0.1 % were used. Other vehicles and vehicle concentrations have been verified to work in the
GARDskin assay by the developing laboratory.
Vehicle*
Max in-well concentration (%)
DMSO
0.5
Water
0.1
Acetone
0.1
DMF
0.1
EtOH
0.1
Glycerol
1
Isopropanol
0.25
DMF:Glycerol 4:1 (v/v %)
0.25
Complete medium
100
*All the vehicles should be of high grade (purity ≥99.5%).

GARDskin Page 19 of 41
Serial dilution
- Perform a serial dilution in the chosen solvent to get a range of Stock A concentrations
(see example in Figure 5). Vortex well between each dilution step. Extensive vortex and
heat (37°C±5°C) can be applied.
- From Stock A, prepare a range of Stock B concentrations by adding appropriate
volume of Stock A to semi-complete medium. Extensive vortex and heat (37°C±5°C)
can be applied. If the substance is poorly soluble in semi-complete medium (typically
identified through observation of precipitation in Stock B), the highest soluble
concentration in semi-complete medium is used as the highest in the dilution range.
- In addition, prepare a Stock B concentration of chosen solvent (neg ctrl) in semi-
complete medium to achieve the corresponding in-well concentration of the solvent.
1-step dilution
If a test chemical has a maximum solubility in Stock B which is lower than expected with
respect to the maximum solubility in Stock A (i.e. displays solubility issues in Stock B), and is
found to be non-toxic, i.e. the relative viability is above 95.4 %, the operator can try to
increase the in-well concentration by bypassing the Stock B step as follows:
1. Prepare Stock A at the maximum possible concentration and prepare a serial dilution.
2. Add appropriate volume of Stock A dilution directly to complete medium.
3. Note the highest possible test chemical concentration in complete medium that does
not have solubility issues i.e. completely solved.
4. If the highest possible concentration is higher than that in Stock B, prepare cells as
described in ‘cell seeding’ in the sections below.
Cytotoxicity Assessment
The GARDskin Input concentration can be established for the test chemical in a cytotoxicity
assessment. For an efficient workflow, multiple test chemicals can be assessed in each
stimulation experiment with shared controls, unstim ctrl and neg ctrl, which are included in
each cytotoxicity assessment. The cytotoxicity assessment results are used as guidance to
find the appropriate stimulation concentration to be used during the Main Stimulations.
To determine the GARDskin Input concentration for a test chemical, cell stimulations are
performed in a range of in-well concentrations as determined appropriate based on solubility
assessment. For details about weighing and calculation, see section Handling of the test
chemical.
Day 1
Cell seeding
The below cell seeding protocol is an example of the cell seeding when using a two-step
dilution of the test chemical. If other dilutions schemes are used, use another seeding practice,
but make sure the final cell concentration in-well after addition of the test chemical is 2 x 10
5
cells /ml.
Note:
• Make sure to secure the lids before heating and vortexing the test chemical.
• A test chemical with solubility issues should be used from the highest possible
concentration, down to 1 µM in-well concentration of the dilution range.
GARDskin Page 20 of 41
- Transfer the cell culture from cell culture flasks to appropriate size tubes (e.g. 50 ml
tubes). Centrifuge at 300-315xg for 5 min at 2-8°C.
- Remove the supernatant by decantation. Resuspend the cells in an appropriate volume
of semi-complete medium.
- Count the cells.
- Resuspend the cell culture in semi-complete medium to a volume corresponding to a
cell concentration of 2.2 x 10
5
cells /ml (final cell concentration in wells after addition of
test chemical will be 2 x 10
5
cells /ml). Add 0.26 µl GM-CSF (150 µg/ml) per 1 ml of cell
suspension to the cell culture.
- Use 24-well plates and seed 1.8 ml of cell suspension into the number of wells needed
(see Figure 5).
Cell stimulation
For each cell stimulation, independent of number of test chemicals and number of plates, it is
recommended to include two wells of unstimulated cells (unstim ctrl) and one well with the
vehicle (negative control) (Figure 5). If the test chemicals are dissolved using different
solvents, each solvent should be present as negative controls. If several different
concentrations of one solvent are used, it is sufficient to use the highest concentration as
negative control in this experiment.
- Test chemical: add 200 µl of Stock B to the 1.8 ml cell suspension seeded in 24-well
plates for the dilution range of each test chemical. Mix well by pipetting. Final cell
concentration in wells is 2 x 10
5
cells /ml.
- Example for 1-step dilution: If the final vehicle concentration should be 0.1% use the
following method:
o Add 2 µl of each Stock A dilution that did not have solubility issues in complete
medium to wells containing 1.8 ml cells.
o Add 198 µl semi-complete medium to the same wells and mix by pipetting.
- Negative control: add 200 µl of relevant solvent Stock B to the 1.8 ml cell suspension
Example for 1-step dilution: If the final concentration should be 0.1% solvent use the
following method:
o Add 2 µl of solvent to wells containing 1.8 ml cells.
o Add 198 µl semi-complete medium to the same wells and mix by pipetting.
- Unstimulated control: add 200 µl of semi-complete medium to the 1.8 ml cell
suspension, to achieve an in-well cell concentration and total volume equivalent to test
chemical treated samples.
- Incubate for 24 h±0.5 h at 37°C1°C and 5%0.5% CO
2
.
Example of preparation of a serial dilution and a cytotoxicity assessment stimulation for one
test chemical is shown in Figure 5.
GARDskin Page 21 of 41
Figure 5. Example of a schematic description of preparation of dilution series of one test chemical for cytotoxicity assessment.
Day 2
Cell harvest and sample preparation
After 24 h±0.5 h incubation, harvest and prepare:
- Duplicate flow cytometry samples of each test chemical stimulation for the
dilution range.
- Duplicate flow cytometry samples of negative control.
- Four flow cytometry samples of unstimulated cells (unstim ctrl).
- Mix the cell cultures in each well by carefully pipetting up and down and split
into duplicate samples, ~1000 µl to each replicate. For the unstim ctrl four flow
cytometry samples should be generated; two for staining with PI and two for
non-staining. It is recommended to clearly mark the two samples which should
not be stained. If only one unstim ctrl well has been used, split this cell culture
into four flow cytometry samples.
- Wash the cells by adding ~1 ml Wash buffer and centrifuge.
- Remove the supernatant by aspiration, resuspend in ~1 ml wash buffer and
centrifuge.
- Prepare a staining solution (enough for 50 µl for each flow cytometry sample) of
50 µl Wash buffer and 1 µl Propidium Iodide (PI).
- Resuspend each sample in 50 µl of the staining solution. Note: Leave 2 (out of
4) samples with unstimulated cells unstained, resuspend them in 50 µl Wash
buffer instead.
- Incubate in dark at 2-8°C for ~10 min.
- Wash the cells by adding ~1 ml Wash buffer and centrifuge. Resuspend in a
suitable amount of Wash buffer (using FACSVerse: resuspend in 200 µl).

GARDskin Page 22 of 41
- Analyze the samples on a flow cytometer according to manufacturer’s
instructions(FACSVerse: flow rate 60-120 µl/min). Record approximately and at
least 10,000 events and analyze using the gating instructions below.
Analysis of Cell population
Exclude dead cells and cell debris by setting the “Cells” gate in the FSC-A/SSC-A scatter plot
using the unstimulated unstained sample, see Figure 6. Apply the “Cells” gate on all PI stained
samples and record fraction of “Cells”.
Figure 6. Instructions for setting the gate for the SenzaCells.
Analysis of Absolute viability (PI negative)
Use the unstimulated unstained sample to set the gate for “Absolute viability”, in the PE/FITC
scatter plot showing “All events” (Figure 7A). Apply the preset “Absolute viability” gate on all PI
stained samples as in Figure 7B. Record the fraction of “Absolute viability” in % (PI negative
cells).
Figure 7 Instructions for setting the gate for “Absolute viability” (A). Apply the gate “Absolute viability” on all PI stained
samples (B).
Note:
• The “Cells” population is not used for further analysis but is used to keep track of the
placement of the cell population in the FSC-A/SSC-A scatter plot, see Annex 4. Cell
population for a common pitfall. A low “Cells” population can give a false percentage
“Absolute viability”.

GARDskin Page 23 of 41
Once the fraction of Absolute viability in % for the entire dilution range of a test chemical has
been recorded, the Relative viability for each sample is calculated according to Equation 3. For
each concentration of the dilution range, calculate the mean value of the duplicate samples.
(Equation 3)
Where
Rv is the Relative viability of the sample in %
V
S
is the Absolute viability of the sample in %
V
C
is the mean Absolute viability of the two unstimulated PI stained control samples in %
The GARDskin input concentration of a test chemical is decided as following:
1. A test chemical that induces cytotoxicity should be used for GARDskin Main
Stimulation at the concentration that induces 90% Relative viability (Rv90), where an
acceptance criterion for each sample is a Relative viability of 84.5%-95.4%. If multiple
concentrations fulfill the acceptance criterion, the concentration that yields the Relative
viability closest to 90% is chosen as the GARDskin input concentration.
2. If the Relative viability decreases from ≥95.5% to <84.5% between two data points
within the dilution range, the cytotoxicity assessment is repeated with a number of data
points within the relevant concentration range. Interpolation between data points is not
recommended, as linearity cannot be assumed.
3. A test chemical that is not cytotoxic (Relative viability ≥95.5%) is used for GARD Main
Stimulation at 500 µM or highest soluble concentration.
GARDskin Main Stimulation
The purpose of the Main Stimulation is to generate three biological replicates of cell cultures
exposed to the test chemical. The three should have been stimulated with the same test
chemical concentration. However, in Main Stimulations several concentrations of the same
test chemical may be used. For example time restrictions may necessitate the cytotoxicity
assessment to coincide with the Main Stimulations.
The Main Stimulations should be performed three times with individual preparations of the test
chemicals and controls. Individual cell batches (see section Abbreviations and definitions)
should be used, to achieve three biological replicate samples (see Table 4 for details of the
controls). The chemical concentration to be used in this step could be determined during the
cytotoxicity assessment or directly in the main stimulation step where several concentrations
may be assayed. The three GARDskin Main Stimulations can either be run in parallel or
sequentially. If several test chemicals are to be analyzed in the same GARDskin experiment,
the controls can be shared. Prior to starting a Main Stimulation, it is recommended to assign
all Test and Reference Items to be tested a Study-unique Sample ID according to standard
procedure set up in the testing laboratory. Consult permissible characters for the endpoint
measurement CDF-files (NanoString technologies) and avoid incompatible characters in the
Sample ID. Use the Sample ID for the Main Stimulation and for further procedures.
Note:
• The controls should pass the viability acceptance criteria, see Table 4, unstim ctrl:
Absolute viability ≥84.5% and neg ctrl: Relative viability ≥95.5%.
GARDskin Page 24 of 41
In Figure 8, a schematic example of a stimulation experiment with 8 test chemicals and the 3
controls are visualized, including one extra cell culture well with unstimulated controls.
Day 1
Preparation of test chemical and controls
- Prepare the test chemical in the same way as determined during solubility
assessment and cytotoxicity assessment.
- Take into account the increased volume, 4 ml final cell suspension, for the
stimulation.
- In addition, prepare the positive and negative control to achieve appropriate in-
well concentration.
Cell seeding
Below cell seeding protocol is an example of the cell seeding when using a two-step dilution of
the test chemical. If another dilution scheme was determined during solubility and cytotoxicity
assessment, other cell seeding practices apply. No matter how the test chemical is diluted, the
final cell concentration in wells after addition of test chemical should be 2 x 10
5
cells /ml.
- Transfer the cell culture from cell culture flasks to appropriate tubes. Centrifuge
at 300-315xg for 5 min at 2-8°C.
- Remove supernatant by decantation. Resuspend the cells in an appropriate
volume of semi-complete medium.
- Count the cells.
- Resuspend the cell culture in semi-complete medium to a volume corresponding
to a cell concentration of 2.2 x 10
5
cells /ml (final cell concentration in wells after
addition of test chemical will be 2 x 10
5
cells /ml). Add 0.26 µl GM-CSF (150
µg/ml) per 1 ml of cell suspension to the cell culture.
- Use 12-well plates and seed 3.6 ml of cell suspension into the number of wells
needed for test chemicals and controls (see Figure 8).
Cell stimulations
For each cell stimulation experiment, it is recommended to include two cell culture wells of
unstimulated cells (unstim ctrl). Below is, for convenience, described a test chemical standard
dilution. Since the test chemical preparation can differ this is only a recommendation and
guidance.
- Test chemical: add 400 µl of Stock B to the 3.6 ml cell suspension seeded in
12-well plates. Mix well by carefully pipetting up and down. Final cell
concentration in well is 2 x 10
5
cells /ml.
If the 1-step dilution method is used (example for 0.1 % vehicle in-well):
o Add 4 µl of each Stock A to wells containing 3.6 ml cell
suspension.
o Add 396 µl semi-complete medium to the same wells and
carefully pipette up and down to mix.
- Positive control: add 400 µl of Stock B to the 3.6 ml cell suspension.
- Negative control: add 400 µl of Stock B to the 3.6 ml cell suspension.
If the 1-step dilution method is used and the final solvent
concentration should be 0.1 %:
o Add 4 µl of solvent to wells containing 3.6 ml cell suspension.
o Add 396 µl semi-complete medium to the same wells and
carefully pipette up and down to mix.
GARDskin Page 25 of 41
- Unstimulated control: add 400 µl of semi-complete medium to the 3.6 ml cell
suspension, to achieve an in-well cell concentration and total volume equivalent
to test chemical treated samples.
- Incubate for 24 h±0.5 h at 37°C1°C and 5%0.5% CO
2
.
Figure 8. Schematic visualisation of test chemical addition to a GARDskin Main Stimulation.
Day 2
Cell harvest for RNA sample preparation and flow cytometry
From each cell culture well, prepare samples for RNA preparation and flow cytometry analysis
as described below.
Samples for RNA preparation:
- Resuspend the cells by carefully pipetting up and down, ~1 ml volume, swirl on
the bottom.
- Harvest 2 – 3 ≥1 ml samples from each cell culture well into separate RNase
free 1.5 - 2 ml tubes and keep the tubes at 2 – 8°C for now.
- Harvest all samples from all plates before continuing.
Samples for flow cytometry analysis:
- Harvest the remaining volume from each cell plate well and split into two flow
cytometry samples (~500 μl each).
- For the unstim ctrl four samples should be generated. Two for PI staining and
two for non-staining. If only one unstim ctrl well has been used, split this well
into four flow cytometry samples.
Note: Recommendation: clearly mark the two samples which should not be
stained.
- Store the flow cytometry samples at 2 – 8°C.
- Harvest all samples for flow cytometry from all plates before continuing.
Samples for RNA preparation:
- Centrifuge the samples for RNA preparation at 300-315×g for 5 min at 2-8°C.
- Remove supernatant carefully by aspiration. Optional: depending on format
aspirate only up to 12 tubes at a time, to avoid long-term contact with air and
degradation of the RNA.
GARDskin Page 26 of 41
- Quickly add 500 µl of TRIzol or equivalent reagent, as specified in the RNA
isolation kit protocol, to each cell pellet.
- Homogenize cells by vortexing the samples for 10-20 sec.
- Homogenized samples can be stored short-term in RT for maximum 1 hour,
long-term at -18°C or below (stable for one month), or
-80°C 10°C (stable for one year).
Note: Though several reagents can be used instead of TRIzol, for practical reasons, these
samples are called TRIzol samples throughout this protocol.
- Samples for flow cytometry analysis: Wash the flow cytometry samples by
adding 1 ml Wash buffer and centrifuge at 300-315xg, 5 min, 2-8°C.
- Remove the supernatant by aspiration and repeat the washing step.
- Prepare a staining solution (enough for 50 µl for each flow cytometry sample) of
50 µl Wash buffer and 1 µl Propidium Iodide (PI).
- Resuspend each sample in 50 µl of the staining solution.
Note: the two unstimulated cells which are unstained are resuspended in 50 µl
Wash buffer instead.
- Incubate in dark at 2-8°C for ~10 min.
- Wash the cells by adding approximately 1 ml Wash buffer and centrifuge at 300-
315xg, 5 min, 2-8°C.
- Remove the supernatant by aspiration and resuspend in appropriate volume
(FACSVerse: 200 µl) Wash buffer.
- Analyze the samples on a flow cytometer according to manufacturer’s
instructions (FACSVerse 60 – 120 µl/min). Record approximately and at least
10,000 events.
Analysis of Cell population
Analyze the flow cytometry results in the same way as for the cytotoxicity measurement and
calculate the mean Relative viability for each substance using Equation 3.
The purpose of the propidium iodide (PI) stained samples in the Main Stimulation is a Quality
Control of the Relative viability to ensure that the test chemical and controls passes the
relative viability acceptance criteria.
Relative viability acceptance criteria
- The unstimulated control should have an Absolute viability of ≥84.5%.
- The negative control should have a Relative viability of ≥95.5%.
- The positive control should have a Relative viability of ≥84.5%-95.4%.
- Test chemicals that are expected to induce cytotoxicity based on the cytotoxicity
assessment should have a Relative viability between 84.5%-95.4%.
- Test chemicals that are assayed at 500 µM, or at the highest soluble concentration,
should have a Relative viability of ≥84.5%.
If a test chemical or control does not pass the Relative viability acceptance criteria, either the
entire Main stimulation should be discarded or only the test substance replicate from a single
Main Stimulation should be discarded according to the decision tree below.
Procedures at failed Relative viability Quality Control
- If the Quality Control criteria is not reached for the unstimulated control
(Absolute viability ≥84.5%), the Main stimulation has failed and all samples are
discarded. A new Main Stimulation should be performed.

GARDskin Page 27 of 41
- If the Quality Control criteria is not reached for the positive control (Relative
viability 84.5% − 95.4%) the Main stimulation has failed and all samples are
discarded. A new Main Stimulation should be performed.
- If the Quality Control criteria is not reached for the negative control (Relative
viability ≥95.5%), the Main stimulation has failed and all samples are discarded.
A new Main Stimulationshould be performed.
- If the Quality Control criteria for the Relative viability is not reached for a test
chemical, discard its generated samples from this stimulation. The controls for
this Main stimulation may still be used for other test chemicals within the same
Main stimulation, but are not used for this test chemical. Include the test
chemical in a new Main Stimulation. If necessary, the Test chemical may be re-
analysed for cytotoxicity as described above in Cytotoxicity Assessment, before
performing a new Main Stimulation.
Part result:
For each test chemical and control, 3 replicate samples for RNA isolation with passed
Relative viability Quality Control are required. The replicates are generated in three
individual GARDskin Main Stimulations (i.e. all samples for RNA isolation generated from
test chemical stimulations and control stimlations have to pass the viability quality control
criteria within the same Main stimulation).
RNA isolation
The RNA isolation is recommended to be performed with maximum 24 samples at a time. One
vial of the replicate TRIzol samples generated from each Main Stimulation well is usually
sufficient to obtain enough RNA for the endpoint measurement. If, for any reason, the first
isolated sample does not meet the acceptance criteria, a second sample is generated, either
by isolating the final TRIzol sample, or, when 3 or more TRIzol samples were generated from
one well, by pooling two TRIzol samples onto the same spin column. For the second RNA
sample isolated, the sample ID is suffixed, distinguishing it from the first, failed, sample.
Total RNA is isolated from the TRIzol
samples using a commercially available kit and reagents.
Direct-zol RNA MiniPrep, Zymo Research, specified in Table 3, is used by the assay
developers and is therefore recommended. In general, the manufacturer’s instructions should
be followed.
Prepare the buffers and follow the protocol in the instruction manual included in the
recommended kit (Direct-zol RNA MiniPrep), but with the following adjustments:
- Thaw TRIzol samples on ice.
- DNase I treatment should not be performed.
- After the centrifugation with RNA Wash buffer, discard the flow-through of the RNA
Wash Buffer (re-use the collection tube) and perform an additional 1 min centrifugation
(10,000-16,000×g) to avoid RNA Wash Buffer residues in the eluate.
- Elute RNA by adding ≥25 µl DNase/RNase free water directly to the column matrix and
centrifuge at 10,000-16,000xg for 30 seconds (though not recommended in the
DirectZol protocol, the RNA can be eluted with as little as 20 µl of DNase/RNase free
water). If necessary to increase RNA yield, it is possible to perform a double elution by
loading the eluted RNA once again on the same column for a second centrifugation.
- The eluted RNA can be used immediately or stored at -70 – -90°C.

GARDskin Page 28 of 41
It is recommended that a small aliquot (2 µl) is stored separately or used immediately, for
quantification and quality control purposes.
RNA quantification and quality control
Analyze the RNA from each sample using an Agilent Bioanalyzer, or an equivalent instrument.
Follow protocols provided by the supplier. RNA concentration and quality should correspond to
NanoString recommendations. During test method development and validation, a sample with
an RNA Integrity Number (RIN) of 8.0 and above, as derived from the Agilent Bioanalyzer
2100, was considered a sample of high quality. Corresponding or otherwise equivalent RNA
quality metrics may be used to assure high quality RNA.
Part result:
For each test chemical and control, three RNA samples, each identified with a unique
Sample ID and passing the RNA Quality Control is generated.
GARDskin Page 29 of 41
GARDskin Endpoint measurement
The endpoint measurement of GARDskin is the mRNA quantification of the GARDskin
prediction signature (GPS) using the NanoString nCounter system. In the provided instructions
below the nCounter MAX system is used. If another equivalent nCounter platform is to be
used, refer to the manufacturer’s instructions for appropriate experimental procedure and
discuss with method developer.
The custom made CodeSet (i.e. a set of oligonucleotide probes representing the genes of the
prediction signature) has been developed by SenzaGen and NanoString. To place an order for
a batch of the CodeSet, please contact SenzaGen AB. It is not possible to use different
batches of CodeSets for analysis of the endpoint using the GDAA application. The nCounter
analysis is performed with maximum 12 RNA samples at a time (one cartridge and CodeSet).
Setting up a NanoString Hybridization assay
All hybridization reactions use a total RNA input of 100 ng. According to the protocol below,
the sample is added to the reaction in a volume of 5 µl. Thus, all samples are to be diluted to a
concentration of 20 ng/µl.
General Probe Handling warning: During setup of the assay, do not vortex or pipette
vigorously to mix as it may shear the Reporter CodeSet. Mixing should be done by flicking or
inverting the tubes. Do not spin any faster than 1000 x g for more than 30 seconds as this may
spin the CodeSet out of solution. Be aware that the maximum speed of a minicentrifuge is
usually >1000 × g and that the “pulse” option of a microcentrifuge quickly goes to >1000 × g.
- Heat a thermocycler to 65°C, with a lid temperature of 70°C. A time program can
be used. Note: Program the thermocycler using 15 µl volume, at temperatures
stated above.
- Thaw Reporter CodeSet and Capture ProbeSet at room temperature and store
on ice. Flick and spin down. Note: After thawing, inspect the tube of Reporter
CodeSet to make sure no colored precipitate is present. If you see a colored
precipitate, heat the entire tube to 75°C for ~10 min and cool at room
temperature before using.
- Thaw RNA samples on ice. Flick and spin down.
- Dilute all RNA samples to a concentration of 20 ng/µl using RNase-free water.
Label each tube with its Sample ID. Mix by flicking and inverting and spin down.
- Prepare a master mix by adding 70 µl of the hybridization buffer (provided in the
NanoString master kit) to the Reporter CodeSet. Carefully mix by flicking and
inverting and spin down.
- Cut a 12-strip of hybridization-tubes (provided in the NanoString master kit) in
half, if necessary to fit them into a centrifuge. Note that the hybridization-tube
strip has an orientation from 1-12, shown by the indent after the 1
st
and 8
th
position. Mark the tubes with Sample ID.
- Distribute 8 µl of the Reporter CodeSet master mix to each hybridization tube.
- Add 5 µl of diluted RNA sample to each hybridization tube. Carefully mix by
flicking and inverting and spin down.
- Add 2 µl of the Capture ProbeSet to each hybridization tube. Close the tubes
with plastic lids and carefully mix by flicking and inverting and spin down.
- Place the hybridization tubes in the preheated thermocycler and incubate for 24
±0.5 h.
Setting up a nCounter Prep Station Run
- Remove the cartridge from storage at -20 ±4°C and equilibrate to RT for ~30
minutes before the seal is broken.
GARDskin Page 30 of 41
- Remove 2 reagent plates from storage at 4°C and equilibrate to RT for ~30
minutes. Centrifuge the reagent plates 2000xg for 2 min, remove plastic lids
before installing in the Prep Station.
- Chose “Start processing” on the screen and select the high sensitivity mode.
- Install all components into the Prep Station according to instructions on-screen.
All required plastic material is provided in the NanoString master kit “prep pack”
(stored at RT).
- After 24h (±0.5 h) hybridization, remove the hybridization tubes from the
thermocycler and spin down. Lift the metal lid in the prepstation and place the
tubes without lids in the position highlighted on-screen. Orient the tubes so that
sample #1 is positioned to the left and position #12 is positioned to the right.
Close the metal lid.
- Initiate the run by following on-screen instructions. It is recommended to
supervise the prep station until it starts piercing the foil of the prep plates. If
reagents or plastics are not inserted correctly the Prep Station will have
detected it at this point and informed on the screen.
- Once the Prep Station protocol is finished, after approximately 3 h, carefully
remove the cartridge and place it on a lab-tissue and seal it with a provided
adhesive cover.
- Discard used material in the Prep Station.
- Proceed to Analysis with Digital Analyzer.
Analysis with Digital Analyzer
- Create a Cartridge Definition File (CDF) according to NanoString’s instructions,
using the highest field of view count, and upload it to the Digital Analyzer. The
file maps the reads from each lane in the cartridge to sample specific attributes.
Upload the created CDF-file to the Digital Analyzer prior to starting the analysis .
- Upload the RLF file to the Digital analyzer if it has not been added previously
prior to initiating the analysis.
- Place the cartridge in the Digital Analyzer chose “Add Cartridge” and follow
instructions on screen.
Note: If the Digital Analyzer is quantifying another cartridge, press pause and follow
the instructions to add the new cartridge.
- Follow the on-screen instructions to start the analysis, the analysis takes ~5
hours for a full chip and the instrument can run overnight.
- When the Digital Analyzer is finished, download your RCC files according to
internal documentation (FTP, email, and USB transfer of data is available). If
stored at 2-8°C, the cartridge can be rescanned at least once for at least two
weeks.
RCC file Quality Control
The output from each sample analyzed in the nCounter will automatically be quality controlled
with internal control probes included in the CodeSet.
For NanoString facilities not using the GARD Data Analysis Application (GDAA), each
acquired RCC-file should be quality controlled to assure that the nCounter analysis has been
successful. Samples that fail any of the below described critical quality criteria should not be
used for further analysis in the GARD™skin data analysis pipeline. The critical quality metrics
are imaging quality, linearity of the spike-in RNA control probes, limit of detection (LOD), and
binding density. The imaging quality is calculated as the ratio between the number Fields of
Views (FOV) (predefined in the CDF file as 555) and the number of successfully counted
FOVs. A ratio above 0.75 (>0.75) is required for a sample to pass the imaging quality control.
The linearity of the positive spike-in controls is calculated using the positive control probes

GARDskin Page 31 of 41
(POS_A-E) and their known RNA concentrations. The acquired counts for the positive control
probes and their respective concentrations should be logarithmized (log2) before calculating
the R
2
value of a linear fit to the data points. An R
2
value above 0.95 (R
2
>0.95) is required for a
sample to pass the linearity quality control. The LOD quality control uses all the negative
controls (NEG_A-H) and the positive control E (POS_E). The LOD is defined as the mean
counts of the negative control probes plus 2 standard deviations of the counts, see Equation 4.
(Equation 4)
Where μ and σ are the mean value and the standard deviation of the negative control probes’
counts respectively. For a sample to pass the LOD quality control, the positive control probe
POS_E must be above the estimated LOD (POS_E > LOD). The binding density is a measure
of the number of probes observed per cartridge surface area during the gene expression
acquisition in the Digital Analyzer. For a sample to pass the binding density quality control, the
binding density must be above 0.05 and below 2.25 (0.05< binding density <2.25). For a
summary of the critical quality control parameters, see Table 8.
Table 8. Summary of the critical RCC-file quality control parameters
Quality Metric
Critical parameter
Imaging Quality
>0.75
Linearity
>0.95
Limit of Detection
<POS_E
Binding Density
0.05 - 2.25
In addition to the above described critical quality control parameters, it is also recommended to
count the number of endogenous probes with 0 observed gene counts. If any samples contain
multiple endogenous genes with 0 observed counts, a plausible explanation could be that the
cartridge was analyzed with the wrong version of the RLF file. If this is the case, the affected
cartridge should be rescanned (within two weeks) with the correct version of the RLF file to
maintain sample integrity, and the previously generated RCC files should be discarded. If no
apparent cause could be identified for the presence of multiple endogenous genes with 0
observed gene counts, other troubleshooting actions should be taken (not described herein).
Part result:
For each Sample ID analyzed by NanoString, a NanoString raw data file (RCC-file) is
generated.

GARDskin Page 32 of 41
Data Analysis with GDAA
GDAA is an application that facilitates the endpoint analysis and the RCC file Quality control.
Contact the GDAA support at gdaa.support@senzagen.com to receive a user account and the
appropriate web site to be able to log in to the latest version of the GDAA.
Each sample (except unstim ctrl) analyzed with the GARDskin prediction model by
GDAA will be assigned a decision value (DV).The GARDskin classifications of test
chemicals, negative and positive controls correspond to the mean decision values (DVs) of the
three GARDskin biological replicates.
- For skin sensitizers the mean DV ≥ 0 (UN GHS category 1).
- For non-sensitizers the mean DV < 0.
Important: The RCC files for the test chemical should be analyzed together with relevant
control RCC files i.e. only control samples (unstim, neg and pos) that are stimulated in the
same GARD Main Stimulation as the test chemical.
Log in to the GDAA in a web browser and upload RCC files and annotation files. Annotation
files are prepared according to the instructions under “Information” in the GDAA. The GDAA
will generate a report (PDF format) containing the classifications and quality control. To be
able to verify the integrity of the report, a MD5 checksum is also provided and it is
recommended to save this code.
GARDskin Page 33 of 41
Acceptance Criteria
For the final GARDskin prediction to be valid for a test chemical, the following acceptance
criteria must be met by the test chemical:
Phenotypic Control
All cell stimulations should have been performed with a batch of SenzaCell cells that passed
the acceptance criteria of the Phenotypic Quality Control (Table 9).
Table 9. Acceptance range for phenotypic markers of the SenzaCells.
GARD Main Stimulations
a. Should have been performed in three GARD Main Stimulations where each
GARD Main Stimulation generated one biological replicate of the test chemical.
b. The generated replicates should have passed Relative viability Quality Control.
RNA and RCC file Quality Control
a. At least three replicates should have passed the RNA Quality Control.
b. At least three replicates should have passed the RCC file Quality Control.
GARDskin classifications
a. The classification should be based on three test chemical replicates, each of
which should be derived from a GARD Main Stimulation that also generated:
i. An unstimulated control that passed Absolute viability-, RNA- and RCC
Quality Control.
ii. A positive control that passed Relative viability-, RNA- and RCC Quality
Control.
iii. A negative control that passed Relative viability-, RNA- and RCC
Quality Control.
b. The positive control and negative control should be accurately classified as a
skin sensitizer and a non-skin sensitizer, respectively, by the GARDskin
prediction model, i.e. the mean decision value of the positive control should be
≥ 0 and the mean DV of the negative control should be < 0.
If these criteria cannot be met for a test chemical, the necessary parts of the GARDskin assay
needs to be repeated for the specific test chemical to meet the acceptance criteria.
GARDskin Page 34 of 41
Recording of data
Recommended documentation regarding test chemical information and essential results are
listed below. For a full overview of what to include in a test report see TG xxx.
Test chemical
- Substance ID, i.e. name of the test chemical or a simplified code of your choice (avoid
special characters) used throughout the study to identify the substance. For the
controls use “pos ctrl”, “neg ctrl” and “unstim ctrl”
- Molecular weight, density and purity used in the calculations
- Selected solvent and solvent in-well concentration
- Max screened in-well concentration
- GARD Input Concentration (µM)
- Relative viability at 90% (Yes/No)
Test method conditions
- Cell passage number at cell stimulation
- Phenotypic Quality Control passed (Yes/No)
Cytotoxicity assessment
- Determined GARD Input concentration (µM).
- Relative (or Absolute for unstim ctrl) viability at GARD Input concentration.
- Relevant comments, e.g. if Stock B was bypassed with a 1-step dilution.
GARD Main Stimulations
- In-well test chemical concentration (µM).
- Relative (or Absolute for unstimulated control) viability (%).
RNA Isolation and RNA QC
For each RNA Sample:
- RNA concentration (ng/µl).
- RNA Integrity Number (RIN) or other relevant RNA quality unit.
Endpoint measurement
For each RNA sample analyzed with NanoString:
- NanoString Quality Control passed (Yes/No).
Data analysis
- Save the rendered report files of the predictions.
Results
- Number of replicates meeting acceptance criteria with respect to Relative viability, RNA
QC and NanoString QC.
- GARDskin prediction results.
GARDskin Page 35 of 41
Test Report
See OECD TG 442E for full list of information to report.
Annexes
Annex 1. FBS assessment
Annex 2. Antibody titration
Annex 3. SenzaCell Phenotype
Annex 4. Cell population
GARDskin Page 36 of 41
Annex 1. FBS assessment
The SenzaCell cell line provided by SenzaGen AB to a licensed CRO are accompanied with a
previously assessed lot of Fetal Bovine Serum (FBS). New lots of FBS must be assessed to
assure that it can support the phenotypic characteristics of SenzaCells. This is done by
culturing the cells for 10 passages (or longer) with a previously assessed lot of FBS in parallel
with the new lot of FBS. Cell growth and phenotypic characteristics are analysed at regular
intervals throughout the assessment. Thawing, maintenance of cells at every passage and
Phenotypic QC are performed as previously described in this protocol.
The FBS assessment is performed as follows:
- Prepare semi-complete medium with both control FBS (Control semi-complete
medium) and new FBS (New semi-complete medium).
- Thaw a vial of cells and seed in Control complete medium (Passage 0).
- The next day, count and seed half the cells in Control complete medium and the other
half in New complete medium (Passage 1).
- For passages 2-3, maintain the cells and seed in 20 ml Control and New complete
medium, respectively.
- The FBS assessment is initiated at passage 4. For passages 4-10, at each passage,
count the cells, perform a Phenotypic QC and seed in 20 ml Control and New complete
medium.
- After passage 10, if seven Phenotypic QC records have been obtained, the cells can
be discarded.
- A prolonged evaluation may be necessary depending on the results.
Acceptance criteria
The new FBS lot must fulfil the following criteria for it to be accepted for use in a Study:
- Cells grown in the new FBS lot must pass all Phenotypic QC criteria in at least 5 of the
7 recordings.
- Cells grown in the new FBS lot must display a cell growth where the cell density is
±30% of the cell density in the control FBS in at least 5 of the 7 cell density recordings
in passages 4-10.

GARDskin Page 37 of 41
Annex 2. Antibody titration
The antibodies to be used for phenotypic control of Senza Cells shall be titrated (Ab
list in Annex 2 Table 1). The antibody titrations should be perfomed on SenzaCells
everytime a different brand, product number or of if a new batch within the same brand
and product number is used. The staining with antibodies should reach saturation
while using as small amount of antibodies as possible. Cell preparation, staining
incubation, and flow cytometry analyses are performed as in section Phenotypic
Quality Control. Include the Isotype controls as gating reference during the titrations.
Annex 2 Table 1. Antibodies used in the Phenotypic Quality Control.
Sample
FITC conjugated antibodies
PE conjugated antibodies
Sample 1
Mouse polyclonal anti-IgG1-FITC
Mouse polyclonal anti-IgG1-PE
Sample 2
Mouse anti-human CD86-FITC
Mouse anti-human CD54-PE
Sample 3
Mouse anti-human HLA-DR-FITC
Mouse anti-human CD80-PE
Sample 4
Mouse anti-human CD34-FITC
Mouse anti-human CD14-PE
Sample 5
Mouse anti-human CD1a-FITC
None
The phenotypic biomarker antibody titration is performed as follows:
- Wash and prepare the cells for staining as in section Phenotypic Quality Control.
- Stain the cells with the antibodies by adding different volumes, for an example, see Annex 2
Table 2, including the concentration suggested by the supplier.
- If the volume for the antibody to be used for costaining is known (Annex 2 Table 1), costain the
cells keeping the concentration of the costaining antibody constant. If both antibody
concentrations are unknown, titrate both separately and then test the chosen concentrations
costained, to detect any quenching effects.
- Choose the concentration of the new antibody at the saturation point.
The Isotype antibody titration is performed as follows:
When assessing one of the Isotype antibody controls, a titration range is performed to assess that there
is no unspecific staining. If the isotype control antibody has been used previously (i.e. from same brand
and same product number) it only has to be tested at the concentration previously used (e.g 2 µl) and
one concentration above (see Annex 2 Table 2). Laboratory procedure is the same as for other antibody
titrations described above.

GARDskin Page 38 of 41
Annex 2 Table 2. Example of titration volumes for Ab titration.
Volume (μl) of old Ab and/or
recommended volume
according to Ab producer.
0.5
1
1.5
2
2.5
3
Recommended titration
volumes (μl) of new Ab.
0.25
0.5
0.5
1
1.5
2
0.5
0.75
1
1.5
2
2.5
0.75
1
1.5
2
2.5
3
1
1.5
2
2.5
3
3.5
1.25
2
2.5
3
3.5
4
1.5*
2.5
3
3.5
4
4.5
-
3*
3.5*
4*
4.5*
5*
Total volume of new Ab
needed for titration (μl)
5.25
11.25
14
17.5
21
24.5
*If no saturation is seen, increase the Ab concentration.
The lowest concentration generating maximum fluorescence is selected. For representative figures of
each antibody staining of SenzaCells see Annex 3. The GARDskin phenotypic control acceptance
criteria is shown inTable 9.

GARDskin Page 39 of 41
Annex 3. SenzaCell Phenotype
An example of the SenzaCell phenotype is visualized in Annex 3 Figure 1.
Annex 3 Figure 1. PE/FITC scatter plots of mAb stained SenzaCell cells for phenotypic control.
Absolute
viability
GARDskin Page 40 of 41
Annex 4. Cell population
During analysis of the viable cell population it is important to keep track of the “Cells”
population in the FSC(-A)/SSC(-A) scatter plot and the diagonal displacement of the “Absolute
viability” population in the PE/FITC scatter plot. Annex 4 Figure 1 is visualizing the FSC(-
A)/SSC(-A) scatter plot and PE/FITC scatter plot for cells stimulated with 400 µM (A) and 100
µM (B), respectively. A low fraction of “Cells” can give a false percentage of Absolute viability,
see Annex 4 Figure 1A.
Annex 4 Figure 1. FSC/SSC and PE/FITC scatter plots of cells stimulated with a test chemical at 400 µM (A) and at 100 µM (B).
Absolute
viability
Absolute
viability
A
B
GARDskin Page 41 of 41
Bibliography
Scientific Publications
Johansson H., Gradin R., Johansson A., Adriaens E., Edwards A., Zuckerstätter V., Jerre A.,
Burleson F., Gehrke H., Roggen E. Validation of the GARD™skin assay for assessment of
chemical skin sensitizers – ring trial results of predictive performance and
reproducibility.Toxicological Sciences. May 17, 2019.
Gradin R., Lindstedt M., Johansson H. Batch Adjustment by Reference Alignment (BARA):
Improved prediction performance in test sets with batch effects. PLOSOne, 2019.
Gradin, R., Forreryd, A., Mattson, U., Jerre, A. and Johansson, H. (2021). Quantitative
Assessment of Sensitizing Potency using a dose-response adaptation of GARDskin. Sci. Rep,
Manuscript in press.
Zeller K. S., Forreryd A., Lindberg T., Gradin R., Chawade A., and Lindstedt M. The GARD
platform for potency assessment of skin sensitizing chemicals. ALTEX Online first published
April 12, 2017.
Johansson H., Gradin R., Forreryd A., Agemark M., Zeller K., Johansson A., Larne O., van
Vliet E., Borrebaeck C., Lindstedt M. Evaluation of the GARD assay in a blind Cosmetics
Europe study. ALTEX Online first, 2017.
Forreryd A., Zeller K., Lindberg T., Johansson H., Lindstedt M. From genome-wide arrays to
tailor-made biomarker readout – Progress towards routine analysis of skin sensitizing
chemicals with GARD. Toxicolgy In Vitro, 2016.
Forreryd A., Johansson H., Albrekt A.S., Lindstedt M. Evaluation of high throughput gene
expression platforms using GARD – an assay for prediction of skin sensitization based on a
genomic biomarker signature. BMC Genomics, 2014.
Johansson H., Rydnert F., Kuehnl J., Schepky A., Borrebaeck C.A.K., Lindstedt M. GARD in-
house validation – A proof of concept. Tox Sci, 2014.
Johansson H., Lindstedt M. Prediction of skin sensitizers using alternative methods to animal
experimentation. Basic Clin Pharmacol, 2014.
Johansson H. GARD - Genomic Allergen Rapid Detection. A testing strategy for assessment
of chemical sensitizers. Academic Doctoral Thesis, 2013.
Johansson H., Albrekt A.S., Borrebaeck C.A.K., Lindstedt M. The GARD assay for
assessment of chemical skin sensitizers. Toxicol In Vitro, 2013.
Lindstedt M., Borrebaeck C.A.K. Pattern rules: biomarker signatures for sensitization as an
alternative to animal testing. Biomark Med, 2011.
Johansson H., Albrekt A.S., Lindstedt M., Borrebaeck C.A.K. A genomic biomarker signature
can predict skin sensitizers using a cell-based in vitro alternative to animal tests. BMC
Genomics, 2011.
