
Australian ETA App
Guidance notes for industry users

Page 2 of 16
Australian ETA App – Guidance notes for industry users
Table of Contents
1. Australian ETA App eligibility 3
2. Downloading the Australian ETA App 3
3. Getting Started 3
4. Travel agent requirements 4
5. Commencing an ETA application 4
6. Scanning the applicant’s passport 5
7. Reading the ePassport chip 6
7.1. All passports (except passports from United States of America) 6
7.2. United States of America (USA) 7
8. Confirm biographic information 8
9. Taking the applicant’s photo 9
10. Other passports and existing visas 9
11. Personal Information 10
11.1. Alias and home information 10
11.2. Email verification 11
11.3. Confirm profile 11
12. ETA questions 12
13. Payment 13
13.1. Payment for a single applicant 13
13.2. Payment for multiple applications 14
13.3. Unable to submit an application 15
14. Technical support 15
14.1. System maintenance 15
14.2. Contact us and delete travel agent details 16
Page 3 of 16
Australian ETA App – Guidance notes for industry users
1. Australian ETA App eligibility
The Australian ETA App can be used by, or on behalf of, passport holders from Electronic
Travel Authority (ETA) eligible countries to apply for an ETA. Please see Eligible ETA countries
for a full list.
Applications can be made by individual applicants or by travel industry representatives (travel
agents and airlines) on behalf of applicants.
Industry users must use a mobile device that has Near Field Communication (NFC)
functionality.
2. Downloading the Australian ETA App
The app is available to download for free onto your own mobile device, from both the Apple and
Google app stores. You can search for “AustralianETA” or use the following links: Apple Store
(Apple) or Google Play store (Android)
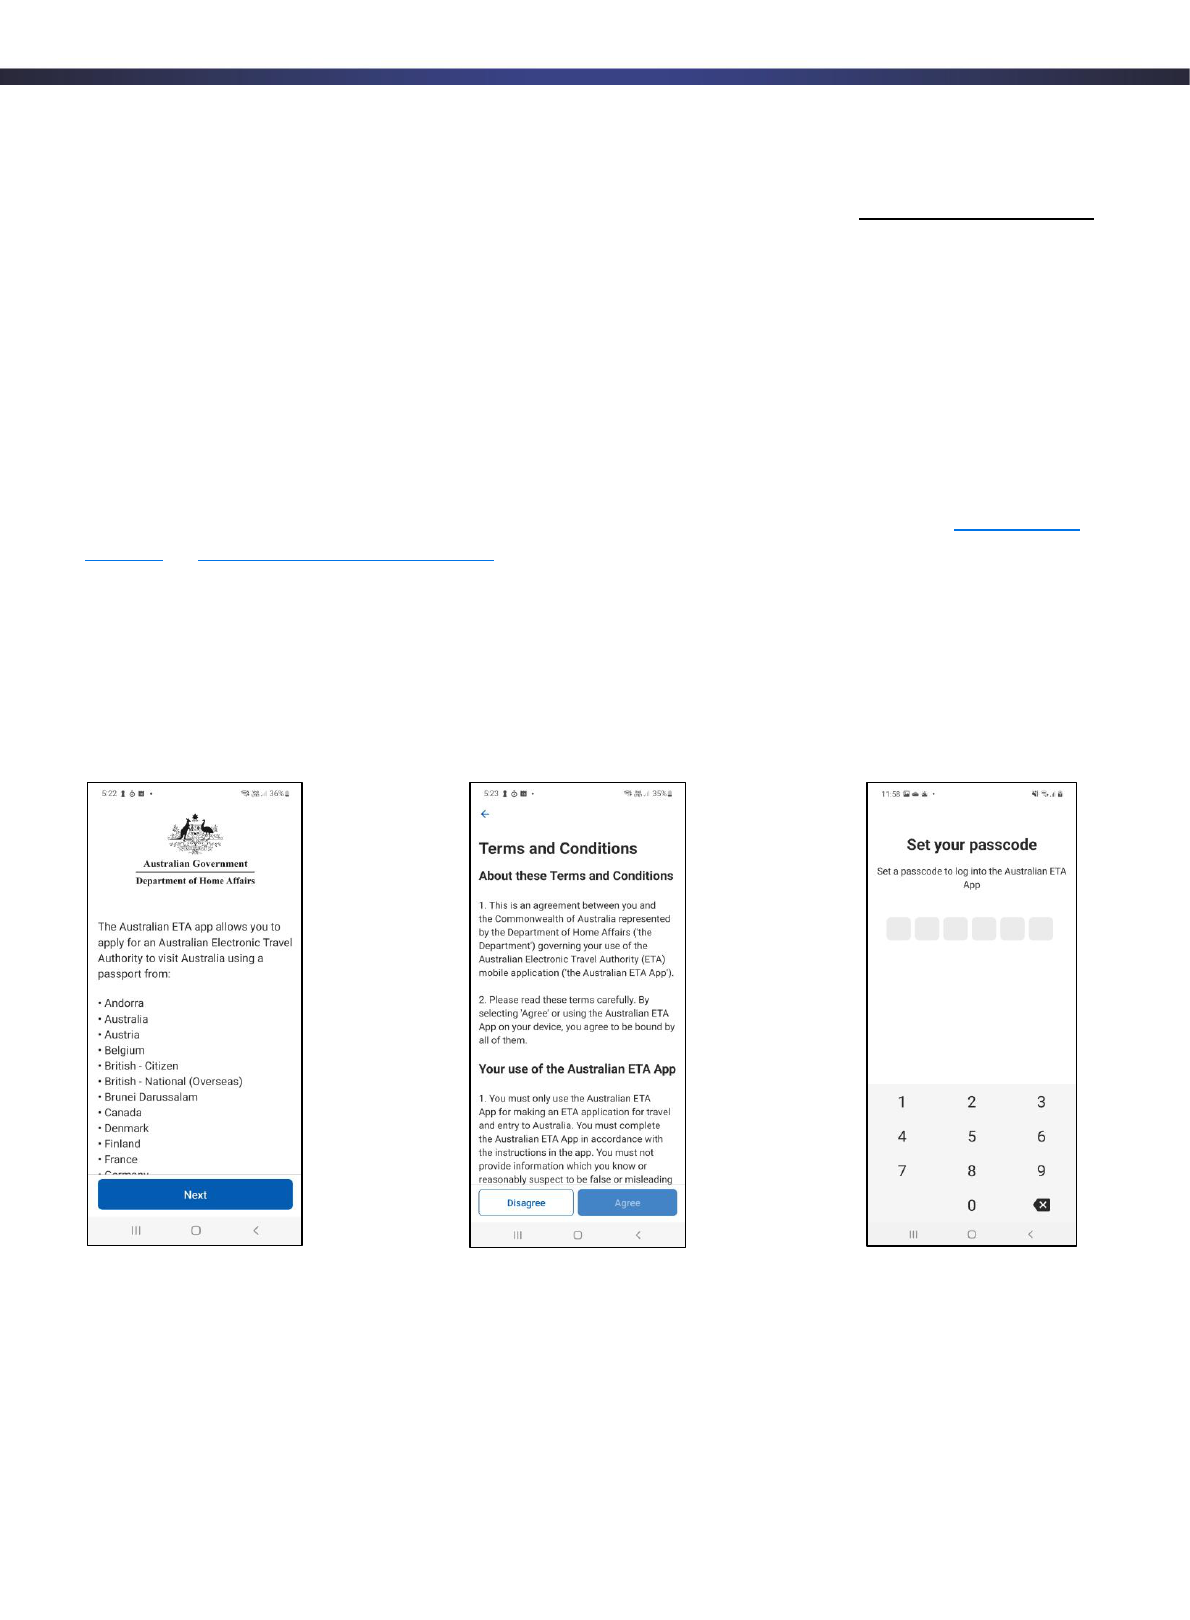
3. Getting Started
Once the app is downloaded and opened, it first takes the user through a series of screens,
including the screens shown below, with information on eligible countries, terms and conditions
for using the Australian ETA App and establishing security settings.
You must read and ‘Agree’ to the terms and conditions of using the app before you can
proceed.
You must set a passcode to ensure that personal applicant information available on the app is
protected. You will also have the option to enable a ‘biometric’ log in. This is the biometric used
to unlock your mobile device.
Page 4 of 16
Australian ETA App – Guidance notes for industry users
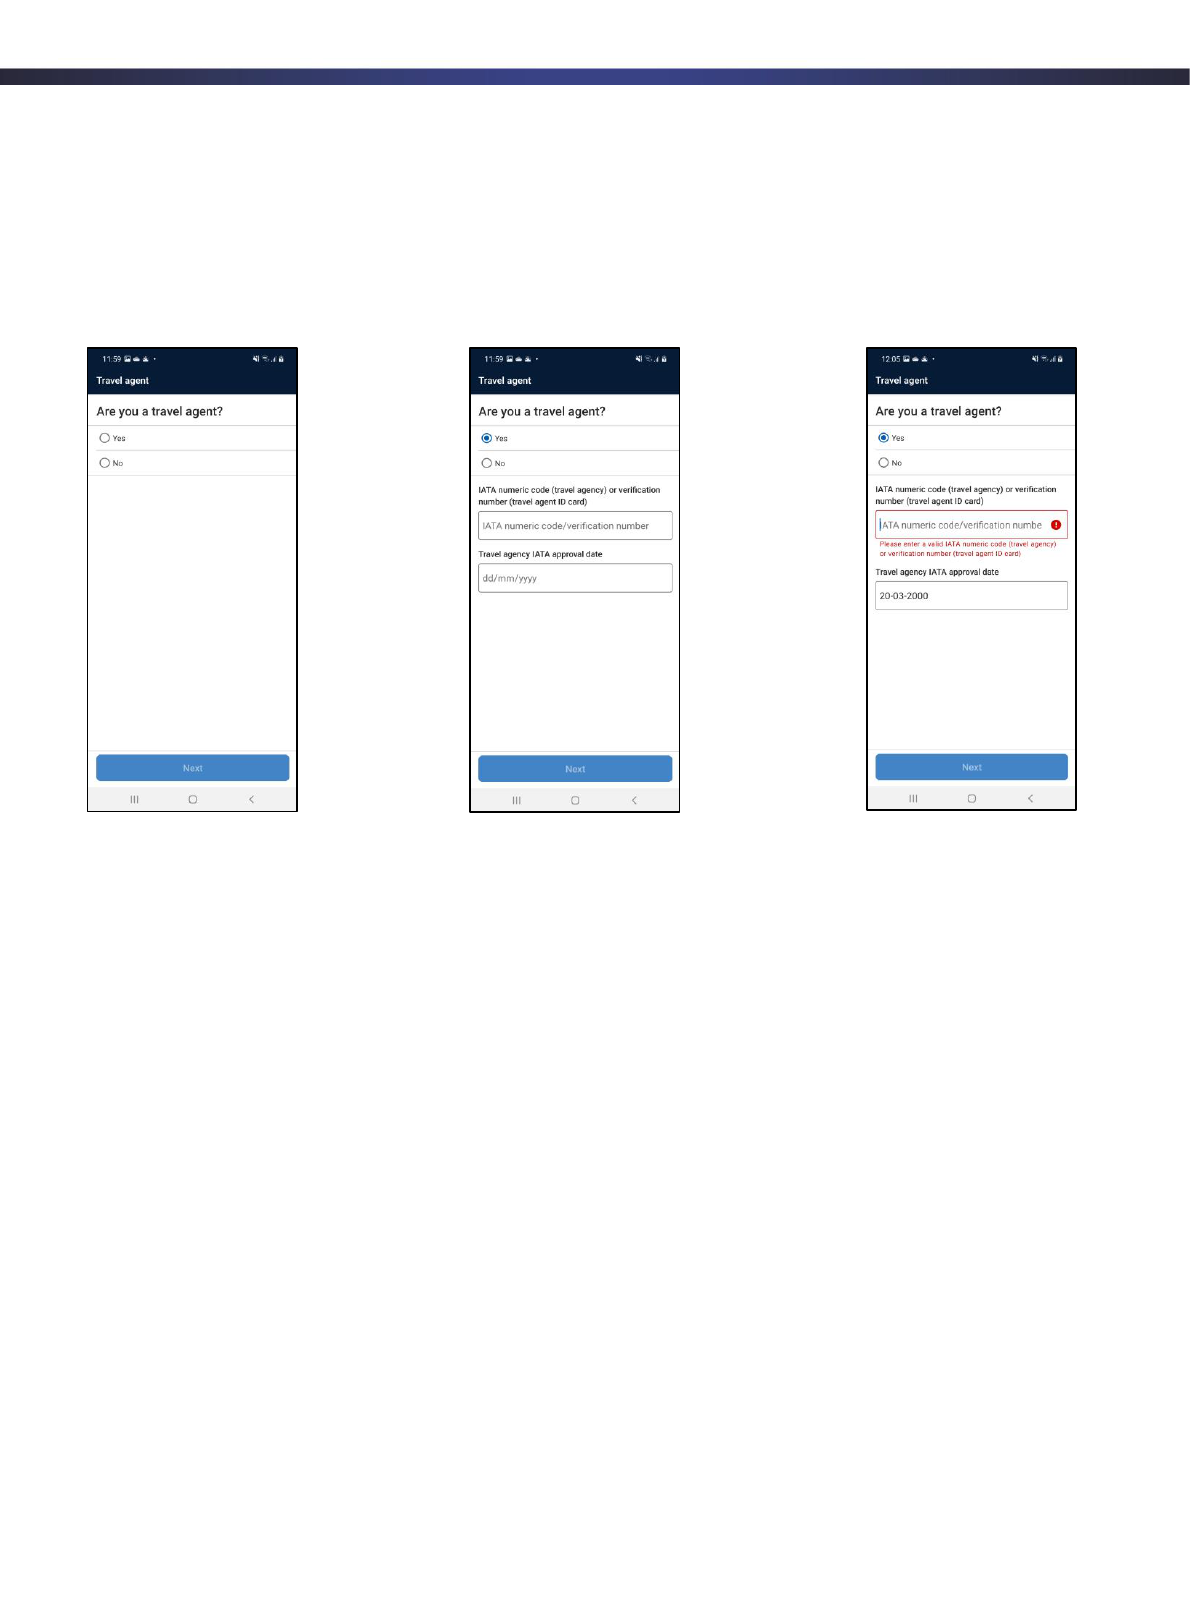
4. Travel agent requirements
The app asks if you are a travel agent.
Travel agents and airline representatives must answer “Yes”. You will then be required to enter
your IATA numeric code (travel agency) or verification number (travel agent ID card), followed
by your travel agency IATA approval date.
If the IATA details are incorrect, you will see an error message, as shown in the third image
above, requesting you to enter valid details. If you are unsure of your details or if your
accreditation has expired, you will need to obtain your details or accreditation directly from
IATA. This information cannot be provided by the Australian Department of Home Affairs.
You will also not be able to proceed if your mobile device is not NFC enabled.
Once your IATA details are verified, you are then able to commence a new ETA application.
The IATA details are only required to be entered once after the first download and use of the
app.
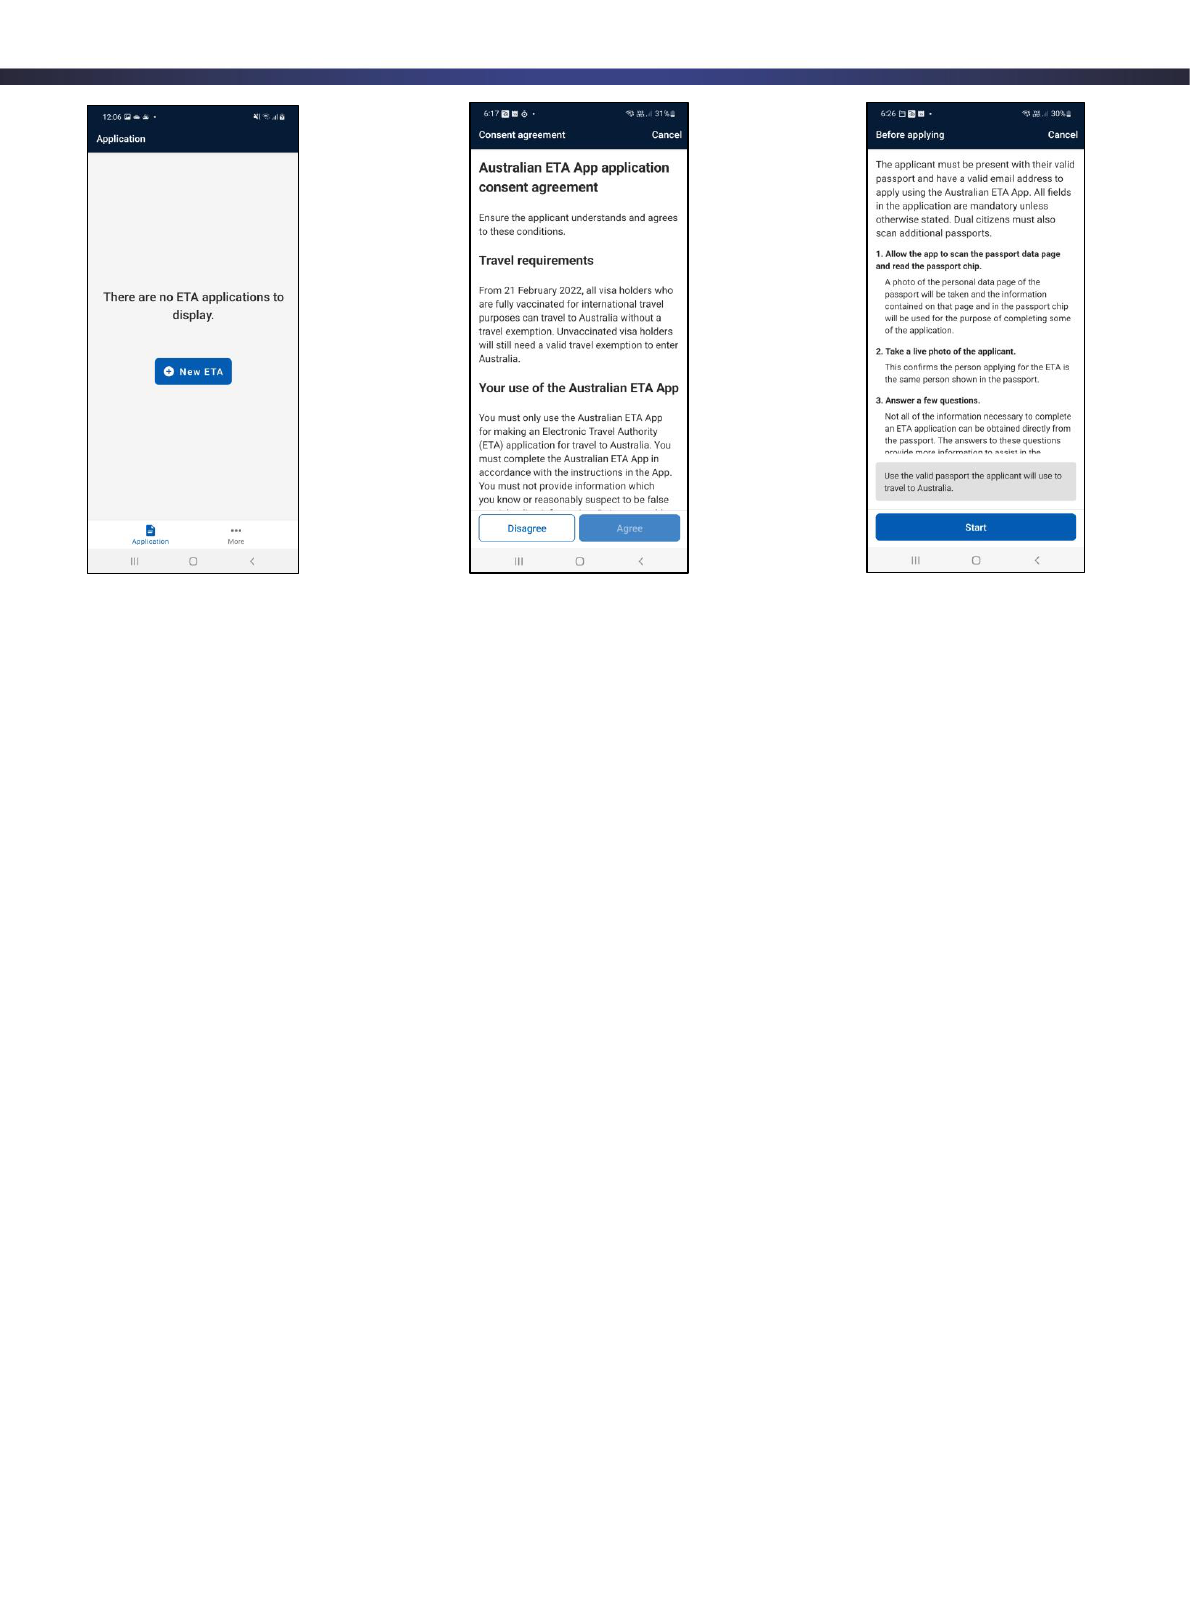
5. Commencing an ETA application
After completing the above steps, you will arrive at the application ‘Home’ screen. Prior to
commencing an ETA application, the applicant must be physically present with you, have their
passport with them and have access to their nominated email account.
When you’re ready to commence the application, press the “New ETA” button (as shown in the
first screen image on the next page).
The applicant must read and “Agree” to the terms of the Australian ETA App application consent
agreement before you can proceed.
Page 5 of 16
Australian ETA App – Guidance notes for industry users
The “Before applying” screen (as shown in the third image above) outlines the main steps
required to assist an applicant with their ETA application. These steps are also described below.
The first steps will require you to scan the applicant’s passport and read the passport chip. The
biographic information captured from the passport during these steps will be automatically
populated into the ETA application. You will not have to enter these details manually.
You will then be required to take a live photo of the applicant. The photo is used to confirm that
the applicant is the same person shown in the passport and should be a good quality passport
style photo.
The app will provide guidance on how to complete these steps, with links to guidance videos
provided for further assistance.
To finalise the application, you will then need to ask the applicant a series of questions.
To protect the privacy of applicants, application information cannot be saved on industry
registered mobile devices. Once an application is submitted or if the app is closed for any
reason throughout the application process, all applicant and application information will be
deleted.
6. Scanning the applicant’s passport
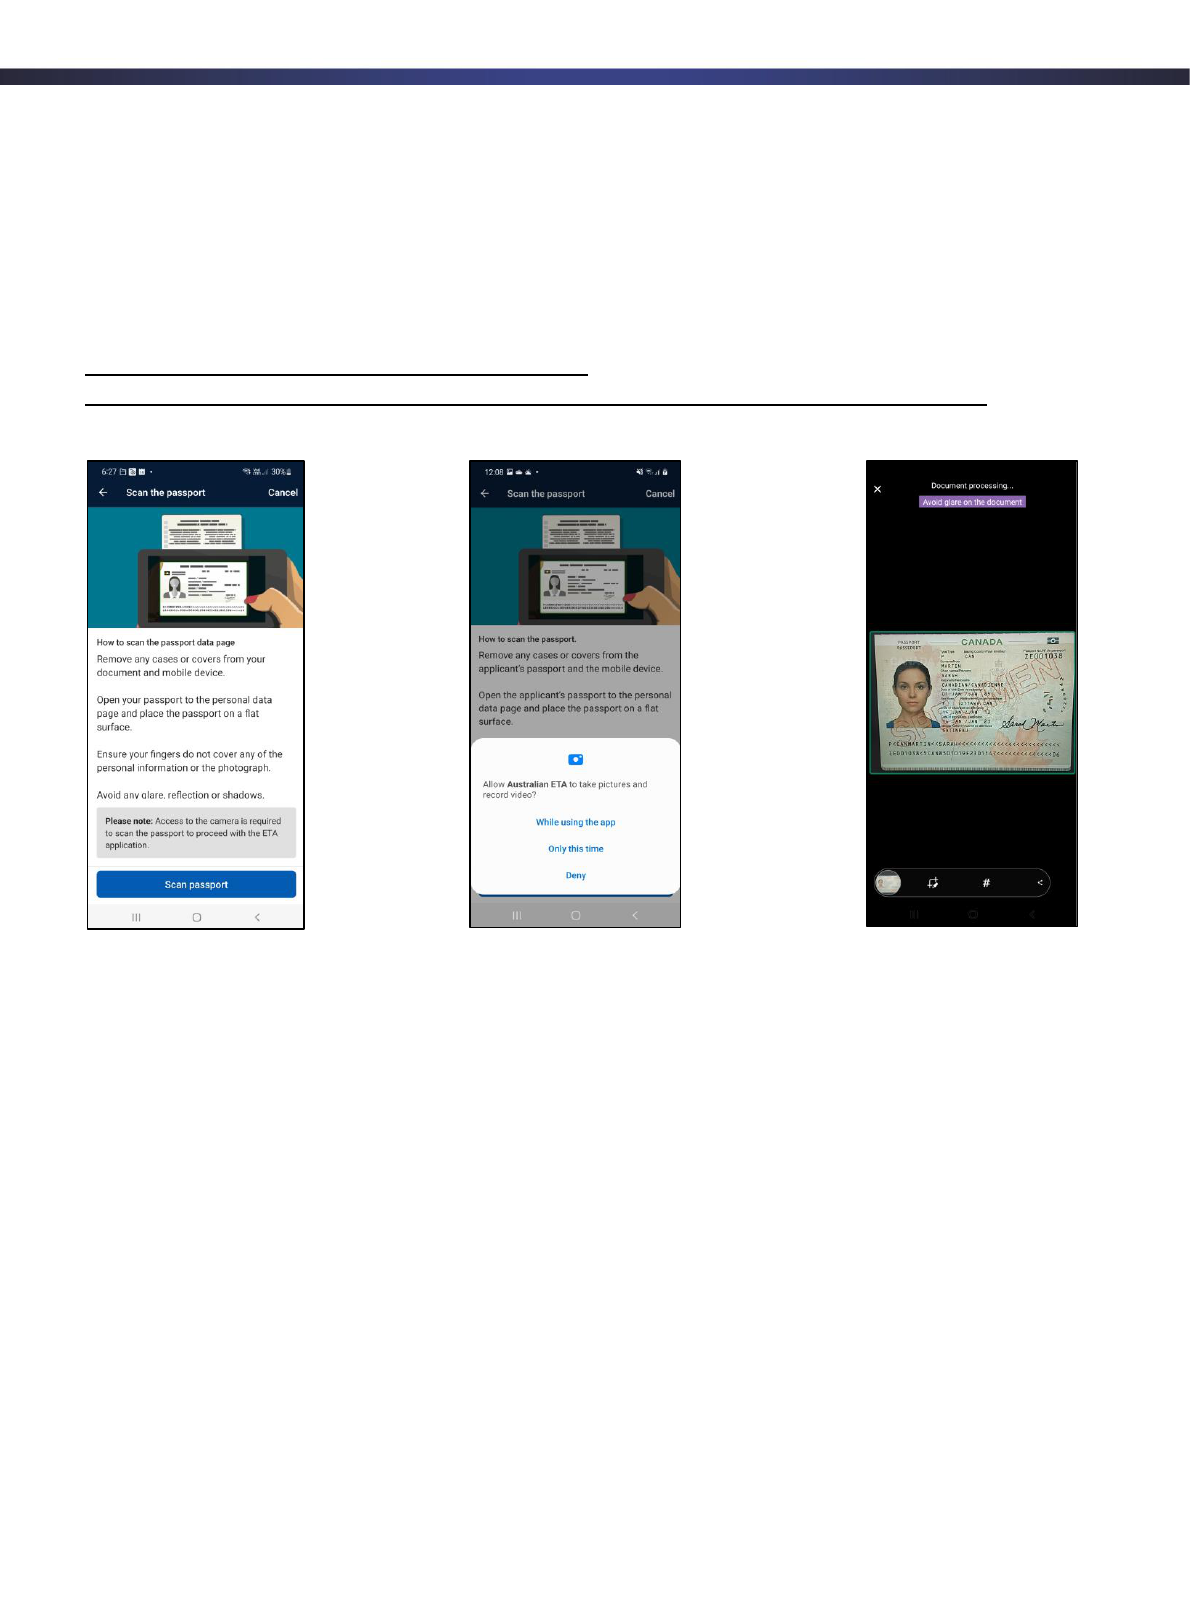
You will need the applicant’s passport.
You will need to remove any covers from both the mobile device and the passport.
Open the passport to the personal data page, as can be seen in the first screen image of the
next page, and place it on a flat surface.
It is important that nothing is covering the personal information, photo or machine readable zone
(MRZ) of the passport. This includes fingers, glare, reflections or shadows.
You will need to allow the mobile device to take pictures and record videos if prompted, as
shown in the second screen image on the next page.
Page 6 of 16
Australian ETA App – Guidance notes for industry users
To scan the passport, the mobile device can be held in landscape (with the mobile device held
sideways as shown in the first image below) or in portrait (as shown in the third image below).
Once the passport is framed appropriately inside the ‘green’ box, it will scan the passport
automatically. If the framing box is red, the app will prompt you to adjust the mobile device to
make sure the document is captured correctly. The prompts will appear in a text box at the top
of the screen, as pictured in the third screen image below.
A guidance video is available at the following hyperlinks to assist users with this step:
ETA App Video - eta-scan-data (vbrickrev.com) or
https://bordertv.au.vbrickrev.com/#/videos/2d607dd8-829b-408c-8eb5-4005b7e5ef60
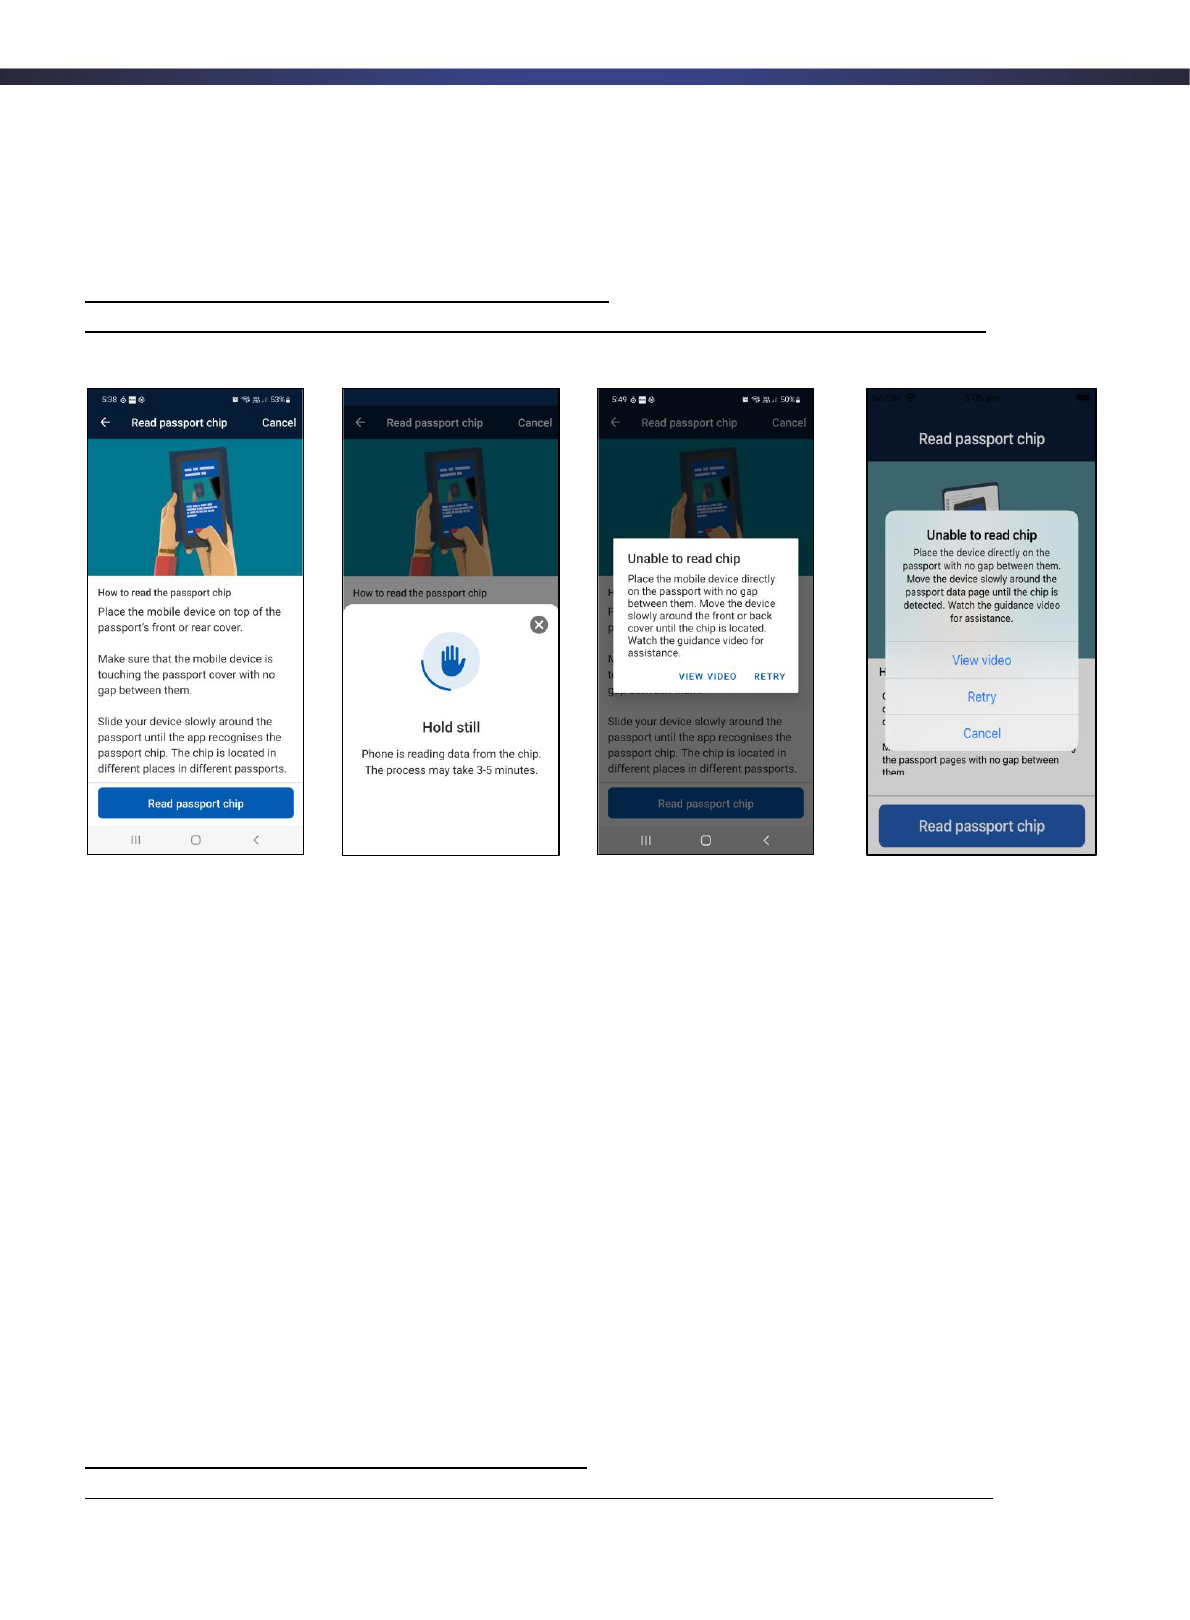
7. Reading the ePassport chip
The location of ePassport chips can differ between countries. For this reason, you may need to
try the front cover, the back cover, or for USA passports, inside the document. For this reason,
passports from the USA have separate instructions.
7.1. All passports (except passports from United States of America)
To read the chip, place the mobile device directly on top of the passport’s front or back cover,
as shown in the first image on the next page. There should be no gap between your mobile
device and the passport.
As the chip is located in different places on different countries’ passports, you will need to slowly
slide the mobile device around the document (top, middle and bottom) until the app finds and
recognises the passport chip.
When the chip is located, you will see a message saying “Hold still” if using an Android device,
as shown in the second image below. On an Apple device you will see a yellow progress bar in
the background. Do not move the mobile device from its location on the passport while the chip
is being read.
Page 7 of 16
Australian ETA App – Guidance notes for industry users
If the chip cannot be read, you will see an error message as pictured below in the third and
fourth images from Android and Apple devices, respectively. You will be able to view the
guidance video or retry the chip read. For Apple devices, there is also a ‘cancel’ option to return
to the instruction screen.
A guidance video is available at the following hyperlinks to assist users with this step:
ETA App Video - eta-eChip-other (vbrickrev.com) or
https://bordertv.au.vbrickrev.com/#/videos/3f24932c-d86b-4367-bd66-99d9225203ce
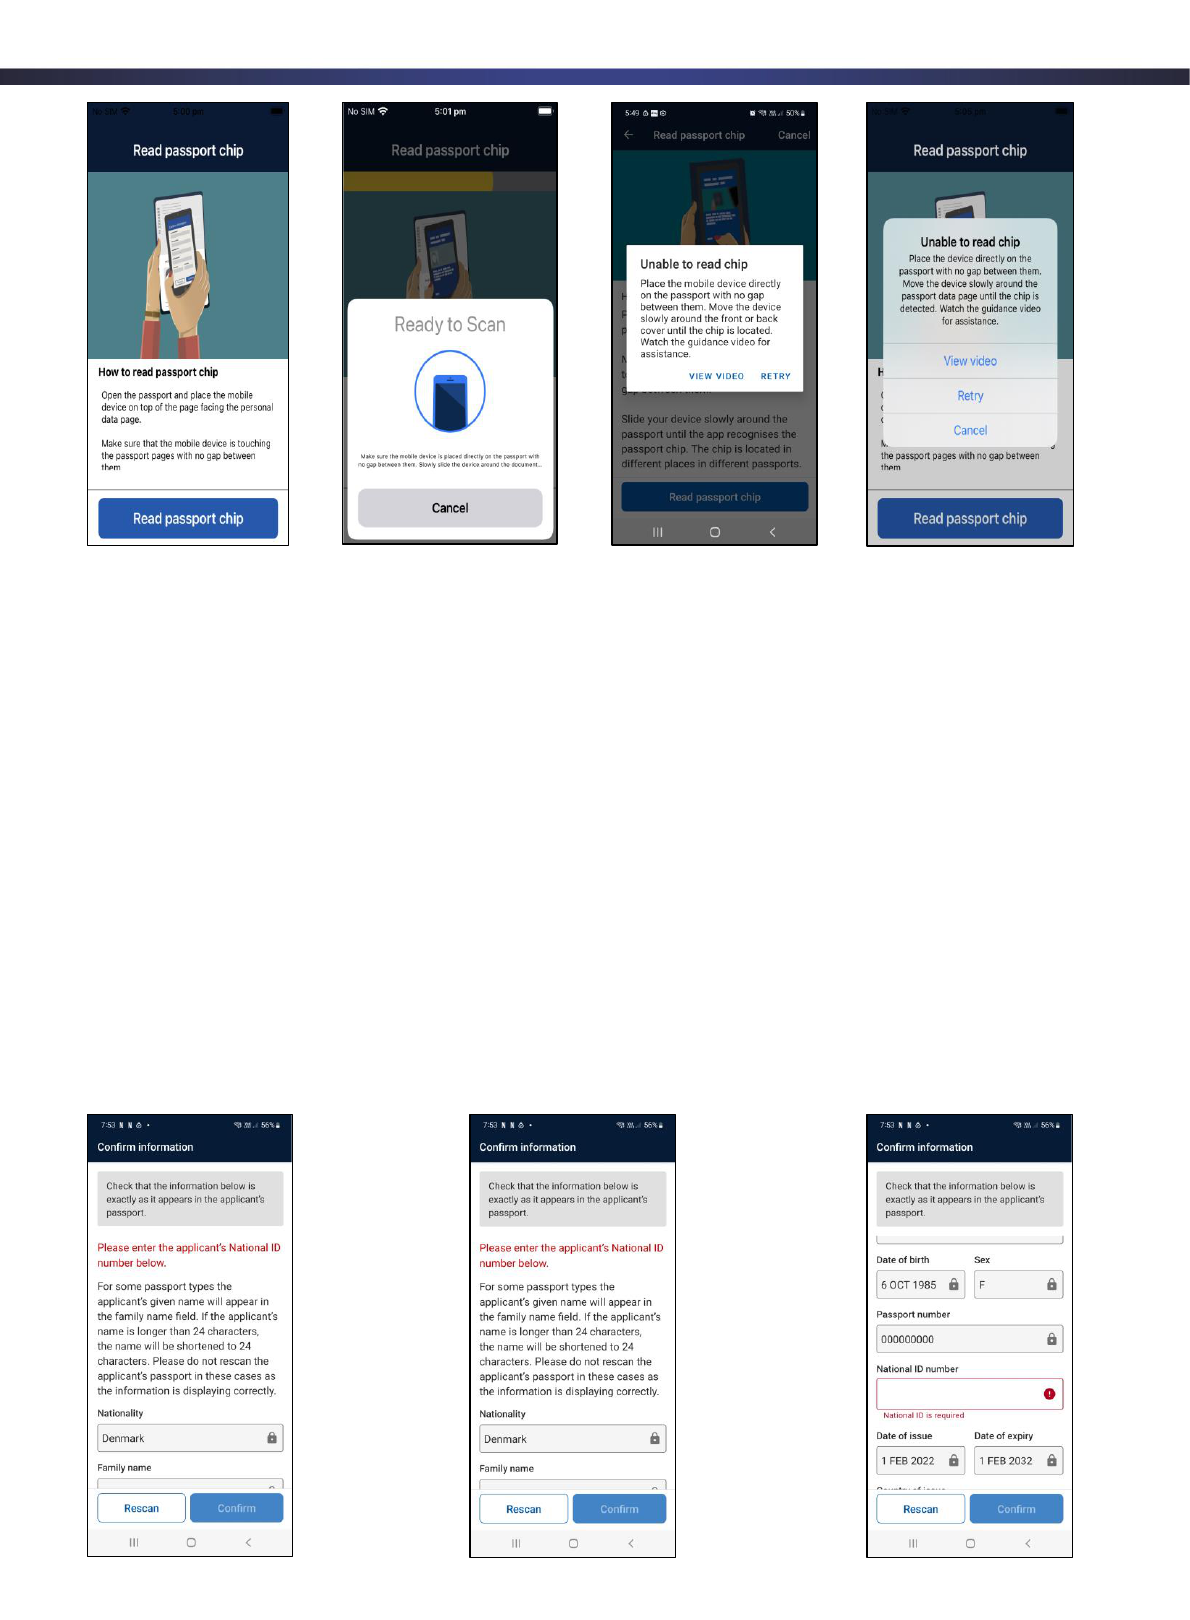
7.2. United States of America (USA)
To read the chip for USA passports, you must open the passport to the personal data page, as
shown in the first screen image on the next page.
Place the device directly on top of the page opposite the personal data page. There should be
no gap between your mobile device and the passport. Slowly slide the mobile device up and
down the document until the app recognises the passport chip.
When the chip is located, you will see a message saying “Hold still” if using an Android device.
For an Apple device, you will see a yellow progress bar in the background, as shown in the
second image on the next page. Do not move the mobile device from its location on the
passport while the chip is being read.
If the chip cannot be read, you will see an error message as pictured on the next page in the
third and fourth images from Android and Apple devices, respectively. You will be able to view
the guidance video or retry the chip read. For Apple devices, there is also a ‘cancel’ option to
return to the instruction screen.
A guidance video is available at the following hyperlinks to assist users with this step:
ETA App Video - eta-echip-usa (vbrickrev.com) or
https://bordertv.au.vbrickrev.com/#/videos/08294c2c-91a6-4d09-a696-bd41a76866d0
Page 8 of 16
Australian ETA App – Guidance notes for industry users
8. Confirm biographic information
The biographic information will be automatically populated into the ETA application. Please
check that the applicant’s details are the same as detailed on their passport. If the information is
incorrect, please rescan the passport.
Some countries are no longer including their citizens’ National Identity (ID) numbers on their
passports. In these instances the app will prompt you to manually add the applicant’s National
ID number to the application. Please see the second screen image below.
Please note that for some countries, a person’s ‘given name/s’ appear in the MRZ and on the
chip as part of their ‘family name’. In these cases, the information is being presented correctly
and the passport should not be rescanned.
Where a person’s given and/or family names are longer than 24 characters, the name will also
be shortened to the first 24 characters. In these cases, the information is being presented
correctly and the passport should not be rescanned.
Page 9 of 16
Australian ETA App – Guidance notes for industry users
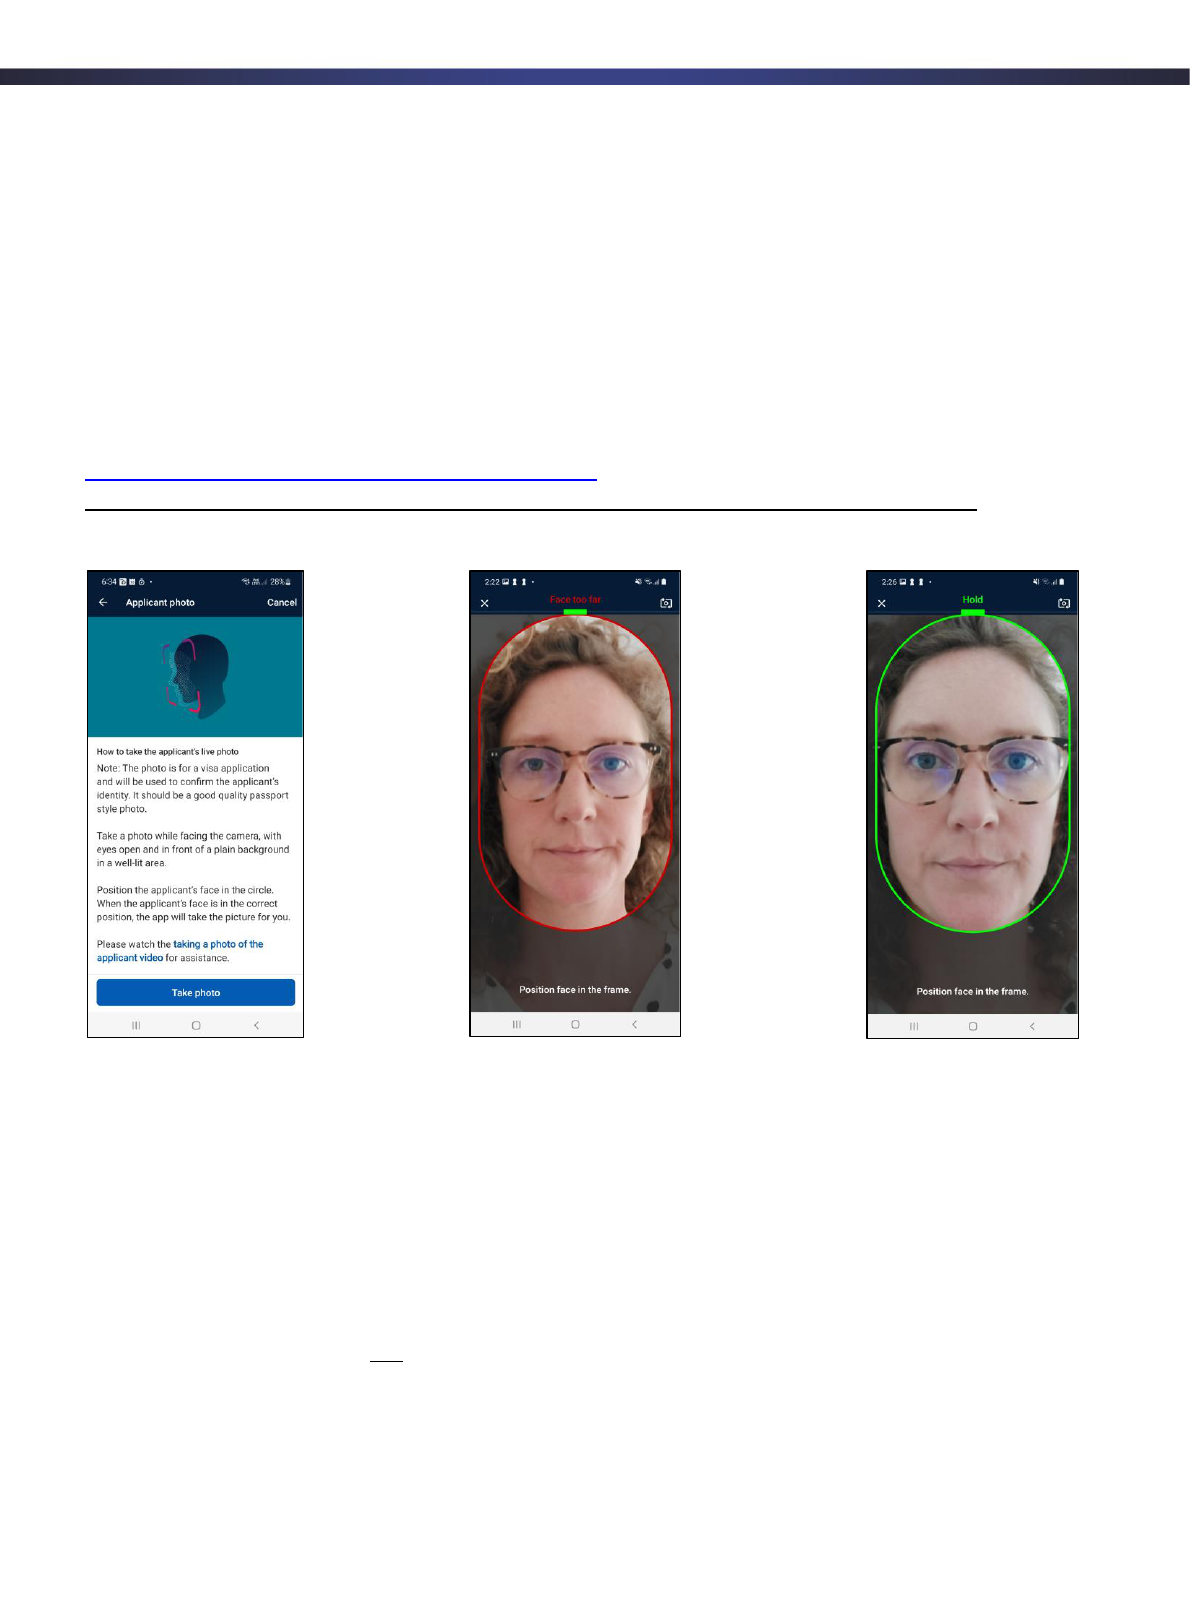
9. Taking the applicant’s photo
You will be required to take a live photo of the applicant. The photo is used to confirm that the
applicant is the same person as shown in the passport.
The photo should be a good quality passport style photo.
The applicant must be facing the camera. They should be standing in front of a plain
background in a well-lit area, avoiding direct overhead lighting if possible. While glasses can be
worn, heavy rimmed glasses will make it difficult to capture the photo. At times it may be
necessary for the applicant to remove their glasses.
A guidance video is available at the following hyperlinks to assist users with this step:
ETA App Video - eta-take-photo (vbrickrev.com) or
https://bordertv.au.vbrickrev.com/#/videos/03cc38fc-d065-4507-92c3-01d45f76e6e1
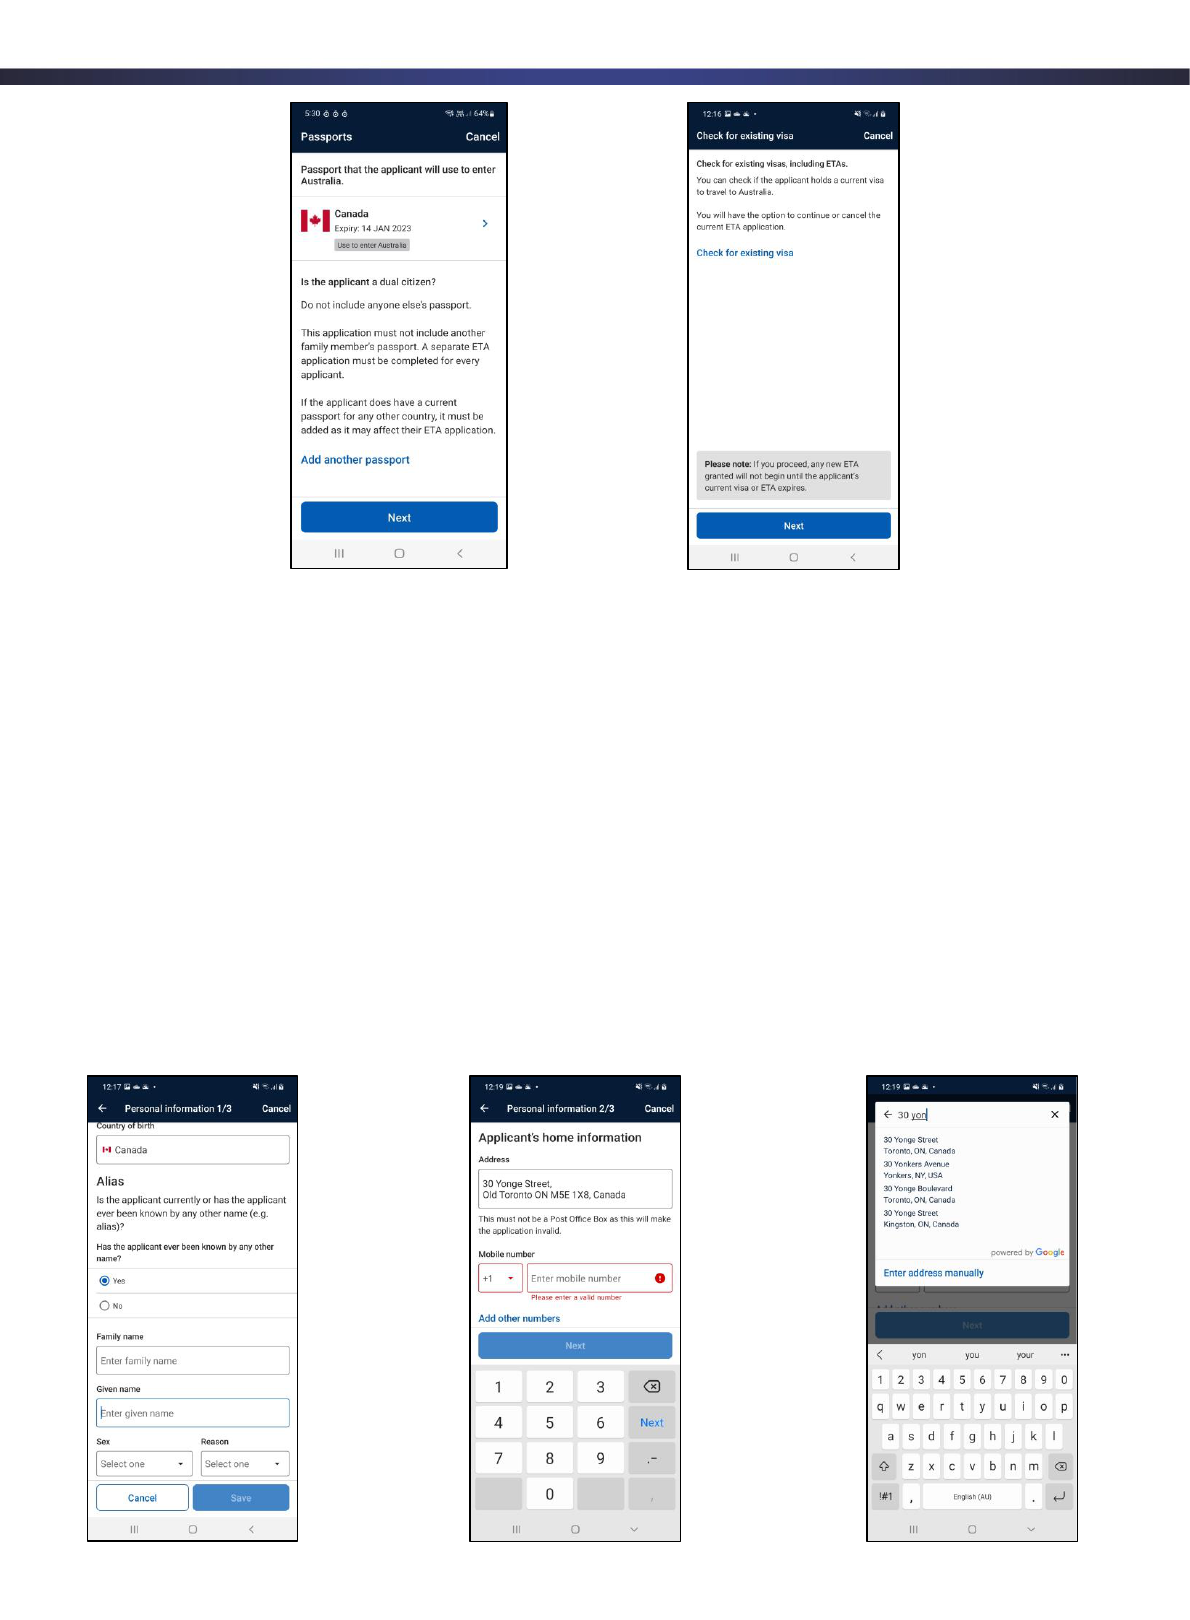
10. Other passports and existing visas
Some applicant’s may be dual nationals, meaning they may hold a passport in their name for
another country.
If you are assisting an applicant who is a dual national, please click on the “Add another
passport” link, as shown in the first image on the next page, and add their other passport/s for
another country/countries.
Please note that you must not add a passport for any other person, including a family member.
Each ETA application is for one individual applicant only.
You can check if an applicant has an existing visa. This may assist in determining whether they
require an ETA or not.
Page 10 of 16
Australian ETA App – Guidance notes for industry users
11. Personal Information
11.1. Alias and home information
If the applicant is known by any other name, you will need to enter their details into the
application.
You will also need to add the applicant’s address and phone number.
The app includes address look-up functionality. Once you start typing the address you can
select the correct address from the drop down menu, if it appears.
Some addresses may not display in the drop down menu. In these cases you can select to add
the address manually. The link can be seen in the third screen image below.
Phone numbers must be provided in the correct format for the selected home country.
Page 11 of 16
Australian ETA App – Guidance notes for industry users
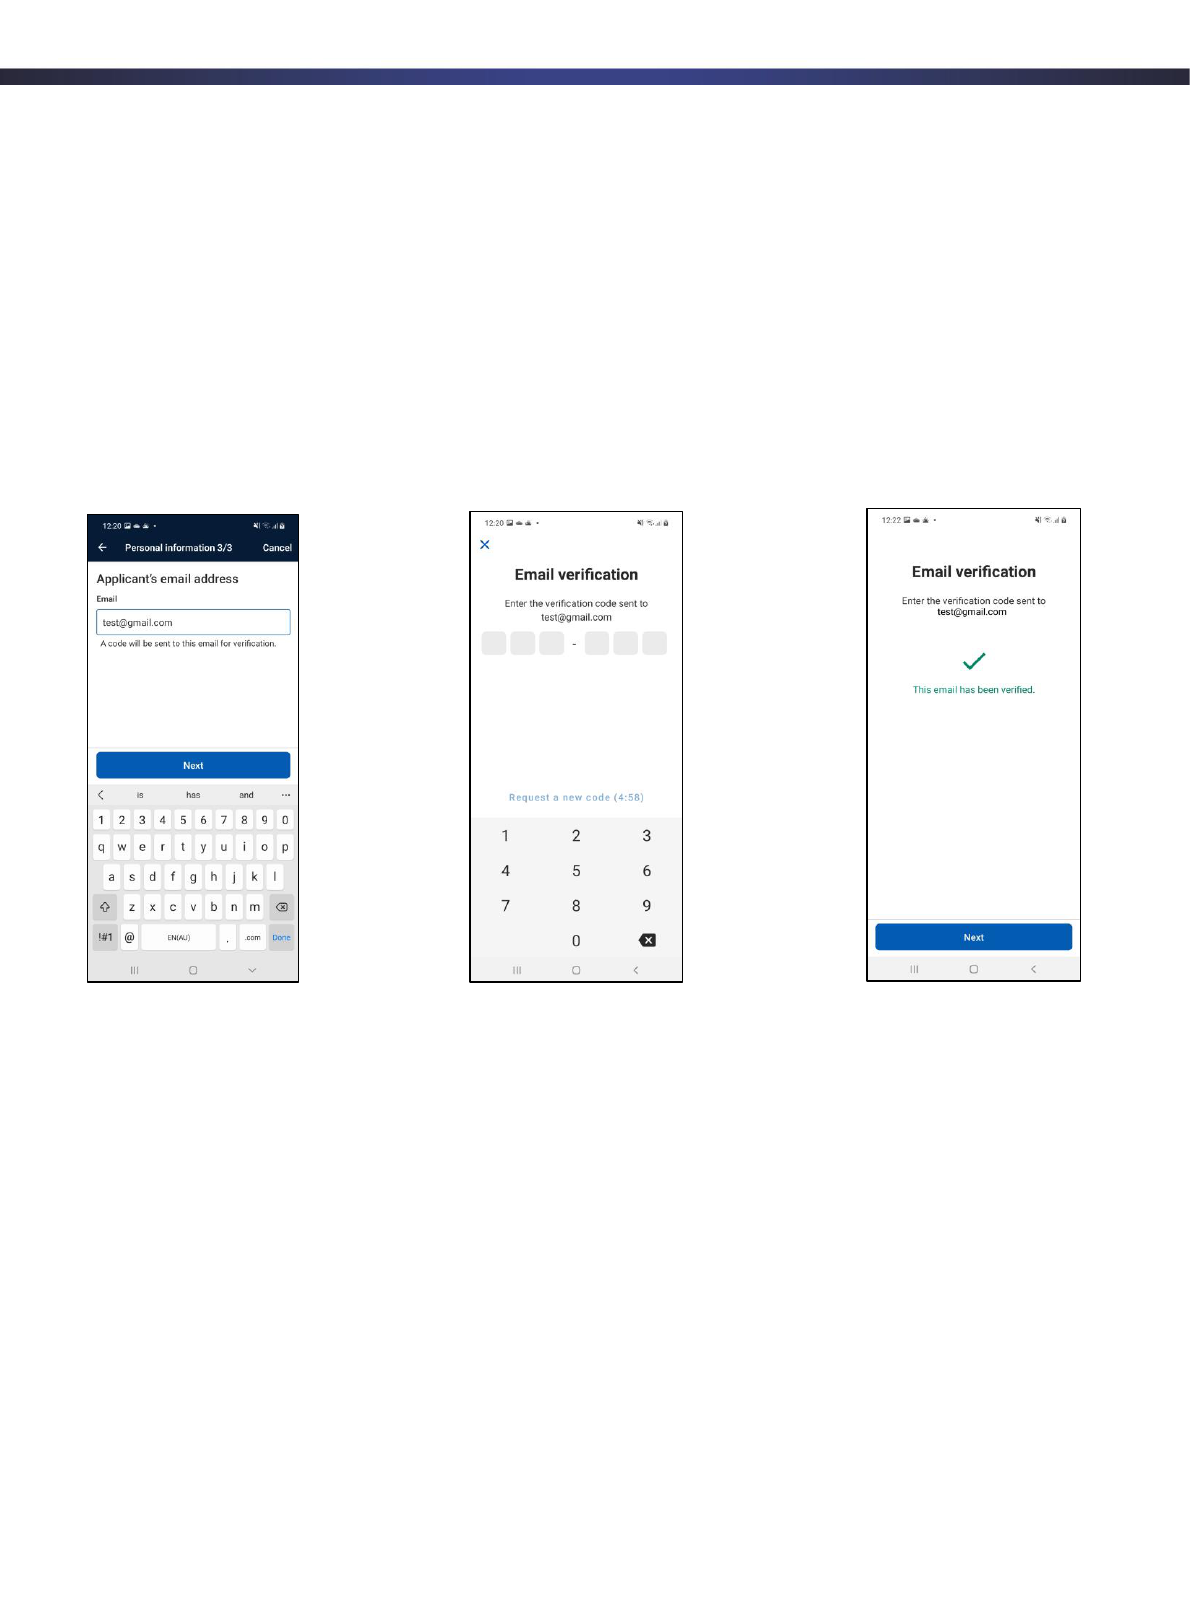
11.2. Email verification
You will be required to provide the applicant’s email address.
The nominated email address is where the applicant’s ETA application outcome notification and
receipt of payment for the Australian ETA App service fee will be sent.
The applicant will need to have access to their email account at the time of making the
application, as a verification code will be sent to the nominated email address. You will have five
minutes to enter the verification code into the app to enable you to continue the application.
If the email is not received, you can request a new code. Some email addresses (for example,
government email accounts) may block the email. In these cases, you should try a different
email address.
11.3. Confirm profile
Once all of the above steps have been completed, you will be able to “confirm and save” the
applicant’s profile and continue on to the ETA question set.
Please note that if you exit the app before completing and submitting the applicant’s ETA
application, the profile will be deleted to protect the privacy of the applicant.
Page 12 of 16
Australian ETA App – Guidance notes for industry users
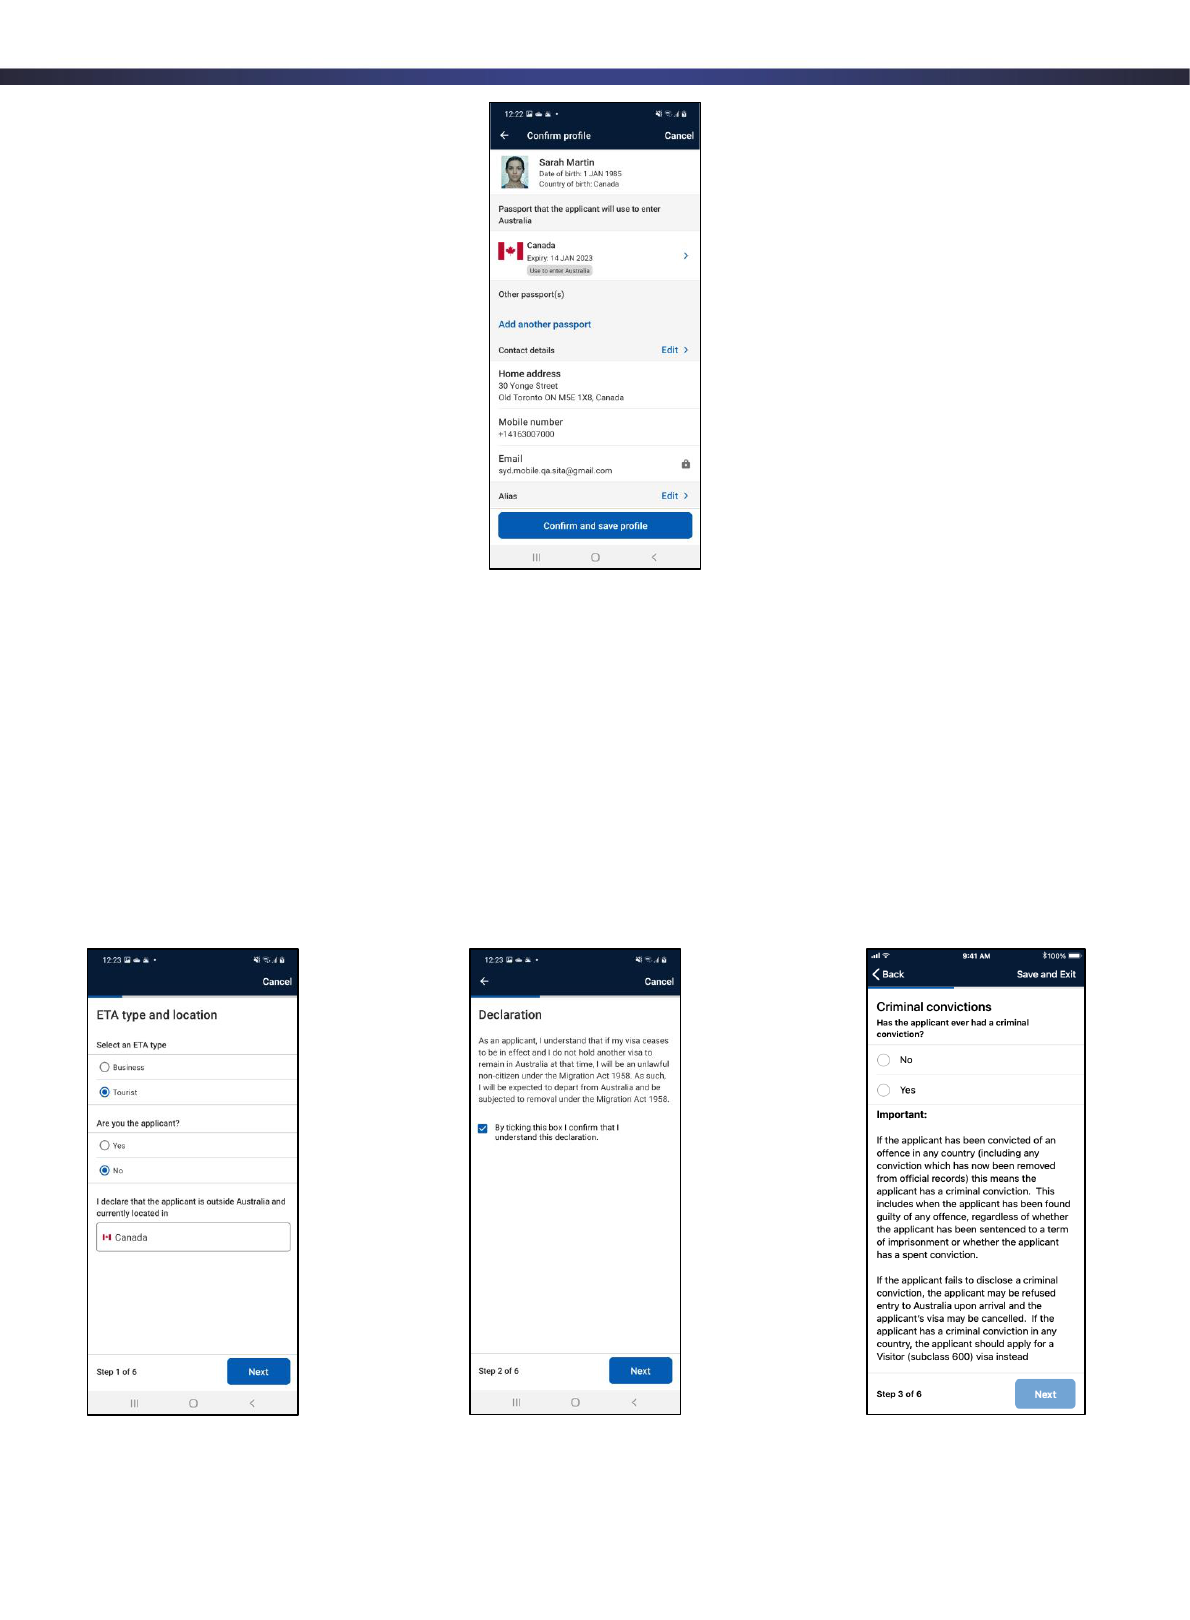
12. ETA questions
You will be required to ask the applicant a few questions. You will need to declare that you are
not the applicant, as you are completing the application on behalf of someone else.
It is important the applicant understands the declaration and answers the criminal conviction
question correctly.
Please note, if the applicant has a criminal conviction in any country they should instead apply
for a Visitor visa (subclass 600) and provide evidence about their criminal convictions.
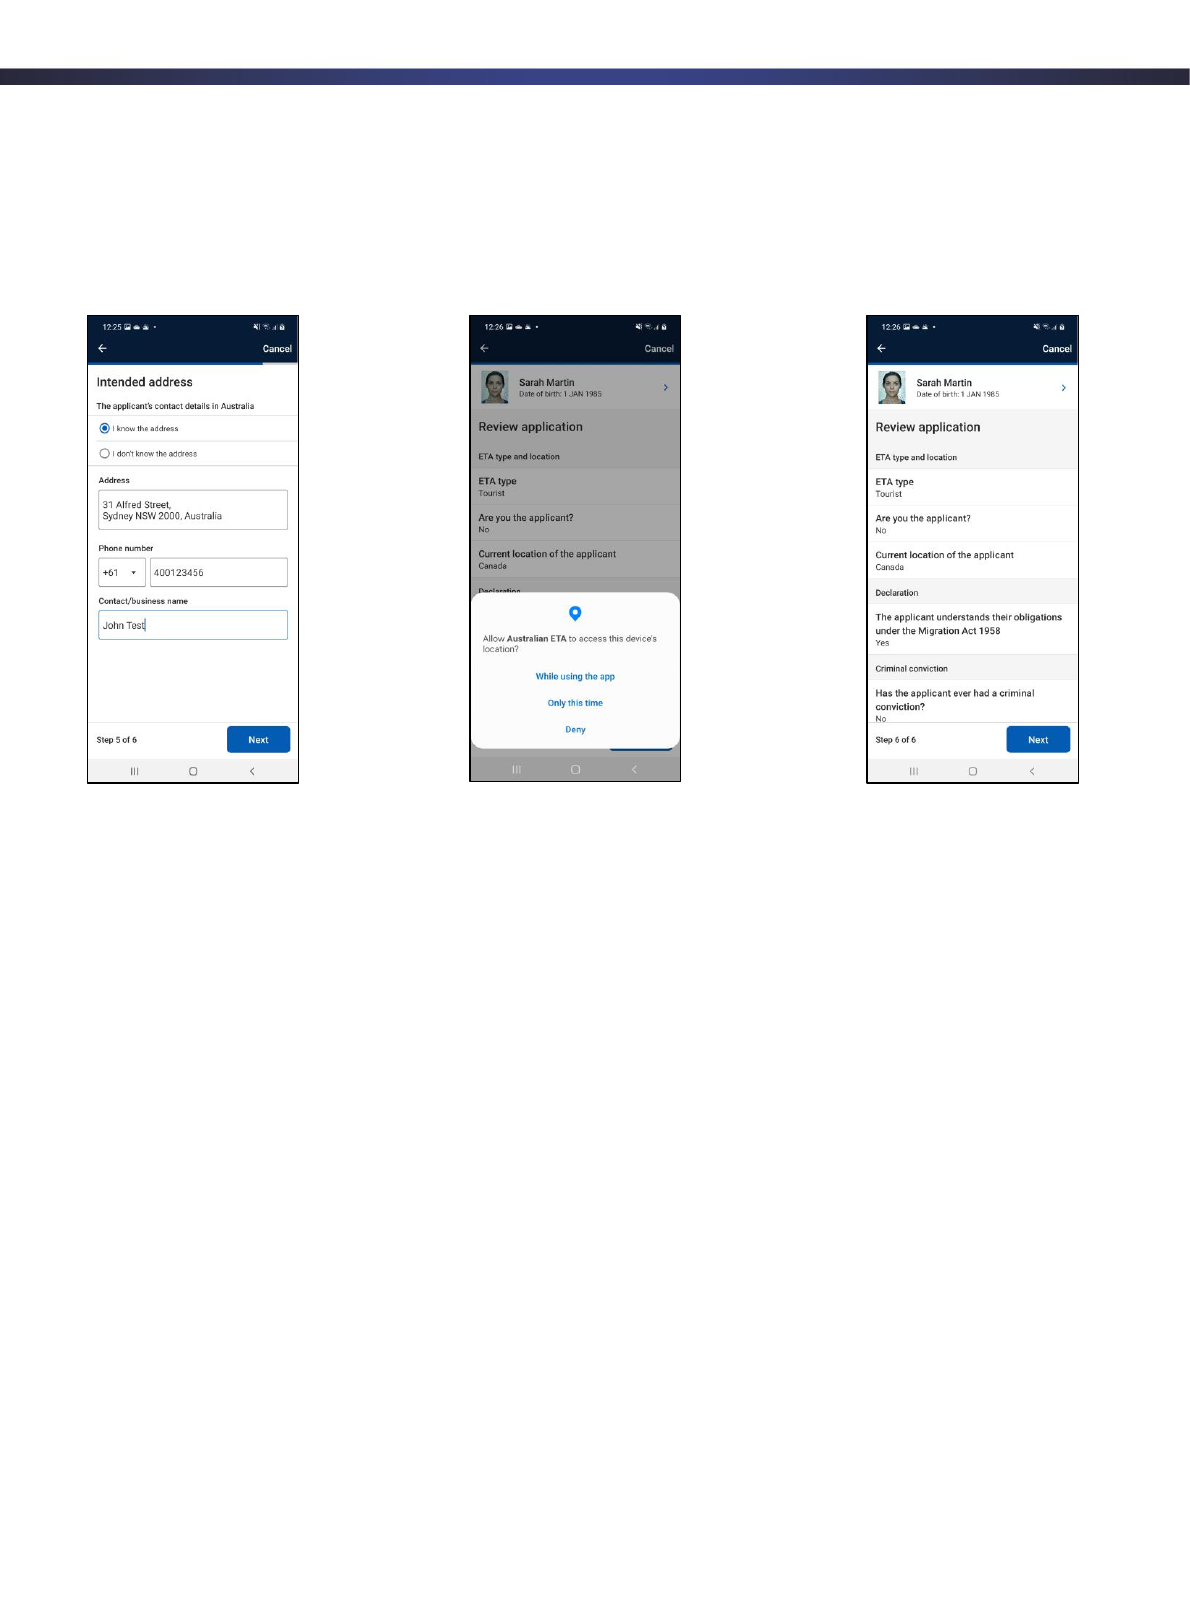
You will need to enter the applicant’s intended contact details for their stay in Australia.
Page 13 of 16
Australian ETA App – Guidance notes for industry users
If you are asked to allow the Australian ETA App to access the device’s location, you must grant
access to continue the application, as shown in the second screen image below.
You will need to review the application. If the applicant confirms that the information provided is
correct, you can select “Next” to progress to payment or complete another ETA application for a
subsequent applicant.
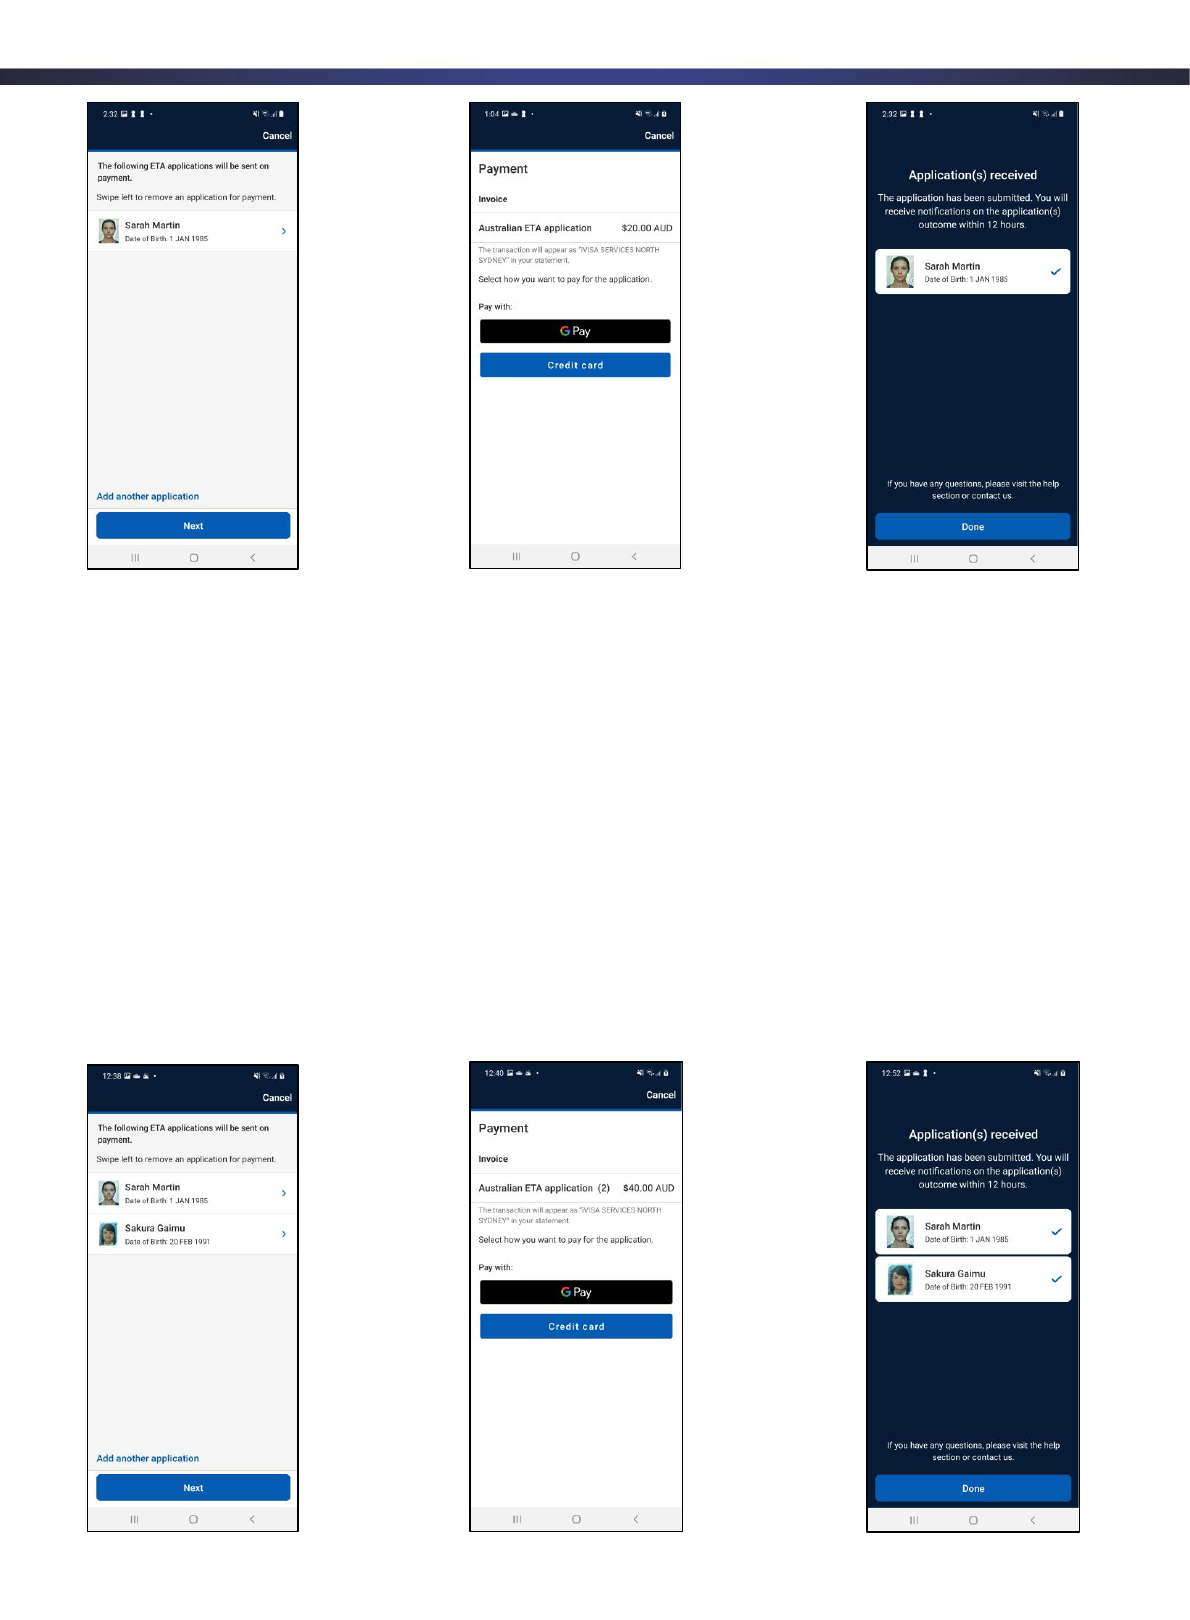
13. Payment
An Australian ETA App service fee is applied to each individual application. You can submit and
pay for a single application or you can submit and pay for multiple applications in one
transaction.
The receipt of payment will be sent to the email address that was nominated in the ETA
application.
13.1. Payment for a single applicant
Where completing and submitting one application, select the “Next” button. You will be able to
select from the following payment methods, depending on your device: Google Pay, Apple Pay
or credit card.
Once payment has been received, you will see a screen, as shown in the third screen image on
the next page, that confirms that the application has been submitted.
Page 14 of 16
Australian ETA App – Guidance notes for industry users
13.2. Payment for multiple applications
Where completing and submitting two or more applications, select the “Add another applicant”
button. This will enable you to complete application/s for any subsequent applicants.
Please note that if you close the app it will delete any applications that have been completed or
partially completed. Industry users cannot save any personal information to protect the privacy
of applicants.
After completing the applications, you will be able to proceed to payment and submit the
applications. You can select from the following payment methods, depending on your device:
Google Pay, Apple Pay or credit card.
Once payment has been received, you will see a screen that confirms that the applications have
been submitted.
Page 15 of 16
Australian ETA App – Guidance notes for industry users
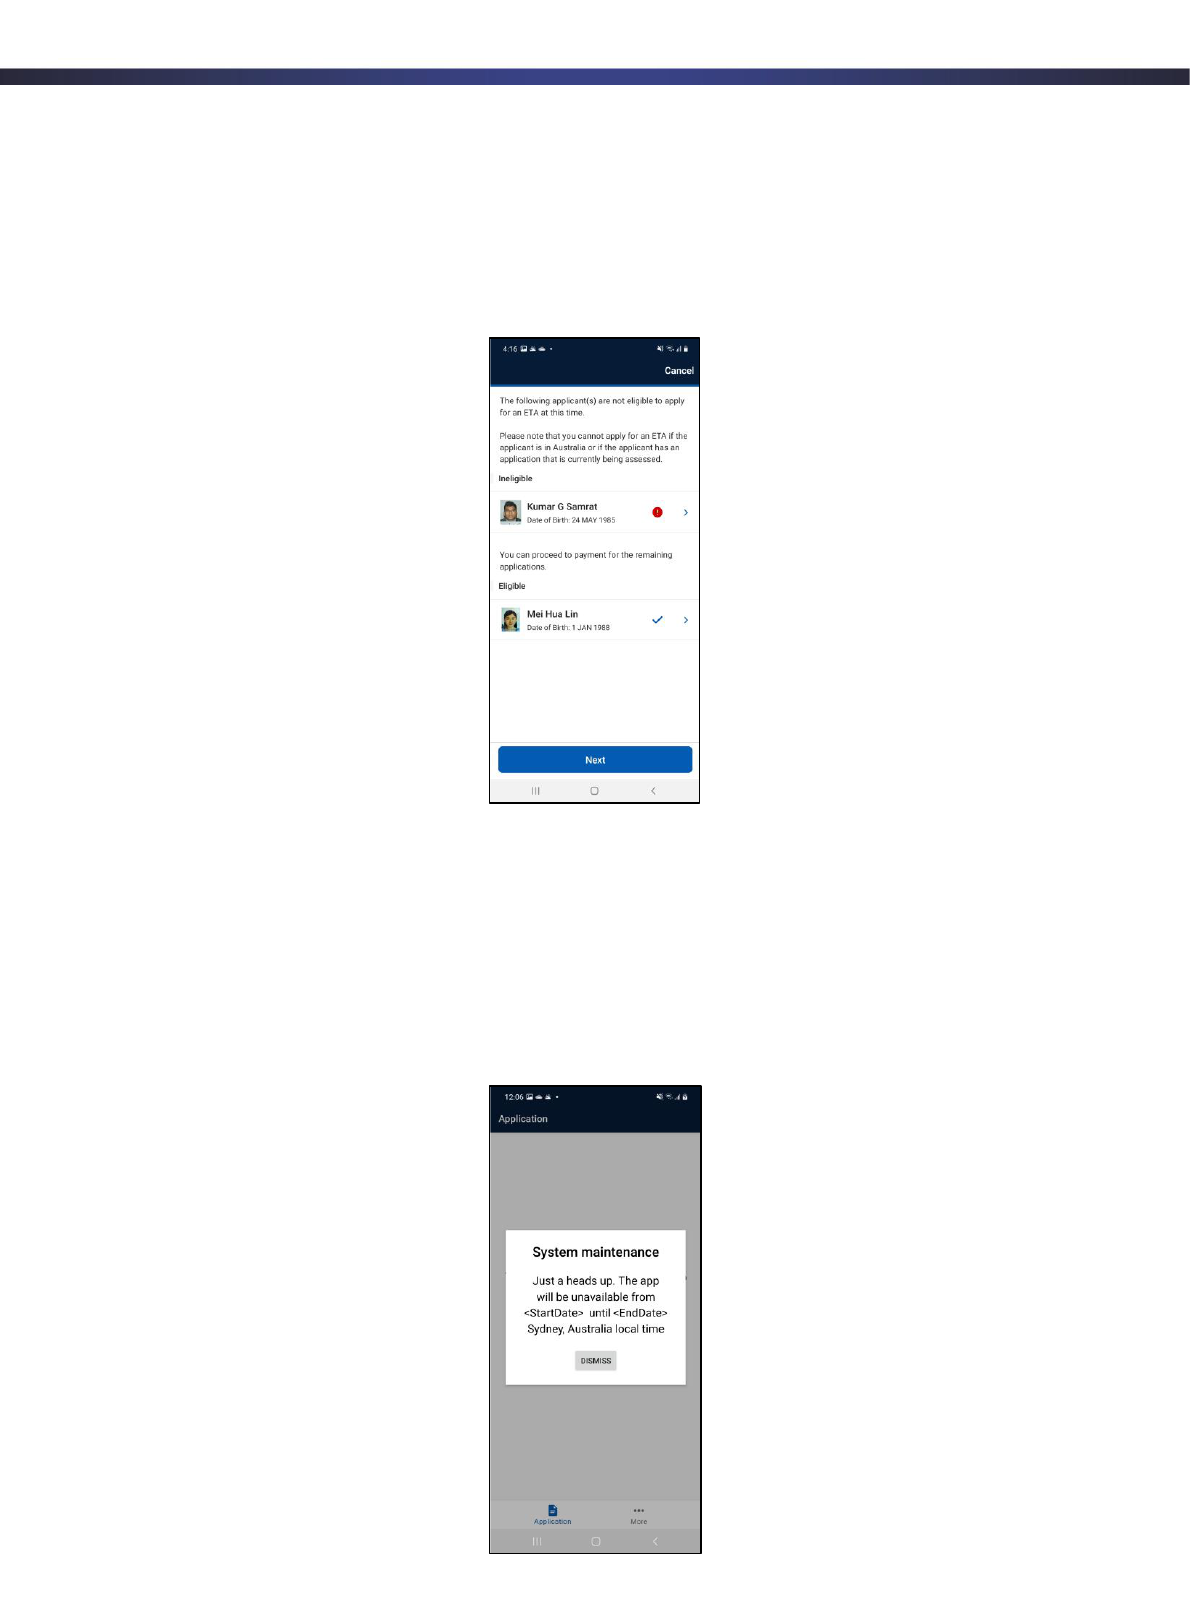
13.3. Unable to submit an application
There will be instances where an application is not eligible for submission, as seen in the screen
image below.
This includes if the Department’s systems indicate that an applicant is located in Australia or if
they have an application that is currently being assessed.
14. Technical support
14.1. System maintenance
At times the app will be unavailable due to system maintenance being conducted. A message
will be displayed each time the app is opened for at least one day ahead of the planned outage.
Page 16 of 16
Australian ETA App – Guidance notes for industry users
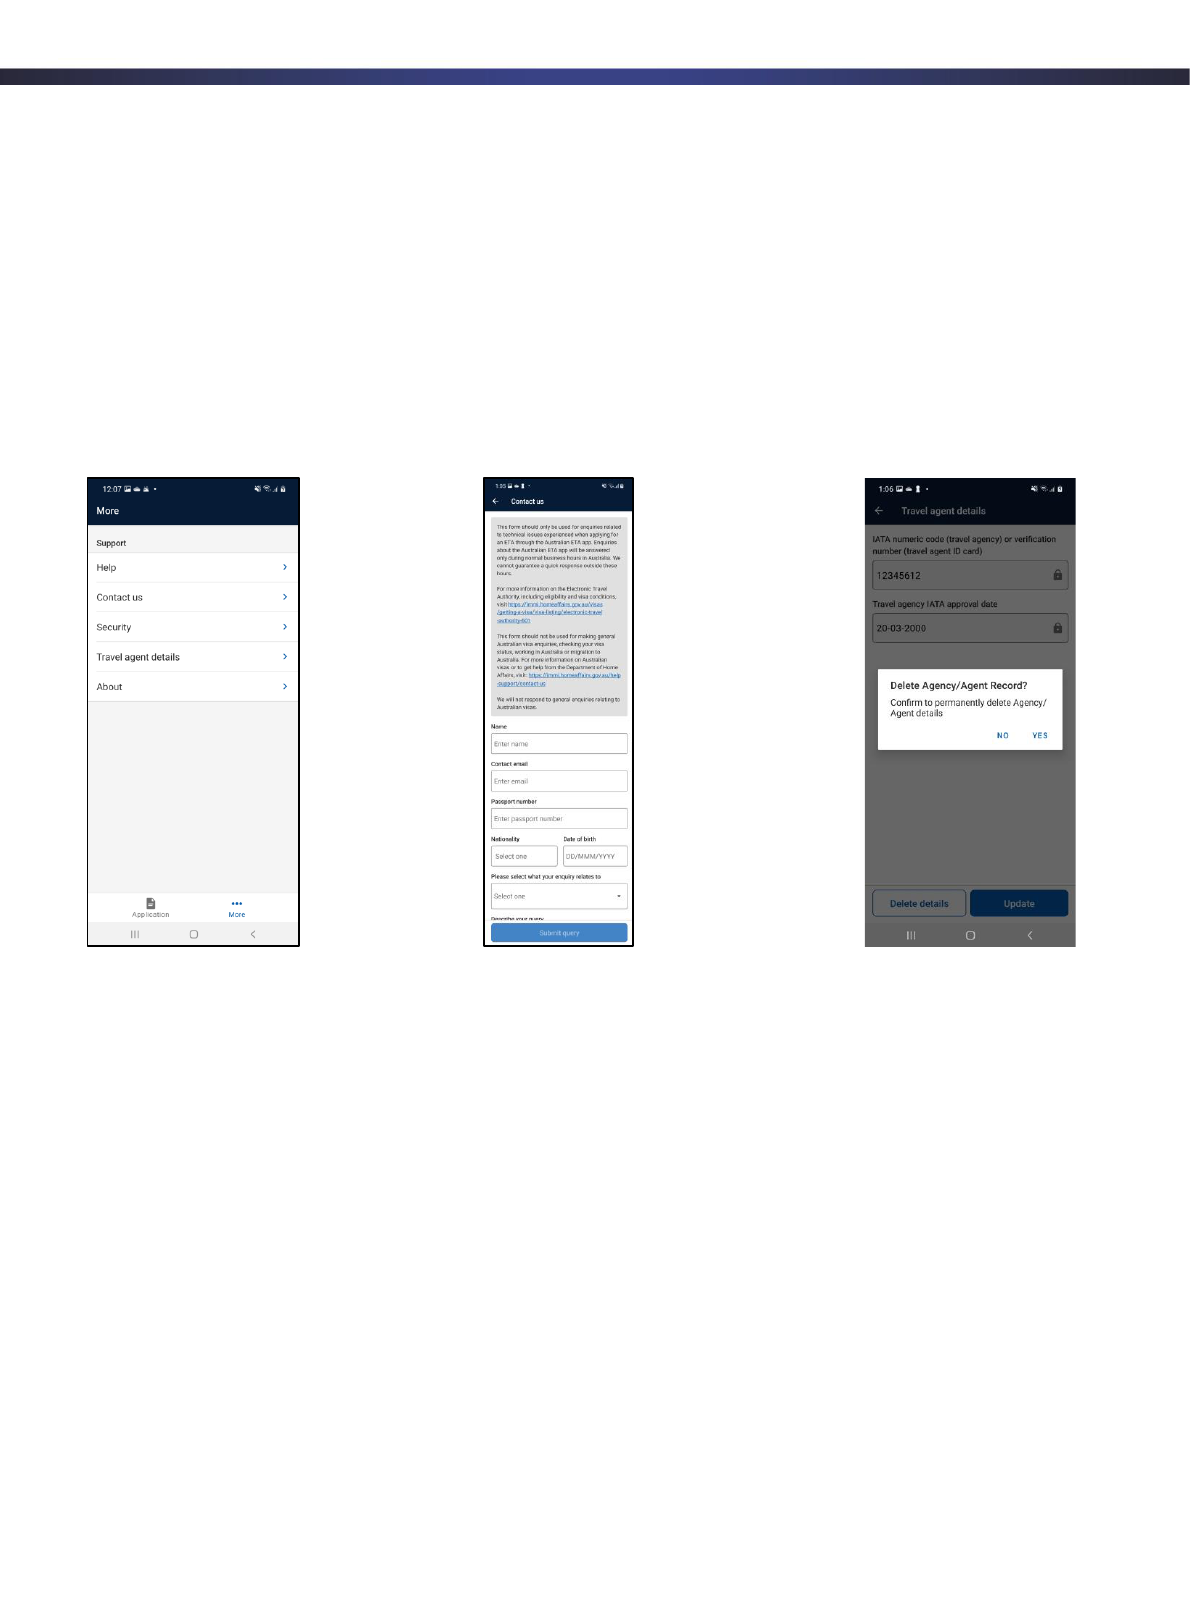
14.2. Contact us and delete travel agent details
If travel agents are experiencing technical difficulties, they are able to use the ‘Contact us’
function in the app. This can be found by clicking the “… more” tab at the bottom of the screen,
as displayed in the first screen image below.
Please ensure enquiries made through this function are of a technical nature only. Enquiries
regarding the status of applications will not be answered through this mechanism.
You can delete your agency details at any time by selecting Travel agent details and “Delete
details”, as shown in the third screen image below.
