
ADMINISTRATIVE PROCEDURES #31
Taking and Uploading Case Photos in SACWIS and A.S.K. Mobile App
September 29, 2020 – PT 2020.16
Illinois Department of Children and Family Services
Administrative Procedure #31 – (1)
Table of Contents
31.1 Purpose
31.2 Case Photo Features in SACWIS and A.S.K.
31.3 Categorizing Photos
31.4 Labeling Photos
31.5 Acquiring Photos Taken by Others
31.6 Notification and Consent Requirements
31.7 Use of Photographs in Documentation
31.8 Emailing Photos
Appendix A – Tips for Taking High Quality Photos with a Smart Phone
Section 31.1 Purpose
The purpose of this Administrative Procedure is to provide a protocol for taking photos in the
course of casework, and uploading and storing photos in SACWIS and the A.S.K. mobile app.
Both SACWIS and A.S.K allow “Identification”, “Child” and “Home/Environment” photos to be
uploaded and stored in a family and/or child case.
This Administrative Procedure applies to all Department Child Protection Specialists, and
Department and Purchase of Service agency (POS) Intact Family Workers and Permanency
Workers and their supervisors.
Section 31.2 Case Photo Features in SACWIS and A.S.K.
DCFS and POS workers can capture and upload case related photos by using the A.S.K. mobile
app. Photo types are case member specific and are available for all case members, including adult
case members when appropriate. Photos can also be uploaded directly into SACWIS from the
A.S.K. mobile app. Workers can also upload photos acquired from other sources into SACWIS
(see Section 31.5, Acquiring Photos Taken by Others).
All Department and POS casework staff who take case related photos with Department
issued or personal phones must:
• have the A.S.K. app on that phone; and
• take the photo only while working in the A.S.K. app.
To ensure the confidentiality of case information, Department and POS casework staff shall
take photos only when using the A.S.K. mobile app.
Department and POS staff shall not take case related photos using their regular iPhone camera
feature or store case related photos in the iPhone photo gallery. Just as personal photos taken with
an iPhone camera and stored in the gallery are not secure, case related photos taken and stored this
way would also not be secure.
The Department does not authorize Department or POS staff to use any app other than the
A.S.K. mobile app for taking case related photos.

ADMINISTRATIVE PROCEDURE #31
Taking and Uploading Case Photos in SACWIS and A.S.K. Mobile App
September 29, 2020 – PT 2020.16
Administrative Procedure #31 – (2)
All photo functions are accessed through the “Photos” link in SACWIS. SACWIS Release 5.21
(at D-Net Links>OITS>SACWIS) contains detailed instructions and screen shots to instruct staff
on how to categorize and upload photos.
The A.S.K. app has a Photo page in Family and Child Cases. The “Working with Case Photos”
tip is available in the A.S.K. menu to instruct staff on how to capture and upload these photos to
SACWIS.
Section 31.3 Categorizing Photos
Each photo uploaded in SACWIS and A.S.K. must be categorized as one of the following:
• “Identification” photo. This is a case member-specific photo. Workers must ensure
that an accurate, current “identification photo” of each youth in care is in SACWIS.
Identification photos must be a frontal view of the youth’s face, neck and shoulders
only. The youth should be standing in front of a plain or solid background (so the
background does not distract from the subject). All identification photos should be
taken indoors and updated annually or sooner if the child’s appearance significantly
changes. (See Procedure 301.150, Identification Procedures for Children in
Placement.)
The identification photo is the only required photo for each child in DCFS custody or
guardianship.
• “Condition” photo. This is a case member-specific photo. This includes any photo
of a child or adult that is taken to document marks, scars, bruises and other visible
injuries to the child or adult. (Example: the child or adult has a bruise on a visible part
of the body); or
• “Home/Environment” photo. This includes any photo taken when there is a condition
of the home or environment that is relevant to a concern that the worker is documenting.
Home/Environment photos may be uploaded and used as needed on intact family and
placement cases.
When an injury to a child or an unsanitary or unsafe condition of the home/environment
requires a call to SCR, and Call Floor Worker informs the Intact Family/Permanency
Worker that a report is being taken, the assigned Child Protection Specialist will photograph
the child or scene as part of the child protection investigation.
Section 31.4 Labeling Photos
SACWIS and A.S.K. automatically apply known information (such as name, CYCIS or
investigation or ID number, and date/time) as part of the photo capture process in the A.S.K. app
and photo upload process in SACWIS. The following additional information must be provided
for each identification, condition and home/environment photo:
• for identification photos, the child’s height, weight, scars, tattoos and any other
distinguishing marks are documented in the “Description” field and in a contact note;
• identify any non-case member in the photo;

ADMINISTRATIVE PROCEDURE #31
Taking and Uploading Case Photos in SACWIS and A.S.K. Mobile App
September 29, 2020 – PT 2020.16
Administrative Procedure #31 – (3)
• identify where the photo is taken with detailed information. State the primary person
involved (e.g., Mary Smith’s bedroom, Frank Smith’s kitchen), address of the home, etc.;
• identify what is being documented in the photo in detail (e.g., stack of dirty dishes in sink,
rodent damage in hallway, exposed wiring within reach of children); and
• the name(s) of all persons present when the photo was taken.
Section 31.5 Acquiring Photos Taken by Others
All photos provided to the Department by other sources, (e.g., schools, hospitals, law enforcement)
become the property of the Department, shall be labeled by the worker as noted in Section 31.4
and uploaded into the SACWIS family and/or child case.
For photos acquired from another party (e.g., law enforcement, medical staff), the worker must
document the date and time the photo was taken in the “Description” field. If uploaded in
SACWIS, the date/time stamp will record only the time uploaded. The worker shall enter any
relevant information (who-what-where-when) provided by the sender when uploading the photo.
Example: The child’s doctor, Anthony Doe, emailed this worker 5 photos taken during his
examination of the child at the DeKalb County Hospital Emergency Room when the child
presented with a broken left arm and left leg on 12-6-19 at 5:00 p.m. Per Dr. Doe, Image
1 shows … Image 2 shows … Images 3, 4 and 5 are a collage. The top left image shows…
The top right image shows … The bottom right image shows ….
Workers continue to remain responsible to thoroughly document their observations in contact
notes. The ability to take and upload these photos in the case record does not change that
requirement.
Section 31.6 Notification and Consent Requirements
a) Child Protection Investigations. A Child Protection Specialist is required to notify a
parent or legal guardian that the Department has the right to take or obtain photos during
an investigation and document this notification in a contact note. Notification can be made
by phone. Notification is not required to take a photo of a youth in care in an assigned
investigation. Consent is not required to take photos in Child Protection Investigations.
b) Placement Cases. A Permanency Worker must ask a parent, legal guardian or substitute
caregiver for verbal consent to take a “condition” photo of a child not in DCFS custody or
guardianship who is living in the home of parent/guardian/substitute caregiver. A
Permanency Worker must also obtain verbal consent before taking any
“home/environment” photos of their home or property. Consent is documented in a contact
note. Consent is not required to take a photo of a youth in care assigned to his/her caseload.
c) Intact Family Service Cases. An Intact Family Worker must ask a parent or legal
guardian for verbal consent to take an “identification”, “condition” or “home/environment”
photo. Consent shall be documented in a contact note.

ADMINISTRATIVE PROCEDURE #31
Taking and Uploading Case Photos in SACWIS and A.S.K. Mobile App
September 29, 2020 – PT 2020.16
Administrative Procedure #31 – (4)
Section 31.7 Use of Photos in Documentation
a) Child Protection Specialists
Photos of a child’s injuries may be taken and used to support the descriptive documentation
contained on the CANTS 2A or 2B. Photos shall never be used as a substitute for
completing the CANTS 2A or 2B.
To ensure the confidentiality of case information, Department and POS casework
staff should take photos using the A.S.K. app.
When the parent/guardian is available, the Child Protection Specialist shall notify the
parent/guardian that the Department has the right to obtain photos. This notification may
be provided by phone and shall be documented in a contact note.
A Child Protection Specialist shall take an identification photo of each child taken into
protective custody as soon as possible after the child has been removed from the home.
The Child Protection Specialist may take or obtain photos of the alleged child victim and
the child's environment as a part of the investigative process. Photos shall be taken as a
part of gathering inculpatory and exculpatory evidence of abuse or neglect or the lack of
abuse or neglect.
Photos can be used to document a child's injuries or the absence of injuries. When taking
photos of a child, the Child Protection Specialist must ensure that the safeguards described
in Procedures 300.150(c)(5), Observation of the Alleged Victim are followed.
If the alleged child victim is in the hospital, the Child Protection Specialist shall request
assistance from hospital staff in obtaining photos of the child’s injuries and/or acquire
photos of the child taken by hospital staff.
When a child is screened into court but protective custody was not taken, the Child
Protection Specialist or Intact Family Worker screening the child into court shall take an
initial identification photo of the child.
Photos taken by a Child Protection Specialist shall be uploaded into the SACWIS
investigative file within 48 hours of taking the photo.
When uploading a photo, the Child Protection Specialist shall enter the descriptive
information in Section 31.4, Labeling Photos about each photo in the “Description” field.
During the handoff staffing, the Child Protection Specialist shall provide the Permanency
Worker with the child’s identification photo.
b) Permanency Workers
To ensure the confidentiality of case information, Department and POS casework
staff should take photos using the A.S.K. app.

ADMINISTRATIVE PROCEDURE #31
Taking and Uploading Case Photos in SACWIS and A.S.K. Mobile App
September 29, 2020 – PT 2020.16
Administrative Procedure #31 – (5)
The Permanency Worker shall update the child’s identification photo in the SACWIS case
annually or sooner if the child’s appearance has significantly changed. (See Procedures
301.150, Identification Procedures for Children in Placement.)
Example: The child just added homemade tattoos (describe) to her face and
changed her hair color.
Condition and home/environment photos may be uploaded and used as needed in
placement cases. When appropriate, the Permanency Worker may take an identification or
condition photo of the child or a photo documenting the condition of the home or
environment.
When appropriate and with consent of a parent or guardian, the Permanency Worker may
take an identification or condition photo of a non-youth in care with connection to the case
(e.g., living in home of parent; sibling of youth in care living with non-parent).
When appropriate and with appropriate consent, the Permanency Worker may take an
identification or condition photo of the parent or another adult with connection to the case
(e.g., household member), or a photo documenting the condition of the home or
environment.
** When an injury to a child or an unsanitary or unsafe condition of the home or
environment requires a call to SCR, and Call Floor Worker states that a report is
being taken, the assigned Child Protection Specialist will photograph the child or
scene as part of the investigation.
When uploading the photo, the Permanency Worker shall enter the descriptive information
in Section 31.4, Labeling Photos about each photo in the “Description” field.
The Permanency Worker remains responsible to thoroughly document his/her observations
in a contact note. The ability to take and upload these photos in the case record does not
change that requirement.
c) Intact Family Workers
When completing each CERAP safety assessment and with consent of the parent or
guardian, the Intact Family Worker shall take an identification or condition photo of a child
or adult and, if applicable a photo documenting the condition of the home or environment
in open intact cases. The Intact Family Worker shall update an identification photo of each
child in the family in the SACWIS case record.
To ensure the confidentiality of case information, Department and POS casework
staff should take photos using the A.S.K. app.
Condition and Home/Environment photos may be uploaded and used as needed in intact
family cases.

ADMINISTRATIVE PROCEDURE #31
Taking and Uploading Case Photos in SACWIS and A.S.K. Mobile App
September 29, 2020 – PT 2020.16
Administrative Procedure #31 – (6)
** When an injury to a child or an unsanitary or unsafe condition of the home or
environment requires a call to SCR, and Call Floor Worker states that a report is
being taken, the assigned Child Protection Specialist will photograph the child or
scene as part of the investigation.
When uploading the photo, the Intact Family Worker shall enter the descriptive information
in Section 31.4, Labeling Photos about each photo in the “Description” field.
The Intact Family Worker remains responsible to thoroughly document his/her
observations in a contact note. The ability to take and upload these photos in the case
record does not change that requirement.
Section 31.8 Emailing Photos
When emailing case and investigation photos from SACWIS to authorized external recipients,
#ILEncrypt# will automatically appear in the subject line of the email. When #ILEncrypt# is in
the Subject line of any Outlook email, it triggers the encryption service.
DCFS and POS workers should not remove #ILEncrypt# from the subject line.
The sending DCFS and POS workers will receive a read receipt and automated notifications when
an email is opened or when an email expires. The recipient will receive a special message to log
into our system with secure credentials to review the message. The message will be available on
the server for 2 years.

ADMINISTRATIVE PROCEDURE #31
Taking and Uploading Case Photos in SACWIS and A.S.K. Mobile App
September 29, 2020 – PT 2020.16
Administrative Procedure #31 – (7)
Appendix A - Tips for Taking High Quality Photos with a Smart Phone
a) iPhone-specific Photo Tips
1) Snap photos with the volume up button
Did you know that when you’re taking photos with your iPhone, the shutter doesn’t
release until you remove your finger from the button? Combined with the slim size
of your phone and the way you hold it to get a good shot, that makes for a good
amount of camera shake, resulting in blurry photos. Here is an easy solution. Your
iPhone's volume up button acts as an additional camera shutter.
2) Use the iPhone camera shortcut for quick access
To conveniently access the camera, swipe up from the bottom of the screen to
launch Control Center and tap on the Camera button.
3) Turn off your flash
Recent generations of the iPhone flash are much better than their predecessors but
at the end of the day, the flash is still just an LED light and it can occasionally emit
a strange hue onto your photographs. One of the easiest ways to get better pictures
is to light your subject well. With phones, this typically requires turning off the
flash. This isn’t always an option - sometimes the setting is too dark to not use a
flash. Generally, the flash tends to be too harsh and results in blown out
(overexposed) photos or bright spots on people’s faces.
To get better lighting, try framing your photo with your iPhone and then tapping
the area where your subject appears. This helps your phone assess optimum
lighting around your subject.
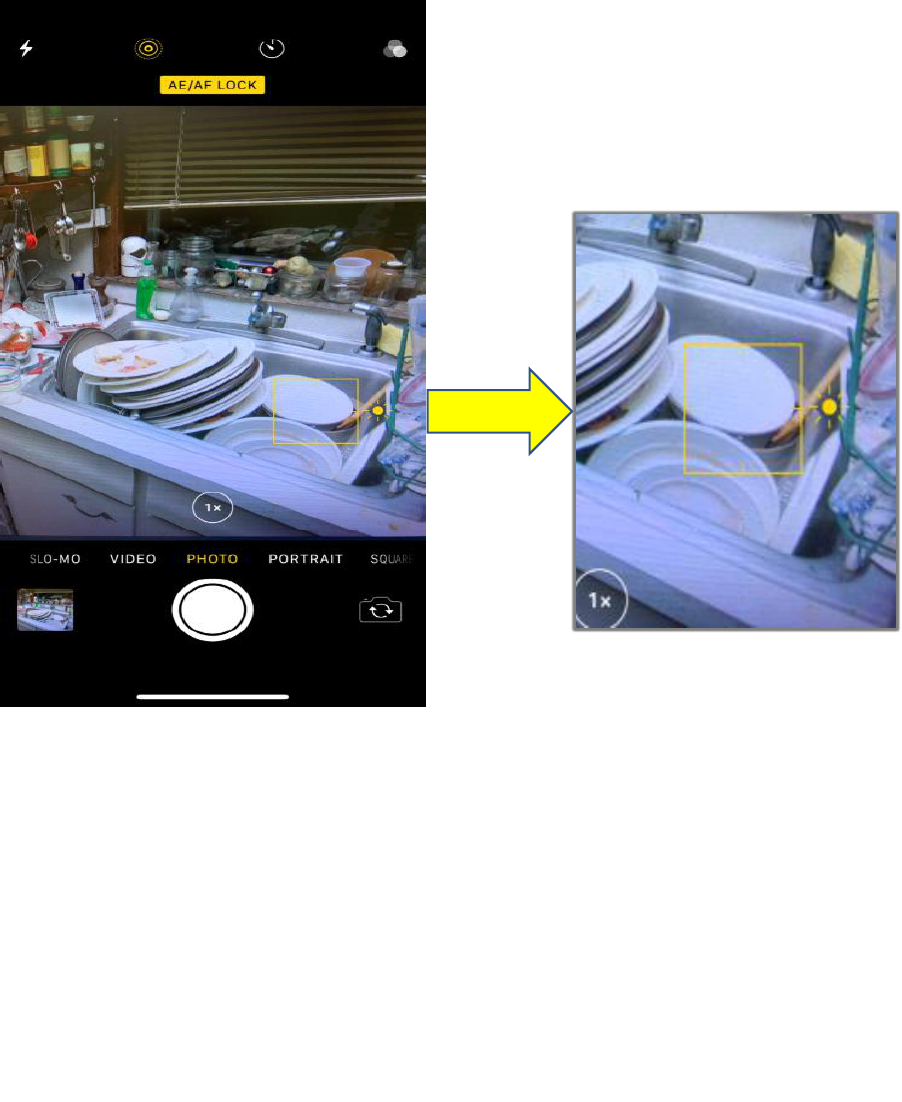
4) Slide the exposure meter to brighten or darken photos
If you're shooting at night or in rooms that are not well-lit, use the Camera app's
exposure slider to boost light in the photo.
To find the exposure slider: launch the Camera app from your Home screen or
Lock screen. Tap anywhere on the live preview in order to bring up the focus point
(a yellow box). Tap and hold on the “exposure button” that appears next to the
yellow box. (In the photos below, it looks like a Sun to the right of the yellow box.)
A slider bar will appear that allows you to slide the Sun up and down to adjust the
exposure.
ADMINISTRATIVE PROCEDURE #31
Taking and Uploading Case Photos in SACWIS and A.S.K. Mobile App
September 29, 2020 – PT 2020.16
Administrative Procedure #31 – (8)
Enlarged view of yellow box and Sun
5) Understand HDR Auto
Your iPhone comes with a software feature called High Dynamic Range, or HDR:
This lets you snap photos that may have high contrast light sources (a TV powered
on in the foreground of a darkened living room) and still capture a nice image
without distorting either the light or the dark area of the picture. Your iPhone
automatically does this by snapping several pictures in quick succession at different
exposures, then merging them together to create a unified image.
HDR uses information from your iPhone's sensor as you point your device at a
subject to determine when an image might need HDR correction, and only then
does it turn on HDR mode. You'll know HDR is enabled by the yellow "HDR" box
that appears at the top or bottom of the screen. This can save storage space on your
device and prevents shooting HDR unnecessarily.
iPhones with iOS 8 and later feature HDR Auto.

ADMINISTRATIVE PROCEDURE #31
Taking and Uploading Case Photos in SACWIS and A.S.K. Mobile App
September 29, 2020 – PT 2020.16
Administrative Procedure #31 – (9)
b) Photo Tips for all Smart Phone Users
1) Clean the lens!
Clean the glass that covers the camera just like you would the screen around front.
A microfiber cloth is good for wiping away fingerprints and body oils, or you can
use a cleaning fluid designed for electronic screens.
2) Steady Yourself!
Try leaning against a hard object (like a wall) when taking a photo to reduce
shaking.
3) Use the light you have correctly
Never point your camera at the light. Try to have the lighting behind you and above
you, ideally pointing towards whatever it is you're taking a picture of. That's not
always possible (especially indoors) but you should still move your feet and try the
best angle you can use if possible.
Some Android cameras do better with less light than others, but you still need some
illumination. And use light to your advantage. Try shooting photos in areas with
adequate natural lighting sources.
4) Don't use the zoom
Your smart phone camera has no optical (using the lens) zoom. Instead, when you
use the zoom feature, it's doing the same thing as blowing an image up in an editor
and cropping out the edge. This generally makes for grainy, pixelated pictures that
are sub-par.
If you need to get a closer view of that thing your photographing, moving closer to
it is always better than using your zoom.
5) Resist using the flash
Camera flash in smart phones is getting better, but flash is still best left turned off
or used for a flashlight. Flash sits too close to the sensor and creates harsh, washed
out pictures.
Sometimes you must use it, and sometimes it works fine, but most times you won’t
like what you see when you use it.
6) Capture Close-Up Detail
One of the biggest photography mistakes is not getting close enough to the subject.
This is particularly important when photographing objects with intricate details.
Moving in close is also a good technique to use with portrait photos. Getting close

ADMINISTRATIVE PROCEDURE #31
Taking and Uploading Case Photos in SACWIS and A.S.K. Mobile App
September 29, 2020 – PT 2020.16
Administrative Procedure #31 – (10)
lets you capture your subject’s facial features and emotions. This gives your
portrait photos far more impact.
7) Take Several Photos
Don’t be afraid to take multiple photos to get a good one. No one can replicate the
same circumstances so it’s essential to capture that moment of time. Upload the
photo that best depicts the person or environment and delete the rest.
